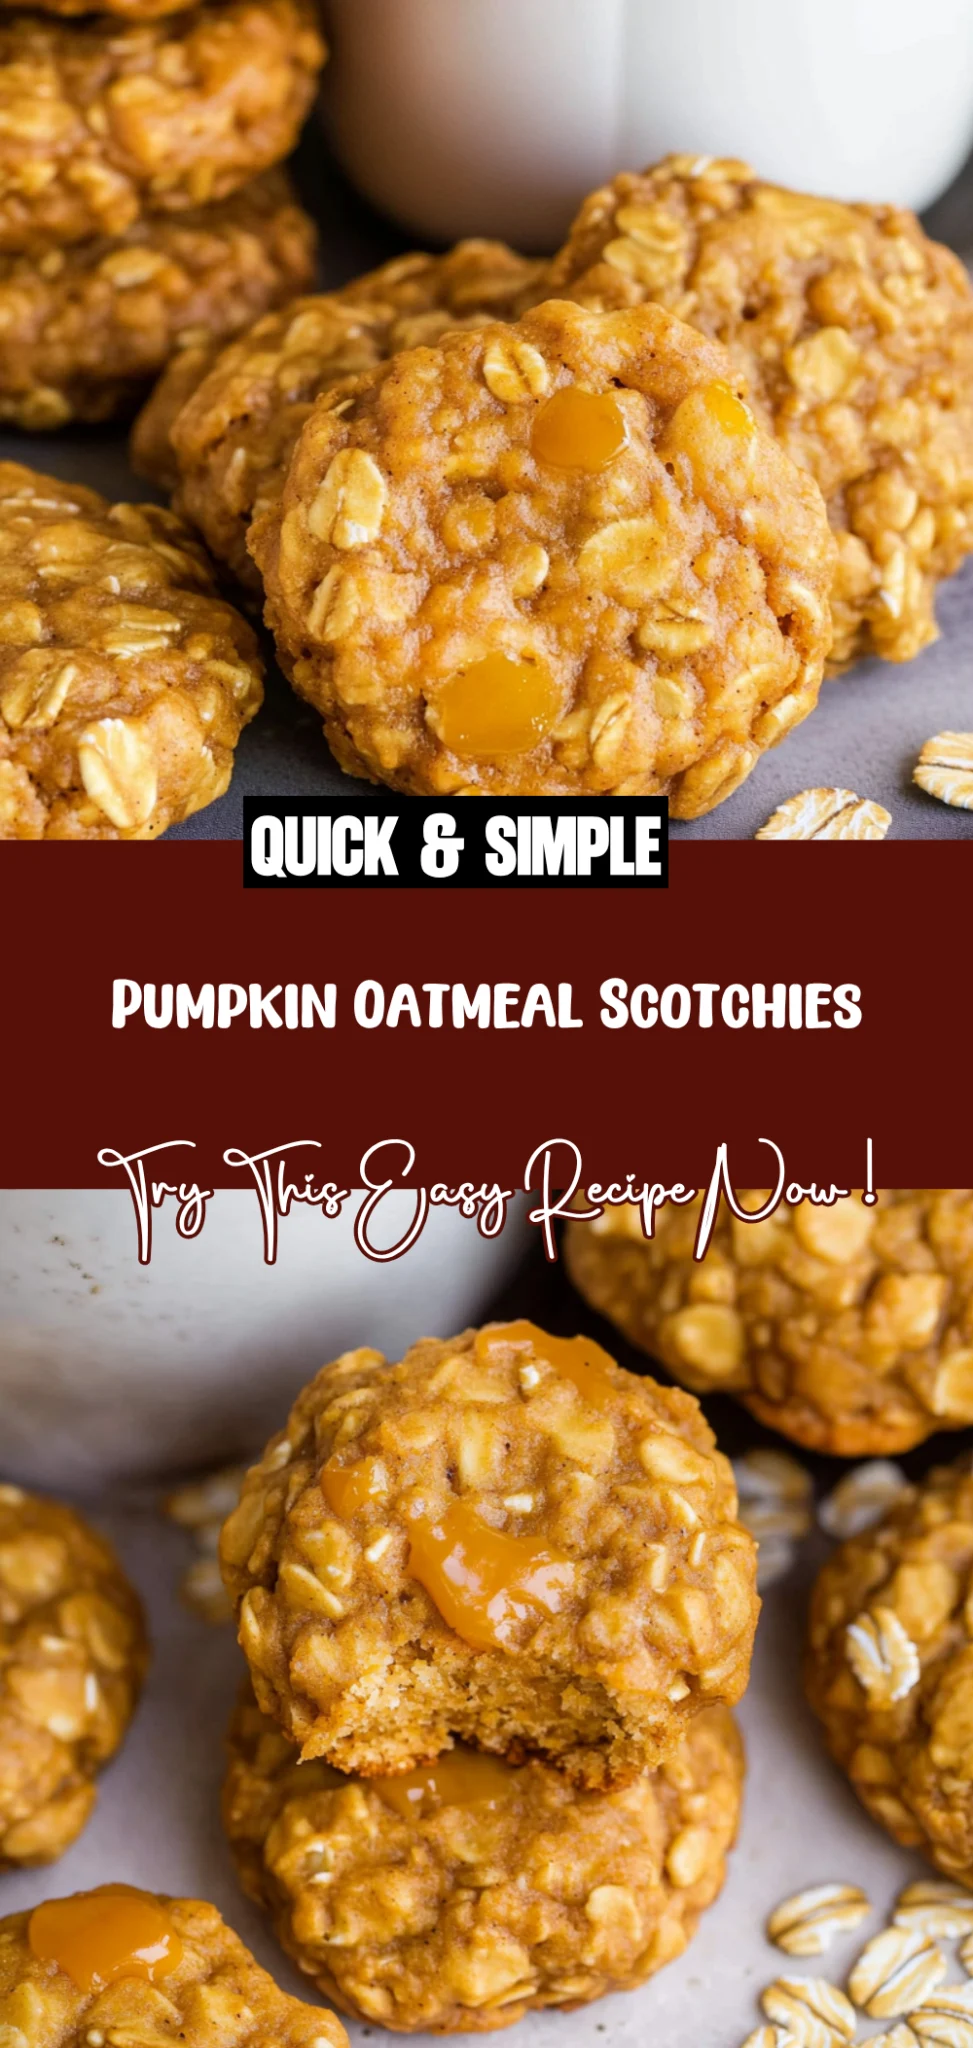
Pumpkin Oatmeal Scotchies: Cozy Fall Treats You’ll Love
I first fell in love with the idea of Pumpkin Oatmeal Scotchies during a cozy fall afternoon at my favorite local café, where I spotted a tempting batch of cookies glowing in the display case. The combination of pumpkin puree and butterscotch chips just screamed autumn, and I couldn’t resist trying one. As I took my first bite, the chewy texture and sweet, buttery flavor danced together in perfect harmony, but as delicious as they were, I knew I had to recreate them at home—mostly because my wallet was starting to feel the strain from all those indulgent treats!
After a series of baking experiments that could only be described as “interesting,” I finally landed on the right combination after what felt like a million tries (okay, maybe just seven). Each attempt was a lesson in patience; I tried everything from adjusting the amount of pumpkin to tweaking the butterscotch chip ratio—let’s just say there were some cookie disasters that would make even the most seasoned baker cringe! But with every flop, I learned something new about achieving that perfect chewy texture while still embracing the warm flavors of fall.
And let me tell you, it was totally worth every failed attempt! These Pumpkin Oatmeal Scotchies are a delightful blend of chewiness and sweetness that’ll have you reaching for seconds (and maybe thirds). With their rich pumpkin flavor complemented by pockets of melted butterscotch, these cookies are not only incredibly satisfying but also stay fresh for days—if they last that long! So grab your apron and get ready to dive into this delicious fall treat; trust me, you’re going to love every bite!
These Pumpkin Oatmeal Scotchies are…
….the ultimate fall treat that combines the cozy flavors of pumpkin and butterscotch in every delicious bite!
1. They have a warm, spiced flavor that captures the essence of fall, thanks to the addition of ground cinnamon and nutmeg. These spices not only enhance the sweet and creamy taste of the pumpkin puree but also create a comforting aroma that fills your kitchen while baking.
2. Irresistibly chewy texture – each cookie boasts a delightful combination of crisp edges and a chewy center, achieved with rolled oats and a well-balanced flour-to-liquid ratio. This unique texture invites you to savor each bite, making them perfect for dunking in your favorite hot beverage.
3. A key technique is using softened butter combined with both brown and granulated sugars, which helps create a perfectly balanced cookie dough. This method ensures that the cookies rise beautifully while allowing the butterscotch chips to melt slightly into the dough for that gooey goodness we all love.
4. Incredible value – not only are these Pumpkin Oatmeal Scotchies easy to make at home, but they also use accessible ingredients like canned pumpkin and pantry staples. This means you can whip up a batch without breaking the bank, enjoying homemade cookies fresh from your oven anytime you crave something sweet.
PS These cookies yield about 24 generous servings, making them perfect for sharing or stashing away for those chilly evenings ahead!
Your Ingredient List
Each ingredient in this dish plays an essential role in flavor and texture. Here’s what you’ll need:
1 cup all-purpose flour: Provides structure and a slight chewiness to the cookies.
1 cup rolled oats (old-fashioned): Adds heartiness and a delightful chewy texture.
1 tsp baking soda: Acts as a leavening agent for a light, fluffy cookie.
1 tsp ground cinnamon: Infuses warm, spicy notes that evoke fall flavors.
1/2 tsp ground nutmeg: Enhances the cookies’ warmth with its rich, aromatic essence.
1/2 tsp salt: Balances sweetness and enhances overall flavor.
1/2 cup unsalted butter (softened): Contributes richness and moisture for a tender bite.
1 cup brown sugar (packed): Adds deep sweetness and chewiness with its caramel notes.
1/2 cup granulated sugar: Provides a touch of sweetness while helping cookies spread nicely.
1 cup pumpkin puree (canned or fresh): Introduces moistness and a subtle pumpkin flavor that defines the cookies.
1 large egg: Binds ingredients together while adding richness and moisture.
1 tsp vanilla extract: Adds depth and a hint of sweetness to round out the flavors.
- 1 cup butterscotch chips: Brings creamy sweetness that complements the spices beautifully.
You MUST Preheat the Oven! Trust Me on This!
I know, I know — preheating the oven feels like a pesky step that feels more like an inconvenience than a necessity. I tried skipping it once, hoping to save time, but my cookies came out flat and sad. Let’s just say they barely resembled cookies at all! So trust me when I say: don’t skip this step.
Preheating your oven is crucial because it ensures that your Pumpkin Oatmeal Scotchies bake evenly from the get-go. Think of it like warming up before a workout; you wouldn’t want to jump into a run without getting your muscles ready. Similarly, starting with a preheated oven allows the baking soda in our dry ingredients to activate properly, resulting in those perfectly chewy cookies instead of a dense, undercooked mess.
What does Preheating the Oven do?
- Even Baking — A preheated oven ensures that heat surrounds the dough uniformly, promoting even cooking throughout.
- Proper Rise — The baking soda requires immediate heat to activate and create lift; without it, your cookies may end up too flat and dense.
- Better Texture — The initial blast of heat helps set the edges quickly, giving you that delightful crispy outer layer while keeping the inside chewy.
- Enhanced Flavor — Starting with high heat caramelizes sugars at the right moment, enhancing the overall flavor profile of your cookies.
- Color Perfection — Preheating contributes to achieving that beautiful golden-brown color on the edges of your scotchies, making them visually appealing.
Different Preheat Times
- 0 minutes (no preheat) (poor) — Cookies spread too much and bake unevenly; likely to result in gooey centers or burnt bottoms.
- 5 minutes (fair) — Better than nothing! But you might still notice uneven texture and color compared to fully preheated cookies.
- 10 minutes (good) — Cookies will rise better and have improved texture, though not optimal for flavor development.
- 15 minutes or longer (great) — Ideal! Allows plenty of time for your oven to reach an even temperature, ensuring perfectly baked scotchies every time.
Don’t think you can skip the preheating step just because you’re in a hurry! The most common mistake I see is rushing this process. If you throw those cookie dough balls into a cold oven, you’ll end up with disappointing results that no amount of butterscotch chips can fix. So please, take the time to preheat! You’ll thank yourself later.
How to make Pumpkin Oatmeal Scotchies
Are you ready to see how straightforward it is to make the Pumpkin Oatmeal Scotchies of your dreams??
1. PREPARE THE OVEN AND BAKING SHEET
Let’s get the oven hot and our baking space ready for these delightful cookies!
1. Preheat – Preheat your oven to 350°F (175°C) and line a baking sheet with parchment paper. This ensures that your cookies bake evenly and won’t stick to the pan, making cleanup a breeze!
2. Whisk Dry Ingredients – In a mixing bowl, whisk together the dry ingredients: flour, oats, baking soda, cinnamon, nutmeg, and salt. Whisking helps to evenly distribute the baking soda and spices throughout the flour, ensuring every bite is perfectly flavored.
HANDY TIPS
- Make sure your flour is spooned into the measuring cup instead of scooped directly from the bag for accuracy—this prevents your cookies from being too dense!
- If you want more spice flavor, you can increase the ground cinnamon or nutmeg slightly without fear.
2. MIX WET INGREDIENTS
Now we’ll whip up a creamy mixture that will bring all that fall flavor!
3. Cream Butters – In another bowl, cream together the softened butter, brown sugar, and granulated sugar until light and fluffy. This step incorporates air into your mixture, creating a tender cookie texture that’s chewy and delightful!
4. Add Pumpkin and Egg – Add the pumpkin puree, egg, and vanilla extract to the butter mixture and mix until well combined. The pumpkin not only adds flavor but also moisture, which keeps these cookies soft!
HANDY TIPS
- For best results, ensure your butter is softened but not melted; it should give a little when pressed but not be runny!
- Using fresh pumpkin puree? Just ensure it’s well-drained to avoid excess moisture in your dough.
3. COMBINE AND ADD MIX-INS
It’s time to bring everything together and introduce those sweet morsels!
5. Combine Mixtures – Gradually add the dry ingredients to the wet ingredients, mixing until just combined. Overmixing can lead to tougher cookies—aim for a slightly lumpy dough that still holds together nicely.
6. Fold in Chips – Fold in the butterscotch chips until evenly distributed throughout the dough. These little gems will melt into gooey pockets of sweetness that are irresistible!
HANDY TIPS
- If you prefer less sweetness, feel free to reduce the amount of butterscotch chips by half; they still provide plenty of flavor without overpowering!
- Consider adding chopped nuts for an extra crunch—walnuts or pecans pair beautifully with pumpkin!
4. BAKE THE COOKIES
Finally, let’s transform this delicious dough into warm cookies that fill your kitchen with an irresistible aroma!
7. Drop Dough – Drop tablespoon-sized balls of dough onto the prepared baking sheet, spacing them about 2 inches apart to allow for spreading during baking. A cookie scoop works great here for uniform sizes!
8. Bake – Bake in the preheated oven for 10-12 minutes or until the edges are lightly golden while centers remain soft—this means they’ll continue cooking slightly after being removed from the oven!
9. Cool Cookies – Allow the cookies to cool on the baking sheet for 5 minutes before transferring them to a wire rack to cool completely. This cooling period helps them set up perfectly!
HANDY TIPS
- For chewier cookies, underbake by a minute or so; they will continue cooking on the cooling rack without becoming hard!
- Want smaller treats? Use a teaspoon instead of a tablespoon for smaller bites—you’ll get around 27 delicious mini cookies!
Make these once, and I wager they will invade your dreams every night too! – Nagi x
FAQ – Pumpkin Oatmeal Scotchies
How long will these cookies keep? 🍪
These Pumpkin Oatmeal Scotchies will stay fresh for about 4-5 days at room temperature in an airtight container. After that, they start to lose their chewy texture and flavor, dropping to about 85% as good on day 6 and only around 70% by day 7. If you want to prolong their shelf life, consider refrigerating them, which can keep them fresh for up to 10 days. Just remember to let them come back to room temperature before enjoying for the best taste!
❄️ Do I really have to chill the dough?
No, you do not need to chill the dough for these cookies! I tested this multiple times with chilling and without, and I found that chilling didn’t significantly improve the texture or flavor. The key is to make sure your butter is well softened before creaming with the sugars — this step helps create a nice chewy cookie without the wait!
🥶 Can I freeze these cookies?
Absolutely! These cookies freeze beautifully. To freeze, simply bake them as directed and allow them to cool completely. Once cooled, you can place them in an airtight container or a zip-top bag, separating layers with parchment paper. They’ll keep well in the freezer for up to 3 months. When you’re ready to enjoy one (or five), just take them out and let them thaw at room temperature for about 30 minutes or pop them in the microwave for a few seconds for a warm treat!
🌾 Can these be made gluten free?
Yes! You can easily make these Pumpkin Oatmeal Scotchies gluten-free by substituting the all-purpose flour with a good quality gluten-free all-purpose blend that contains xanthan gum. It’s important to double-check that your oats are certified gluten-free as regular oats can often be contaminated with gluten during processing. This adjustment maintains the integrity of the cookie while keeping it safe for those avoiding gluten.
Can I reduce the sugar or substitute with sweeteners?
No, unfortunately, you cannot reduce the sugar in this recipe without affecting both texture and taste. I tried reducing it by various amounts and found that anything less than what’s called for results in a cookie that is too dry and crumbly (think more like biscuit than cookie!). If you’re looking for alternatives, consider using coconut sugar instead of brown sugar; it has a lower glycemic index but will yield similar sweetness and flavor.
Why do I need to use old-fashioned rolled oats?
Old-fashioned rolled oats are essential because they provide structure and chewiness to these cookies. Instant oats can absorb moisture too quickly, leading to a mushy texture — not ideal for our lovely scotchies! In my tests comparing different types of oats, old-fashioned rolled oats yielded the best results: chewy on the outside yet soft within.
Can I add nuts or other mix-ins? 🌰
Definitely! Feel free to customize your cookies by adding nuts like walnuts or pecans for extra crunch. You could also swap some of the butterscotch chips with chocolate chips if you prefer chocolate over butterscotch (I won’t tell!). Just keep in mind that additional ingredients may slightly change baking time; keep an eye on those cookies towards the end of baking!
Troubleshooting
I will continue to add more to this Troubleshooting section as I start seeing questions coming through from people who have made the recipe.
Troubleshooting tips
“My cookies came out too flat! 😭”
- This could be due to using melted butter instead of softened butter. Melted butter can cause the cookies to spread too much while baking.
- Another reason might be that your flour measurement was off; if you didn’t spoon and level the flour, you might have added too little, resulting in less structure.
- Don’t worry, they likely still tasted delicious despite their flatness!
“My cookies turned out too dry! 😩”
- Overbaking is a common culprit when cookies come out dry. If you left them in the oven longer than 12 minutes, they may have dried out.
- Using too much flour can also lead to dryness. Make sure you’re measuring accurately by spooning and leveling your flour instead of scooping directly from the bag.
- I bet they were still YUM though!
“The tops of my cookies cracked and split! 😳”
- Cracking can happen if the dough was overmixed after adding the dry ingredients. Mixing too much can incorporate excess air, which causes cracks during baking.
- Also, if your oven temperature is too high, it can bake the outside faster than the inside, leading to splits on top.
- Even with those cracks, I’m sure they were still tasty treats!
“My cookies are unevenly baked; some are dark while others are pale! 😕”
- This could be because your baking sheet wasn’t preheated properly or wasn’t placed in the center of the oven. Uneven heat distribution can cause some cookies to brown faster than others.
- Additionally, if you didn’t space them evenly apart on the baking sheet, they might not have baked uniformly.
- Regardless of their appearance, I bet they were still YUM though!