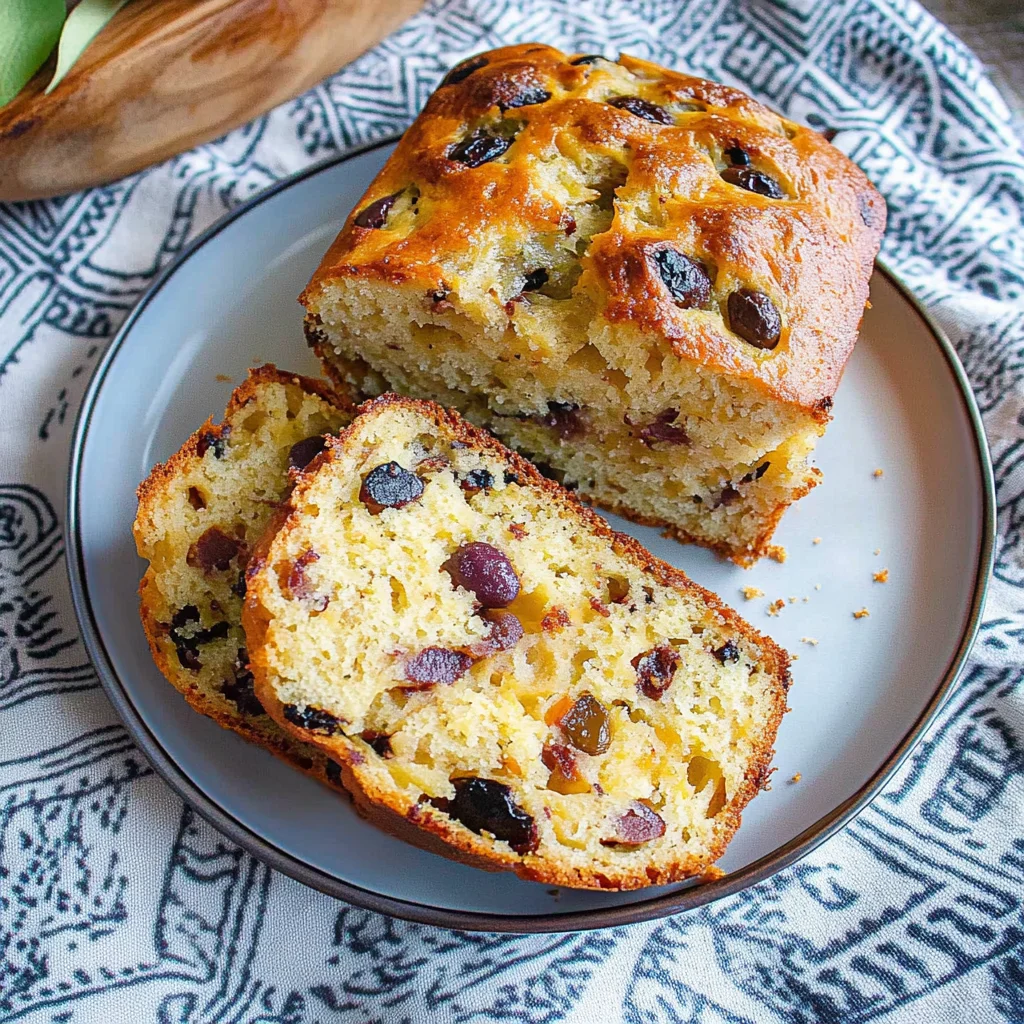
Savory Quick Bread With Cheese And Olives: Irresistible D…
A while back, I stumbled upon a cozy little café that served the most incredible savory quick bread with cheese and olives. It was a revelation! The moment I took my first bite, I was hooked—the way the rich, melty cheese mingled with the briny olives was pure magic. I knew I had to recreate that experience at home, not just for the love of baking but also to save a few bucks. Plus, let’s be honest; can anything taste better than freshly baked bread made in your own kitchen?
I dove headfirst into testing this recipe, and let me tell you—it took me six attempts to get it just right! At first, my bread turned out more like a dense brick than the light, fluffy treat I envisioned. I experimented with different ratios of cheese to olives and even tried various types of flour (did you know there’s a difference between all-purpose and self-raising?). Each time, I aimed for that perfect balance of flavors and moisture, and honestly, there were moments when I thought I’d never nail it. But perseverance is key, right?
Finally, after what felt like an eternity in my kitchen, I produced a deliciously moist quick bread packed with cheese and olives that was everything I dreamed it would be! The texture is perfectly tender with just the right amount of crustiness on the outside, while the flavors are a delightful dance of cheesy richness complemented by those savory olives. This savory quick bread with cheese and olives is perfect for snacking or as a side dish—trust me; you’re going to want to bake this one right away! Happy baking!
These Savory Quick Bread With Cheese And Olives are…
….the ultimate indulgence for your taste buds and the perfect addition to any meal!
1. They deliver a bold, savory flavor that’s simply irresistible, thanks to the combination of cheese and olives. The sharpness of cheddar or the tanginess of feta brings depth, while the olives add a briny punch that elevates each bite.
2. Expect a perfectly moist texture with a delightful crumb that makes this bread incredibly satisfying. The balanced moisture from the milk and olive oil ensures a soft interior, while the baking powder gives it just enough lift for an inviting slice.
3. A simple mixing technique makes this recipe approachable yet impressive. By blending wet and dry ingredients gently, we maintain airiness in the batter, allowing for that fluffy rise without overworking the dough — a key to achieving quick bread perfection.
4. This recipe is an affordable delight, using common pantry staples like flour and baking powder, making it easy to whip up whenever you crave something delicious. Plus, with its shelf-stable ingredients, you can enjoy freshly baked bread without needing special trips to the store.
PS This Savory Quick Bread With Cheese And Olives yields one hearty loaf, perfect for sharing or enjoying throughout the week!
Ingredients for the Savory Quick Bread With Cheese And Olives
Each ingredient in this dish plays an essential role in flavor and texture. Here’s what you’ll need:
- 2 cups all-purpose flour: Provides the structure and heartiness to the bread.
- 1 tablespoon baking powder (ensure it’s fresh): Helps the bread rise for a light, fluffy texture.
- 1 teaspoon salt: Enhances all the flavors and balances the richness.
- 1 cup milk (can substitute with almond milk): Adds moisture and contributes to a tender crumb.
- 1 large egg (beaten): Acts as a binder, improving texture and richness.
- 1/4 cup olive oil: Introduces a subtle fruity flavor while keeping the bread moist.
- 1 cup shredded cheese (cheddar or feta work well): Melts beautifully, adding savory depth and creaminess.
- 1/2 cup pitted olives (chopped, black or green): Brings a briny kick that complements the cheese perfectly.
- 1/4 cup fresh herbs (such as parsley or oregano): Infuses freshness and aromatic notes throughout the bread.
You Must Preheat the Oven. Don’t Skip This Step!
I know, I know—preheating the oven seems like an extra step that could be skipped, right? Trust me, I tried to take shortcuts and ended up with a dense, sad loaf of bread more suited for doorstop duty than delighting my taste buds. So take it from me: don’t be tempted to rush this part!
Preheating the oven is crucial because it ensures that the bread begins baking at the right temperature right from the get-go. Think of it like warming up your car on a cold morning; if you don’t give it time to warm up, you’re going to end up with a sluggish ride. Similarly, starting with a hot oven allows those leavening agents to kick into gear immediately, creating a beautifully risen and airy bread rather than a flat disappointment.
What does preheating the oven do?
- Texture — A preheated oven gives your quick bread a nice rise right away, creating a light, fluffy interior instead of a dense brick.
- Crust — It helps develop a golden-brown crust that’s slightly crispy on the outside while remaining moist within.
- Flavor — The initial heat allows for better caramelization of sugars in the batter, enhancing the overall flavor profile.
- Even Cooking — Starting with a hot environment ensures that your bread cooks evenly throughout, avoiding any raw spots in the middle.
- Leavening Agent Activation — Properly heated air activates the baking powder effectively, giving it that much-needed lift for perfect texture.
Different preheating times
- 5 minutes (okay) — Bare minimum; bread will still rise but not as well as it should due to uneven heat distribution.
- 10 minutes (good) — A decent start; your quick bread will have better texture and crust compared to just 5 minutes.
- 15 minutes (great) — Optimal for allowing all heating elements to reach even temperature; expect an impressively risen loaf!
- Beyond 20 minutes (diminishing returns) — While you may enjoy even more pronounced crustiness, you risk drying out your batter before it even starts baking.
Don’t even think about pouring that batter into an unheated oven! The most common mistake is assuming “I’ll just turn it on now” while mixing ingredients. If you skip this essential step, your quick bread might not rise properly and could end up dense and dry—no one wants that!
How to make Savory Quick Bread With Cheese And Olives

Are you ready to see how straightforward it is to make the Savory Quick Bread With Cheese And Olives of your dreams??
1. PREPARE THE OVEN AND PAN
Let’s get our oven hot and ready for this delightful bread!
Preheat – Preheat the oven to 350°F (175°C). This temperature is perfect for achieving a golden-brown crust while ensuring the inside remains moist. Grease – Grease a loaf pan with olive oil or line it with parchment paper to prevent sticking.
HANDY TIPS
- Use parchment paper for easy removal of the bread from the pan!
- Ensure your loaf pan is the right size; a standard 9×5 inch works best for even baking.
2. MIX DRY INGREDIENTS
Now, we’ll create a flavorful base for our quick bread!
Whisk – In a large mixing bowl, whisk together the all-purpose flour, baking powder, and salt until well combined. This step ensures that your leavening agent is evenly distributed throughout the flour, which is crucial for an even rise in your bread.
HANDY TIPS
- Use a sifter if you have one; it helps break up any clumps in your flour!
- Make sure your baking powder is fresh, as expired leavening agents can lead to flat bread.
3. COMBINE WET INGREDIENTS
Time to bring moisture and richness into the mix!
Mix – In another bowl, combine the milk, beaten egg, and olive oil until smooth. Mixing these ingredients separately helps ensure that they are evenly incorporated before joining them with the dry mixture.
HANDY TIPS
- You can substitute regular milk with almond milk if you prefer a dairy-free option!
- Make sure the egg is at room temperature for better emulsification.
4. COMBINE MIXTURES
Let’s unite our dry and wet ingredients!
Pour – Pour the wet ingredients into the dry ingredients and stir gently until just combined. ⚠️ Be careful not to overmix; doing so can result in a dense texture rather than a light, fluffy bread.
HANDY TIPS
- A few lumps are okay; they will disappear during baking!
- If you want added flavor, consider adding some of your chosen herbs directly into this mixture.
5. ADD CHEESE AND OLIVES
This is where we add those fantastic flavors!
Fold – Gently fold in the shredded cheese, chopped olives, and fresh herbs until evenly distributed throughout the batter. This step adds bursts of flavor and texture that elevate your quick bread!
HANDY TIPS
- For extra creaminess, try using feta cheese instead of cheddar!
- Adjust the amount of olives based on your personal preference — more for extra brininess!
6. BAKE THE BREAD
Let’s get this deliciousness in the oven!
Pour – Pour the batter into your prepared loaf pan and smooth out the top with a spatula. Bake in the preheated oven for about 45 minutes or until a toothpick inserted in the center comes out clean. You’re looking for a golden top that’s firm to touch!
HANDY TIPS
- If it starts browning too quickly, cover it loosely with foil towards the end of baking.
- Use an oven thermometer if you’re unsure about your oven’s accuracy; it’s worth it!
7. COOL AND SERVE
The final steps before enjoying this bread!
Cool – Allow the bread to cool in the pan for about 10 minutes before carefully transferring it to a wire rack to cool completely. Slice and serve warm or at room temperature — perfect for snacking or as a side dish!
HANDY TIPS
- Serve with butter or olive oil on warm slices for an indulgent treat!
- This bread keeps well in an airtight container at room temperature for up to three days.
Make this Savory Quick Bread With Cheese And Olives once, and I promise it will become a staple in your home! The combination of cheese and olives creates an irresistible flavor profile that will leave everyone wanting more – Nagi x
FAQ – Savory Quick Bread With Cheese And Olives
🍞 How long will this quick bread keep?
This savory quick bread will stay fresh for about 3 to 4 days when stored in an airtight container at room temperature. After day 1, I’d rate it at 97% as good, then around 90% on day 3, and finally about 85% on day 4. If you notice any signs of mold or an off smell, it’s best to toss it. For optimal taste, I recommend enjoying it within the first two days!
⏱️ Can I skip letting the batter rest before baking?
No, you cannot skip this step! While this recipe is straightforward, allowing the batter to rest for even just a few minutes after mixing helps the flour hydrate fully, leading to a more tender texture. Think of it as giving your ingredients a mini vacation together — they’ll come back better friends in the oven!
❄️ Can I freeze this savory quick bread?
Absolutely! This bread freezes beautifully. Once cooled completely, wrap it tightly in plastic wrap and then aluminum foil to prevent freezer burn. It will keep well for up to 3 months. To thaw, simply leave it at room temperature for a few hours or pop it in the microwave for a quick defrost. Trust me, nothing beats a warm slice straight from the freezer!
🌾 Can I make this recipe gluten-free?
Yes! To make this savory quick bread gluten-free, use a good quality gluten-free all-purpose flour blend that contains xanthan gum. I’ve tested this with brands like Bob’s Red Mill and King Arthur Flour with great results. Just keep in mind that gluten-free flours can sometimes lead to a denser loaf, so don’t be alarmed if it’s not quite as fluffy as traditional versions.
🧀 Can I substitute the cheese or olives?
Definitely! If cheddar or feta isn’t your style, feel free to experiment with other cheeses like gouda or mozzarella for different flavors. As for olives, kalamata olives are fantastic if you’re looking for a bolder flavor profile. Just ensure whatever substitute you choose works well with herbs and complements the overall taste—after all, we want this bread to shine!
🤔 Why do I need to fold in the cheese and olives instead of mixing them?
Folding in ingredients like cheese and olives helps maintain their texture and prevents them from breaking down into smaller pieces. When you overmix, you risk making the bread denser rather than light and fluffy. It’s all about keeping those delightful pockets of flavor intact—think of them like little surprises waiting in each slice!
🥚 Can I use a different type of milk in this recipe?
Yes! You can easily substitute regular milk with almond milk or any other non-dairy milk of your choice without compromising the texture too much. Just make sure that whatever alternative you use is unsweetened; otherwise, you might end up with an unexpectedly sweet loaf! In my experience, almond milk works particularly well here—just don’t forget to shake it well before measuring!
Troubleshooting
I will continue to add more to this Troubleshooting section as I start seeing questions coming through from people who have made the recipe.
Troubleshooting tips
“My bread came out too flat! 😩”
- Your baking powder might not be fresh. Baking powder loses its potency over time, and if it’s expired, it won’t help the bread rise properly.
- You may have overmixed the batter. Overmixing can develop gluten in the flour, resulting in a denser texture that doesn’t rise well.
- I bet it still tasted great though!
“The center of my bread is gooey while the edges are done! 🤔”
- You might not have baked it long enough. Ovens can vary in temperature; using an oven thermometer can help ensure you’re at the right heat for even cooking.
- Your loaf pan could be too small or too large. If your pan is too small, the batter will be thicker and take longer to bake through. A larger pan may cause it to bake unevenly.
- I’m sure it was still delicious despite the texture!
“My bread turned out way too dry! 😢”
- You might have used too much flour. Make sure you’re spooning and leveling the flour instead of packing it into the measuring cup, which can lead to using excess flour.
- You may have baked it for too long. Every oven is different, so checking for doneness a few minutes early can prevent dryness.
- I bet it was still YUM though!
“The crust of my bread is too dark! 🔥”
- Your oven temperature could be too high. If your oven runs hot, reducing the temperature by 25°F (about 15°C) can help achieve a golden crust without burning.
- If you used a dark loaf pan, it absorbs more heat, which can lead to faster browning. Consider using a light-colored pan next time for better results.
- I’m sure it still made for a tasty snack!
“My bread looks wonky and has cracks on top! 😬”
- You may have overmixed the batter when combining wet and dry ingredients. This can create excess gluten, leading to cracks during baking.
- If you poured your batter into the pan without smoothing the top, any air pockets could cause uneven rising and cracking during baking.
- No worries—bet it was still delicious inside!
Savory Quick Bread With Cheese And Olives
Ingredients
Method
- Preheat the oven to 350°F (175°C). Grease a loaf pan with oil or line it with parchment paper.
- In a large mixing bowl, whisk together the flour, baking powder, and salt until well combined.
- In another bowl, mix the milk, beaten egg, and olive oil until smooth.
- Pour the wet ingredients into the dry ingredients and stir until just combined. Do not overmix.
- Fold in the shredded cheese, chopped olives, and herbs until evenly distributed.
- Pour the batter into the prepared loaf pan and smooth the top. Bake for 45 minutes or until a toothpick inserted in the center comes out clean.
- Allow the bread to cool in the pan for 10 minutes before transferring it to a wire rack to cool completely. Slice and serve warm or at room temperature.