Easy Sushi Bake: Creamy and Satisfying Comfort Food
I first stumbled upon the idea of a sushi bake during a late-night food scrolling session, and I couldn’t shake the craving for something that blended the comforting vibes of a casserole with all my favorite sushi flavors. The original version at a local eatery was so good—creamy, savory, and just downright delicious—that I felt challenged to recreate it at home. Plus, let’s be honest: there’s something incredibly satisfying about whipping up a restaurant-quality dish without having to deal with the bill or the wait for a table.
After several attempts and way too many late nights spent in my kitchen, I finally nailed down my Easy Sushi Bake recipe. I think I lost count after my fourth or fifth try (okay, maybe it was closer to eight!), but each iteration brought me closer to capturing that creamy richness and the perfect balance of flavors. I was on a mission to get the textures just right—crispy topping, creamy filling—and trust me, there were some real kitchen disasters along the way that probably would have made great blooper reels!
But oh boy, was it worth it! The final result is an Easy Sushi Bake that’s not just comforting but also bursts with flavor—a harmonious blend of fresh ingredients topped with a delightful crunch. It’s got that satisfying texture contrast between the soft layers of sushi goodness and the crispy topping that keeps you coming back for more. I can’t wait for you to dive into this dish; it’s perfect for sharing or devouring all by yourself—either way, you’re going to love it!
These Easy Sushi Bake are…
…a delightful fusion of sushi flavors that redefine comfort food!
1. They deliver an explosion of umami flavor with every bite, thanks to the combination of imitation crab meat and creamy sriracha mayonnaise. The cream cheese acts as a luscious base that balances the savory notes while enhancing the overall taste experience, making this dish truly exceptional.
2. Irresistibly creamy texture — this bake boasts a rich, smooth top layer that contrasts beautifully with the tender sushi rice base underneath. The softening of the cream cheese during baking creates an inviting consistency that is both comforting and satisfying, ensuring each mouthful is a delightful blend of textures.
3. Smart layering technique — by mixing the toppings thoroughly before baking, I ensure every spoonful captures a perfect balance of flavors and textures. This method elevates the Easy Sushi Bake beyond ordinary casseroles, allowing the flavors to meld beautifully while ensuring even distribution of that creamy topping.
4. Incredible value — creating this Easy Sushi Bake at home saves you money compared to ordering sushi from restaurants, while still capturing all those beloved flavors. Plus, it’s made with accessible ingredients that you can easily find at your local grocery store, making it a practical choice for busy weeknights.
PS This recipe yields a generous portion—perfect for sharing with family or enjoying leftovers throughout the week!
Ingredients for the Easy Sushi Bake
Each ingredient in this dish plays an essential role in flavor and texture. Here’s what you’ll need:
- 2 cups cooked sushi rice: Forms the hearty base with a sticky texture perfect for holding everything together.
- 1 tablespoon rice vinegar: Adds a subtle tang that enhances the overall flavor profile.
- 1 teaspoon sugar: Balances the acidity of the vinegar for a well-rounded taste.
- 1 teaspoon salt: Enhances all the flavors, making every bite more delicious.
- 8 ounces imitation crab meat (shredded): Provides a seafood essence that mimics traditional sushi flavors.
- 1 cup cream cheese (softened): Delivers a creamy richness that binds the topping ingredients together.
- 1/4 cup mayonnaise: Adds moisture and a slight tanginess to complement the crab meat.
- 2 tablespoons sriracha (or to taste): Brings heat and depth, adding excitement to each bite.
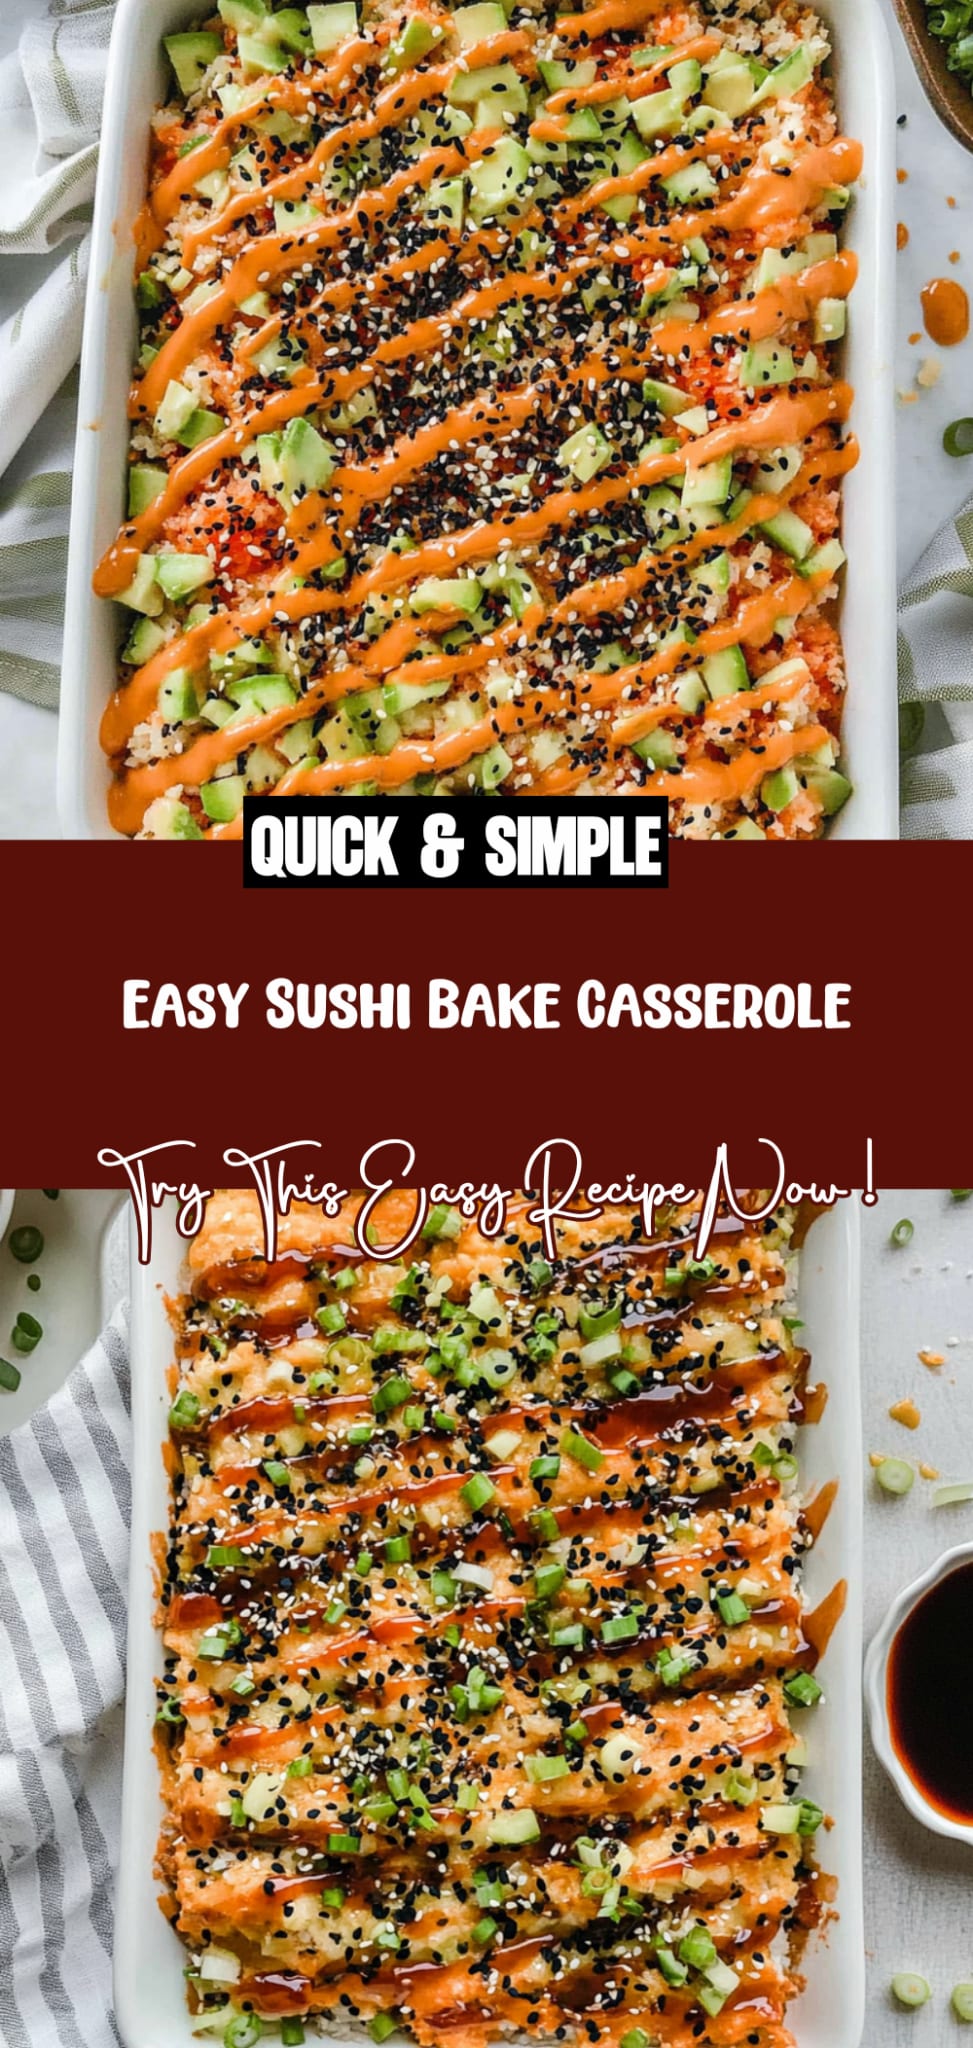
- 1 cup shredded nori (for garnish): Offers a crisp texture and authentic sushi flavor as a finishing touch.
- 1 tablespoon green onions (chopped, for garnish): Introduces a fresh, vibrant element that brightens the dish.
You Must Mix the Rice with Seasoning. No Shortcuts!
I’ll be honest, I tried to skip this step a few times, thinking it wouldn’t matter much. Spoiler alert: I was wrong! Mixing the cooked sushi rice with rice vinegar, sugar, and salt is not just an extra chore; it’s the key to transforming your Easy Sushi Bake from good to absolutely unforgettable. Trust me, I’ve learned this the hard way—multiple times.
This technique is crucial because it ensures that every grain of rice is infused with flavor. Think of it like seasoning pasta water before cooking: if you skip it, the final dish lacks that essential base note of deliciousness. The ingredients in the rice mixture—rice vinegar for tanginess, sugar for balance, and salt for depth—create a perfectly seasoned canvas that elevates your entire sushi bake.
What does mixing the rice do?
- Flavour — Each grain absorbs the seasoning, resulting in a well-rounded taste that enhances every bite.
- Texture — The addition of vinegar helps create a slightly sticky texture that’s characteristic of sushi rice, making it hold together better in the casserole.
- Balance — The sugar offsets the acidity of the vinegar and complements the richness of the crab topping, creating a harmonious flavor profile.
- Moisture retention — Combining the rice with these seasonings helps keep it moist during baking, preventing dryness and ensuring every mouthful is delicious.
- Aroma — The vinegar releases a subtly fragrant scent as it bakes, enhancing the overall sensory experience of your sushi bake.
Different mixing times
- Immediate Mixing (excellent) — This is when you mix right after cooking. The rice absorbs flavors while it’s still warm, providing a delicious base for your bake.
- Letting Sit for 15 Minutes (good) — If you let it sit briefly before mixing in toppings, you’ll notice even better flavor absorption as the spices meld together.
- 1 Hour Later (average) — While still okay, waiting too long can lead to dry rice as it cools down and loses moisture.
- Overnight (not recommended) — Don’t do this! The rice tends to clump together and lose its ideal texture for baking.
Beware! The most common mistake I see is skipping or rushing through this mixing step entirely. Don’t underestimate how vital it is to coat those grains evenly; otherwise, you’ll end up with bland bites of rice scattered throughout your luscious topping!
How to make Easy Sushi Bake
Are you ready to see how straightforward it is to make the Easy Sushi Bake of your dreams??
1. PREPARE THE RICE
First things first, let’s get that delicious rice base ready!
1. Preheat – Preheat the oven to 350°F (175°C). This step is crucial as it ensures even cooking and helps achieve that perfect golden top.
2. Combine – In a mixing bowl, combine the cooked sushi rice, rice vinegar, sugar, and salt. Mix well until the rice is evenly coated. This will enhance the flavor of the rice and give your bake that authentic sushi taste! 💡 TIP: Make sure your sushi rice is slightly warm; it mixes easier when it’s not too cold.
HANDY TIPS
- For best results, use short-grain sushi rice as it clumps together perfectly.
- If you’re making this in advance, store the prepared rice in an airtight container at room temperature for up to 4 hours before baking.
2. MAKE THE TOPPING
Now let’s whip up that creamy crab topping!
3. Mix – In another bowl, mix together the shredded crab meat, cream cheese, mayonnaise, and sriracha until well combined. The cream cheese adds richness while the sriracha brings a delightful kick! ❓ Why does this matter? Because combining these ingredients creates a luscious topping that melds beautifully with the rice.
HANDY TIPS
- If you prefer a milder flavor, adjust the sriracha to taste or substitute it with a mild chili sauce.
- Try adding a splash of lemon juice for an extra zing in your topping!
3. ASSEMBLE THE BAKE
Let’s bring everything together into one glorious dish!
4. Spread – Spread the rice mixture evenly in a baking dish. Use a spatula to press it down gently; this helps create a solid base that won’t fall apart after baking.
5. Layer – Layer the crab mixture over the rice, spreading it out evenly. Ensure every inch of rice is covered so each bite has that creamy goodness! 💡 TIP: For an even bake, try to make sure both layers are of similar thickness.
HANDY TIPS
- If you’re feeling adventurous, consider adding vegetables like finely chopped cucumber or avocado into the crab mixture for added freshness!
- You can prepare this casserole up to a day in advance and keep it in the fridge before baking.
4. BAKE
Time to bake this beautiful creation!
6. Bake – Bake in the preheated oven for 20-25 minutes, or until heated through and slightly golden on top. Keep an eye on it; you want that lovely golden color without overcooking! ⚠️ Be cautious when removing from the oven; it’s hot!
7. Cool & Garnish – Remove from the oven and let cool for a few minutes before garnishing with shredded nori and chopped green onions for that pop of color and fresh flavor!
That’s it! You’ve just created a scrumptious Easy Sushi Bake that’s sure to impress friends and family alike! Just imagine all those comforting flavors of sushi packed into one delightful casserole – what’s not to love? Make this once, and I wager it will invade your dreams every night too! – Nagi x
FAQ – Easy Sushi Bake
🥡 Can I make this sushi bake ahead of time?
Yes, you can prepare the sushi bake in advance! To do this, assemble the rice base and topping as instructed, but do not bake it. Cover the baking dish with plastic wrap or aluminum foil and refrigerate for up to 24 hours. When you’re ready to eat, simply remove it from the fridge, let it sit at room temperature for about 30 minutes, then bake as directed. This is a great way to save time on busy weeknights or for entertaining!
❄️ Can I freeze leftovers of this sushi bake?
Absolutely! If you have leftovers (which is rare because it’s so delicious!), allow the sushi bake to cool completely, then transfer it to an airtight container or wrap it tightly in plastic wrap and aluminum foil. It can be frozen for up to 3 months. To reheat, thaw it in the fridge overnight and then bake at 350°F (175°C) for about 25-30 minutes until heated through. Just be warned: you might be tempted to eat it straight from the freezer!
🍣 Is there a gluten-free option for this recipe?
While traditional sushi rice is gluten-free, some brands of imitation crab meat may contain gluten. To make this recipe gluten-free, look for imitation crab labeled as “gluten-free.” Additionally, check that your mayonnaise does not contain any gluten ingredients. You can also substitute with fresh crab meat if you’re feeling fancy; just make sure to verify that all other ingredients are gluten-free too!
🌶️ Can I adjust the spiciness of the topping?
Definitely! The amount of sriracha can be adjusted based on your heat preference. If you’re not a fan of spicy food, start with just 1 tablespoon, mix it in, and taste before adding more. Alternatively, you can replace sriracha with a milder sauce or even omit it altogether if you prefer a creamier flavor profile. Just don’t skimp on the cream cheese—it’s essential for that rich texture!
🥢 Why do I need to season the rice?
Seasoning sushi rice with rice vinegar, sugar, and salt not only enhances its flavor but also gives it that characteristic sticky texture that holds everything together when baked. This mixture helps create a delicious base that complements the rich toppings perfectly. I’ve tested various ratios over countless batches—trust me when I say that this combination results in perfection!
🦀 Can I use real crab instead of imitation crab?
Yes! You can absolutely use real crab meat in place of imitation crab. In fact, using freshly cooked lump crab meat will elevate the dish with its delicate flavor and texture. Just ensure you shred it into bite-sized pieces before mixing with the cream cheese and mayonnaise so that every scoop has a perfect balance of flavors.
⏲️ How long should I let the sushi bake cool before serving?
It’s best to let the sushi bake cool for about 5-10 minutes after removing it from the oven before garnishing and serving. This allows it to set slightly and makes it easier to cut into portions without falling apart. Plus, trust me—you want your taste buds intact when indulging in this comforting dish!
Troubleshooting
I will continue to add more to this Troubleshooting section as I start seeing questions coming through from people who have made the recipe.
Troubleshooting tips
“My sushi bake came out too dry! 😩”
- You may have overcooked your sushi rice, which can make it lose moisture. Sushi rice should be tender and slightly sticky, so ensure you’re cooking it just right.
- Not enough cream cheese or mayonnaise can also lead to dryness. These ingredients help keep the topping moist, so make sure you’re using the full amounts specified.
- I bet it was still YUM though!
“The rice layer was way too thin! 😱”
- If you don’t use the full 2 cups of cooked sushi rice or spread it unevenly in the baking dish, your base might not be thick enough. Make sure to pack it down lightly for a nice foundation.
- Also, if your baking dish is too large, that can cause the rice layer to spread out and become thinner than intended. Stick with a dish that’s appropriately sized for the recipe!
- I bet it was still YUM though!
“My sushi bake didn’t brown on top! 😕”
- Not baking long enough can prevent proper browning. Make sure you’re keeping an eye on it during the last few minutes of cooking; every oven is different!
- Also, if your oven temperature is a bit off, it might not reach that golden perfection. An oven thermometer can be a great tool for checking accuracy.
- I bet it was still YUM though!
“The top cracked and split open! 😳”
- Overmixing the crab mixture or using overly soft cream cheese can cause instability when baking, leading to cracks. Just mix until well combined without overdoing it!
- Baking at a temperature that’s too high may also cause rapid expansion and cracking. Stick to 350°F (175°C) for even cooking.
- I bet it was still YUM though!