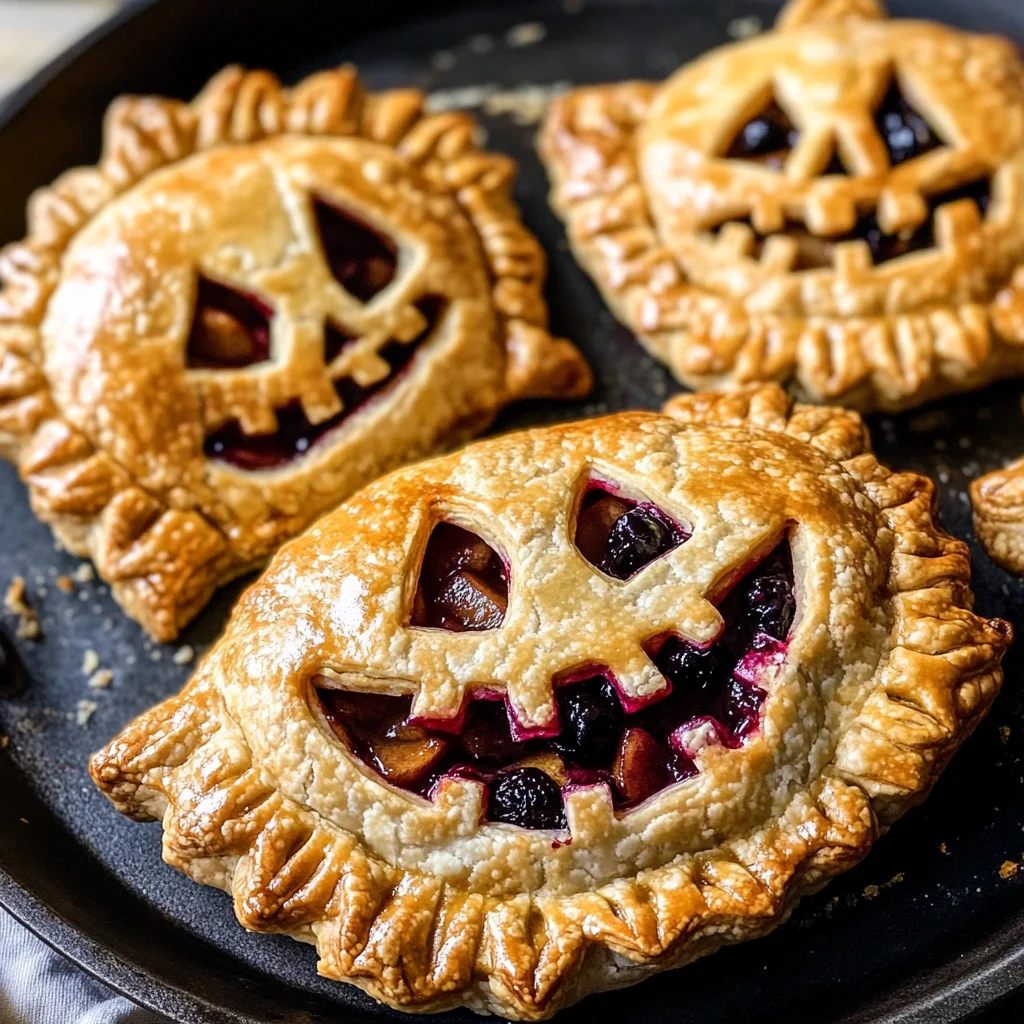
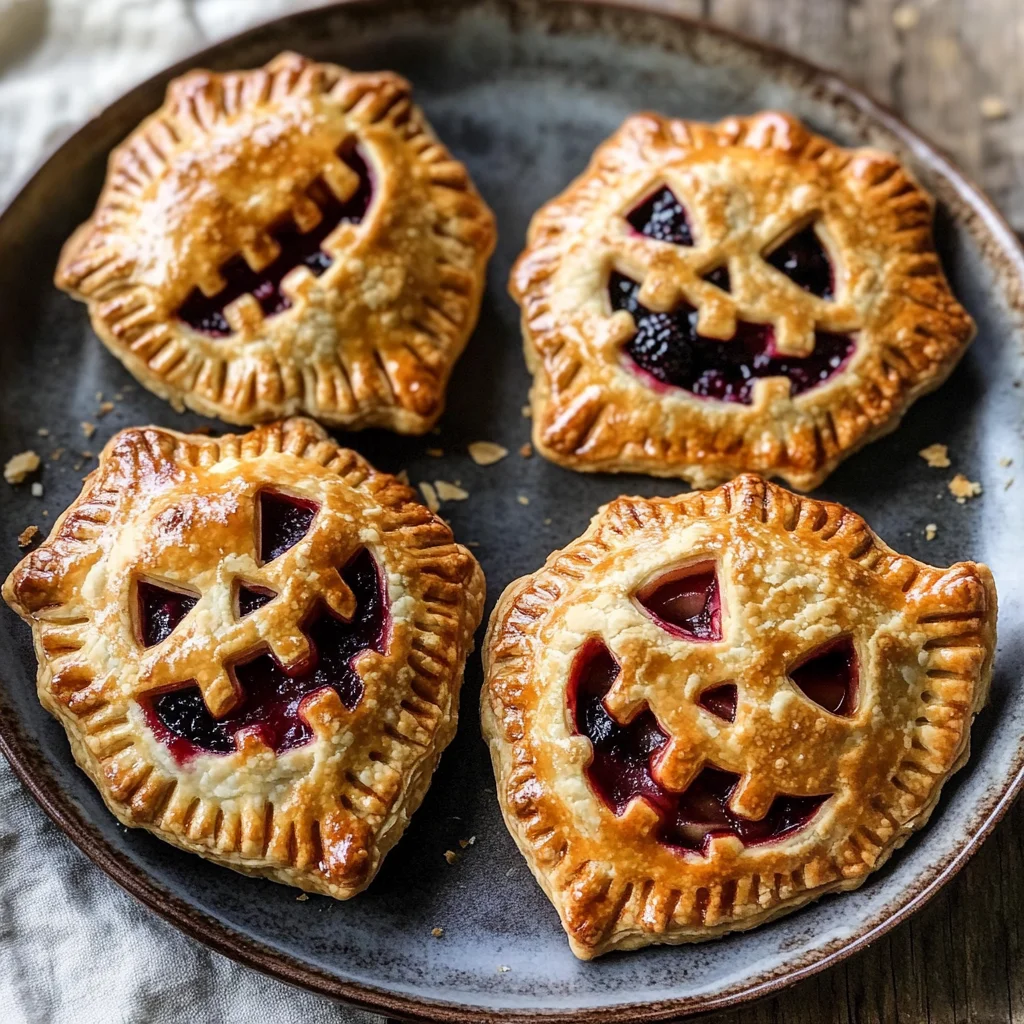
Jack-O-Lantern Hand Pies
If you’re looking for a fun and festive treat to brighten up your Halloween celebrations, these Jack-O-Lantern Hand Pies are just the ticket! They bring together the delightful flavors of apples and blackberries, all tucked inside a buttery, flaky crust. Not only do they taste amazing, but they’re also super cute and perfect for sharing with family and friends. Whether you’re hosting a spooky gathering or just want something special for the kids after school, this recipe will surely bring smiles all around.
I absolutely love making these hand pies during the fall season. The warm spices and sweet fruit filling create a cozy atmosphere that makes me think of crisp autumn days. Plus, they’re easy to make ahead of time, so you can enjoy more time with your guests instead of being stuck in the kitchen!
Why You’ll Love This Recipe
- Perfect for Halloween: These hand pies add a festive touch to any Halloween celebration.
- Family-friendly appeal: Kids love the fun pumpkin shapes and delicious fillings.
- Make-ahead convenience: You can prepare them in advance and bake them right before serving.
- Deliciously customizable: Choose your favorite fruits to mix things up!
- Simple ingredients: Wholesome pantry staples come together for an irresistible treat.
Ingredients You’ll Need
Get ready to whip up some magic with these simple, wholesome ingredients. They are easy to find and come together beautifully to create your Jack-O-Lantern Hand Pies!
For the Crust
- 2 1/2 cups all-purpose flour
- 1 tablespoon granulated sugar
- 1 teaspoon kosher salt
- 2 sticks (8oz unsalted butter, diced and very cold)
- 6-9 tablespoons ice water
- 1 egg (for egg wash)
- 1/4 cup raw or turbinado sugar (for sprinkling)
For the Apple Filling
- 2 large honey crisp apples (peeled and diced small)
- 3 tablespoons salted butter
- 2 tablespoons bourbon barley tea
- 1 teaspoon vanilla bean paste
- 1/2 teaspoon ground cinnamon
- 2/3 cup brown sugar
For the Blackberry Filling
- 18 oz fresh blackberries
- 1/3 cup granulated sugar
- 1 teaspoon vanilla extract
Variations
This recipe is wonderfully flexible! Feel free to experiment with different flavors or ingredients based on what you have on hand or what you love most.
- Mix up the fruit: Substitute pears or peaches for apples or blackberries for a new twist.
- Add spices: Try adding nutmeg or cardamom for an extra layer of flavor in your filling.
- Go gluten-free: Use a gluten-free flour blend in place of all-purpose flour for a gluten-free option.
- Sweeten it differently: Use honey or maple syrup instead of granulated sugar for a natural sweetness.
How to Make Jack-O-Lantern Hand Pies
Step 1: Make the Crust
To start off, we’re going to make that flaky crust which is essential for our hand pies. In your stand mixer bowl, combine the flour, sugar, and salt. Mixing on low helps keep everything light and airy. Once you’ve added in those cold butter pieces, you want it to resemble coarse sand with little bits of butter still showing—this is what makes the crust flaky! Adding ice water is crucial here; it helps bind everything together without overworking the dough.
Step 2: Chill the Dough
Once you’ve mixed your dough into a rough ball, it’s important to let it rest in the fridge. Chilling helps relax the gluten in the flour, making it easier to roll out later. Wrap each portion tightly in plastic wrap and flatten them into discs—this will speed up chilling!
Step 3: Prepare Your Fillings
While that dough chills, let’s create our delicious fillings! Start by heating butter until it’s just golden brown before adding your apples. This enhances their flavor by caramelizing them slightly. Don’t forget those warm spices like cinnamon; they really elevate this filling! Follow that by roasting your blackberries until they’re juicy and bubbling—such an incredible aroma fills your kitchen!
Step 4: Roll Out Dough and Cut Shapes
When you’re ready to assemble those adorable hand pies, dust your surface with flour. Roll out the dough until it’s about 1/8th inch thick—this thickness ensures they bake evenly while staying crispy. Use a pumpkin cookie cutter for fun shapes! Remember to refrigerate them again before baking so they hold their shape better.
Step 5: Assemble Your Hand Pies
Now comes the fun part—assembling! Place a dollop of filling on half of your cutouts and brush those edges with beaten egg; this acts as glue when sealing everything together. Don’t forget to add jack-o-lantern faces on top for that spooky touch! After resting again in the fridge briefly, they’re ready to go into a preheated oven where they’ll transform into golden delights.
Step 6: Bake & Enjoy!
Once baked until golden brown, let them cool slightly on a rack before serving. The anticipation builds as those lovely aromas waft through your home! Your Jack-O-Lantern Hand Pies are now ready to be shared—and trust me, everyone will be asking for seconds!
Pro Tips for Making Jack-O-Lantern Hand Pies
Making Jack-O-Lantern Hand Pies is a delightful experience, and these tips will ensure they turn out perfectly every time!
- Use very cold butter: Chilling the butter before mixing helps create a flaky crust. The cold fat creates steam when baked, resulting in a wonderfully airy texture.
- Don’t skip the chilling step: Allowing the dough to rest in the refrigerator not only makes it easier to roll out but also helps prevent shrinkage during baking. This is key for maintaining the cute pumpkin shape!
- Experiment with fillings: Feel free to get creative! You can substitute the apple and blackberry fillings with your favorite fruits or even savory options like pumpkin or sweet potato for a unique twist.
- Seal them well: Make sure to press down firmly while crimping the edges with a fork. This prevents any filling from leaking out during baking and keeps your hand pies intact.
- Keep an eye on baking time: Ovens can vary in temperature, so check your hand pies a couple of minutes early. You want them golden brown but not burnt!
How to Serve Jack-O-Lantern Hand Pies
These charming hand pies are not just delicious; they also make for an adorable presentation at your Halloween gathering. Here are some fun ways to serve them!
Garnishes
- Whipped Coconut Cream: A dollop of whipped coconut cream adds a light, airy touch that complements the sweetness of the filling beautifully.
- Cinnamon Sugar Dusting: Sprinkling a bit of cinnamon sugar on top gives an extra hint of sweetness and spice, enhancing the autumn flavor profile.
Side Dishes
- Spiced Hot Apple Cider: Warm spiced cider is a perfect drink pairing that brings out the flavors in your hand pies while creating a cozy atmosphere.
- Pumpkin Soup: A creamy pumpkin soup served alongside adds warmth and richness, making for a comforting meal perfect for fall gatherings.
- Autumn Salad: A fresh salad with mixed greens, cranberries, walnuts, and a maple vinaigrette offers a refreshing contrast to the sweet pastries.
- Cheese Platter: A selection of mild cheeses like brie or gouda can balance out the sweetness of the hand pies and provide variety on your dessert table.
With these serving ideas and tips, your Jack-O-Lantern Hand Pies will be both a visual feast and a delightful treat! Enjoy crafting this festive dessert and sharing it with friends and family this Halloween season!
Make Ahead and Storage
These Jack-O-Lantern Hand Pies are perfect for meal prep, allowing you to enjoy their delightful flavors anytime during the spooky season!
Storing Leftovers
- Store any leftover hand pies in an airtight container at room temperature for up to 3 days.
- For longer storage, refrigerate them, where they will keep for about a week.
Freezing
- Allow baked hand pies to cool completely before freezing.
- Place them in a single layer on a baking sheet and freeze until solid, then transfer to a freezer-safe bag.
- They can be frozen for up to 3 months. Just make sure to label the bag with the date!
Reheating
- To reheat frozen hand pies, preheat your oven to 350°F (175°C).
- Place the pies on a baking sheet and bake for about 10-15 minutes or until heated through.
- For best results, avoid using a microwave as it can make the crust soggy.
FAQs
If you have questions, I’ve got answers! Here are some common queries about making Jack-O-Lantern Hand Pies.
Can I make Jack-O-Lantern Hand Pies without apples?
Absolutely! You can substitute the apple filling with other fruits like pears or even pumpkin puree if you want a different flavor profile.
How do I decorate my Jack-O-Lantern Hand Pies?
Get creative with your jack-o-lantern designs! Use cookie cutters or carve faces into the dough before assembling. You can also add icing after baking for extra fun!
Can I use store-bought pie crust for Jack-O-Lantern Hand Pies?
Yes, store-bought pie crust is a great time-saver! Just roll it out and follow the same assembly instructions as you would with homemade dough.
What should I serve with my Jack-O-Lantern Hand Pies?
These hand pies pair wonderfully with vanilla ice cream or whipped coconut cream. A drizzle of caramel sauce also adds an extra touch of sweetness.
How many servings does this recipe yield?
This recipe yields 12 delightful hand pies—perfect for sharing at your Halloween gathering!
Final Thoughts
I hope you enjoy making these adorable Jack-O-Lantern Hand Pies as much as I do! They not only taste fantastic but also bring a festive spirit to your table. So gather your ingredients, get those little hands involved in the kitchen, and most importantly—have fun! Happy baking and enjoy every delicious bite!
Jack-O-Lantern Hand Pies

If you’re searching for a delightful treat to enhance your Halloween festivities, look no further than these charming Jack-O-Lantern Hand Pies. Filled with the sweet and tangy combination of apples and blackberries, these adorable pastries are encased in a buttery, flaky crust that is simply irresistible. Perfect for gatherings or as a fun after-school snack, these hand pies infuse the spirit of autumn into every bite. They are not only delicious but also easy to prepare ahead of time, allowing you to spend more quality moments with family and friends. Get ready to impress everyone with this festive dessert that’s sure to bring smiles all around!
- Prep Time: 30 minutes
- Cook Time: 20 minutes
- Total Time: 50 minutes
- Yield: Approximately 12 servings 1x
- Category: Dessert
- Method: Baking
- Cuisine: American
Ingredients
- 2 1/2 cups all-purpose flour
- 1 tablespoon granulated sugar
- 2 sticks (8 oz) unsalted butter (cold)
- 6–9 tablespoons ice water
- 2 large honey crisp apples (peeled and diced)
- 18 oz fresh blackberries
- 1 teaspoon ground cinnamon
- 2/3 cup brown sugar
Instructions
- In a mixing bowl, combine flour, sugar, and salt. Add cold butter and mix until resembling coarse sand. Gradually add ice water until dough forms.
- Chill the dough wrapped in plastic wrap for at least 30 minutes.
- Cook diced apples in butter with cinnamon until slightly caramelized; mix in brown sugar. Roast blackberries until juicy.
- Roll out dough to about 1/8 inch thick; cut into pumpkin shapes using cookie cutters.
- Assemble by placing fillings on half of the cutouts, sealing edges with egg wash.
- Bake in a preheated oven at 350°F (175°C) for about 20 minutes or until golden brown.
Nutrition
- Serving Size: 1 serving
- Calories: 230
- Sugar: 12g
- Sodium: 160mg
- Fat: 10g
- Saturated Fat: 6g
- Unsaturated Fat: 3g
- Trans Fat: 0g
- Carbohydrates: 32g
- Fiber: 2g
- Protein: 2g
- Cholesterol: 25mg