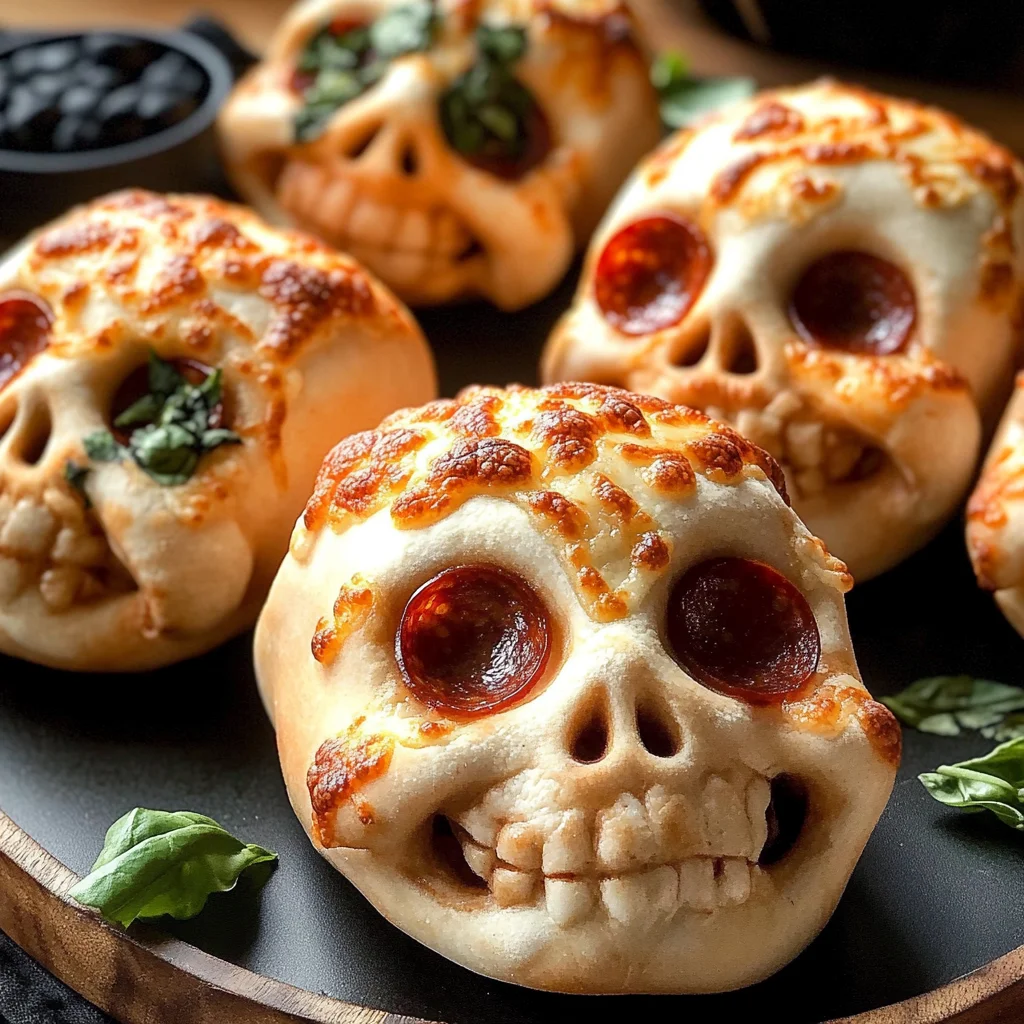
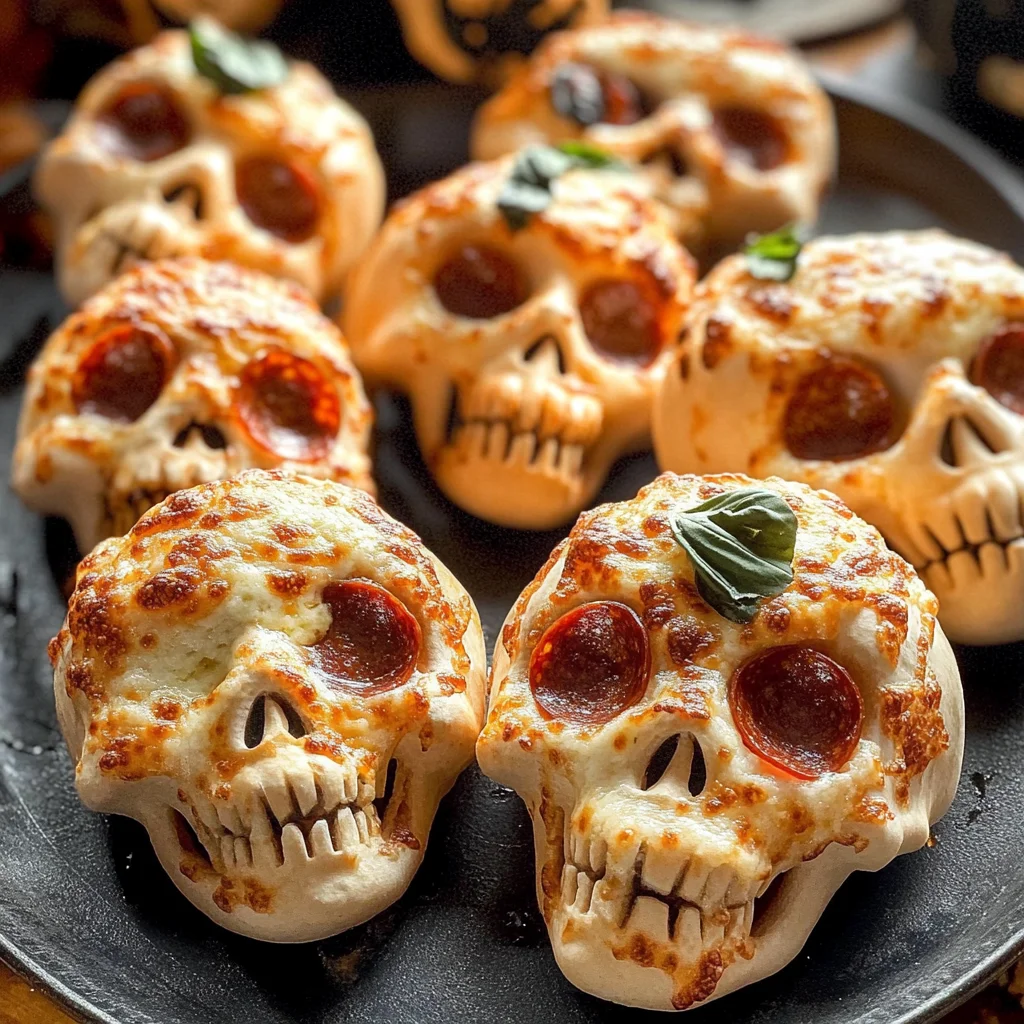
Cheesy Halloween Pizza Skulls
If you’re looking for a fun and spooky dish to whip up this Halloween, you’ve come to the right place! These Cheesy Halloween Pizza Skulls are not only adorable but also incredibly delicious. They make a fantastic savory treat that your family and friends will love. Plus, they’re easy to make, which is always a win on busy weeknights or during festive gatherings. Imagine the joy on your kids’ faces when they see these little skulls on their plates!
This recipe is perfect for Halloween parties, cozy family dinners, or just a special treat while watching spooky movies. The best part? You can customize them however you like! Let’s dive into why you’ll love making these delightful cheesy pizza creations.
Why You’ll Love This Recipe
- Quick and Easy: With just a few simple steps, you’ll have these cheesy delights ready in no time!
- Customizable Toppings: Everyone can create their own unique skulls with their favorite fillings.
- Kid-Friendly Fun: Kids will love getting involved in the kitchen to help make these spooky treats.
- Perfect for Any Occasion: Whether it’s Halloween or just a fun meal, these pizza skulls fit right in.
- Deliciously Satisfying: Gooey cheese and flavorful toppings guarantee every bite will be a hit!
Ingredients You’ll Need
Gathering the ingredients for these Cheesy Halloween Pizza Skulls is super easy! You likely have many of these items at home already. Here’s what you’ll need:
For the Pizza Skulls
- 13 to 16 ounces of pre-made pizza dough
- 3/4 to 1 cup pizza sauce
- 2 cups shredded mozzarella
- Parmesan cheese (about 1/4 cup)
- Cooked sausage (about 8 ounces for 6 pizza skulls)
- Mini turkey pepperoni (about 6 ounces for 6 pizza skulls)
- Black olives (sliced)
- Sliced chicken ham (chopped)
- Crumble crispy bacon
- Mini Italian meatballs
- Cooked corn kernels
- Baby spinach
- Fresh basil
- Marinara sauce for dipping
- Chopped parsley or basil
Variations
One of the best things about this recipe is its flexibility. Feel free to mix things up based on what your family loves or what you have on hand!
- Swap the protein: Try using ground turkey or shredded chicken instead of sausage.
- Go veggie: Load them up with more veggies like bell peppers, mushrooms, or zucchini for a healthier twist.
- Cheese overload: Experiment with different cheeses like cheddar, gouda, or even vegan cheese if you prefer!
- Extra spice: Add some red pepper flakes or jalapeños if you want to heat things up a bit.
How to Make Cheesy Halloween Pizza Skulls
Step 1: Prepare Your Baking Tin
Start by spraying your mini skull baking tin with cooking spray. This ensures that your pizza skulls come out easily after baking, preventing any sad stuck-on bits!
Step 2: Roll Out the Dough
Dust your counter lightly with flour to keep the dough from sticking. Roll, pat, or stretch the dough until it’s about 1/4 thick. Cut it into six rectangles—don’t stress about perfect shapes; they’re going to be filled with deliciousness anyway!
Step 3: Fill Each Skull
Take one piece of dough and gently lay it into the skull cavity. Fill it with a spoonful of pizza sauce, followed by mozzarella and your choice of toppings. Remember to sprinkle a bit of Parmesan cheese on top and add just a touch more sauce before sealing.
Step 4: Seal Them Up
Fold the dough over the fillings and pinch it together snugly like you’re creating little pockets of joy! Repeat this step until all six pieces are filled and sealed.
Step 5: Chill While Preheating
Pop your filled tray in the fridge while you preheat your oven to 400 degrees Fahrenheit. This helps keep their shape during baking.
Step 6: Bake Away!
Once preheated, take your tray out of the fridge and bake those delightful little skulls for about 16 to 20 minutes until they are lightly golden brown. Keep an eye on them as baking times may vary depending on your dough!
Step 7: Cool and Serve
After baking, let your Cheesy Halloween Pizza Skulls cool for five minutes before unmolding them. Serve warm with marinara sauce and sprinkle some chopped parsley or basil on top for that extra touch!
These Cheesy Halloween Pizza Skulls are sure to bring smiles and full bellies around your table this season! Enjoy making them as much as I do!
Pro Tips for Making Cheesy Halloween Pizza Skulls
Making these adorable and scrumptious Pizza Skulls is a breeze with a few handy tips to elevate your cooking experience!
- Use fresh ingredients – Fresh toppings like basil and spinach not only enhance the flavor but also add a pop of color that makes these skulls even more appealing!
- Don’t overfill – While it’s tempting to pack in all your favorite toppings, remember that too much filling can cause the dough to burst open while baking. Stick to a moderate amount for the best results.
- Experiment with flavors – Feel free to swap out any toppings based on your family’s preferences. Whether you prefer more veggies or different types of cheese, customizing your Pizza Skulls will make them truly unique.
- Try different doughs – If you’re feeling adventurous, try using whole wheat or gluten-free pizza dough. These alternatives can add a twist to the texture and taste without sacrificing fun!
- Keep an eye on baking time – Oven temperatures can vary, so check on your Pizza Skulls a couple of minutes before the recommended baking time to avoid overcooking.
How to Serve Cheesy Halloween Pizza Skulls
Serving these delightful Pizza Skulls can be just as fun as making them! They can be presented in various creative ways that will impress both kids and adults alike at your Halloween gathering.
Garnishes
- Fresh herbs – Sprinkle some freshly chopped parsley or basil on top just before serving for an aromatic touch that brightens up the dish.
- Shredded cheese – A light dusting of extra mozzarella or Parmesan right after baking adds a melty finish that cheese lovers will adore.
Side Dishes
- Crispy salad – A simple garden salad with mixed greens, cherry tomatoes, and a light vinaigrette offers a refreshing contrast to the warm, cheesy skulls.
- Garlic breadsticks – These buttery sticks are perfect for dipping into marinara sauce and complement the flavors of the pizza skulls wonderfully.
- Roasted vegetables – A colorful mix of roasted veggies like bell peppers, zucchini, and carrots not only adds nutrition but also creates a festive plate.
- Apple slices with caramel dip – For a sweet ending after your savory treat, serve crisp apple slices with a side of caramel dip. The sweetness balances out the meal perfectly!
Now that you have all these ideas and tips at hand, it’s time to get cooking and create some unforgettable memories this Halloween with cheesy Pizza Skulls! Enjoy every bite!
Make Ahead and Storage
These Cheesy Halloween Pizza Skulls are perfect for meal prep, making them an excellent choice for busy weeknights or festive gatherings. You can easily make them ahead of time and store or freeze them for later enjoyment!
Storing Leftovers
- Allow the pizza skulls to cool completely before storing.
- Place them in an airtight container in the refrigerator.
- They can be stored for up to 3 days.
Freezing
- Ensure the pizza skulls are cooled completely before freezing.
- Wrap each skull individually in plastic wrap or aluminum foil.
- Place wrapped skulls in a freezer-safe bag or container; they will keep well for up to 2 months.
Reheating
- To reheat from frozen, remove the desired number of skulls and let them thaw in the refrigerator overnight.
- Preheat your oven to 350°F (175°C).
- Place skulls on a baking sheet and heat for about 10-15 minutes, or until warmed through.
FAQs
If you have some burning questions about these delicious treats, you’re in the right place! Here are some common inquiries:
Can I customize the toppings in my Cheesy Halloween Pizza Skulls?
Absolutely! One of the best aspects of this recipe is its flexibility. You can swap out toppings based on your family’s preferences. Try adding veggies like bell peppers or mushrooms, or use different cheeses to create your ideal Halloween treat.
What is the best way to serve Cheesy Halloween Pizza Skulls at a party?
Serve these festive pizza skulls warm alongside marinara sauce for dipping. They make a fun finger food that guests will love! For added flair, you could even garnish with fresh herbs like basil or parsley.
How long do Cheesy Halloween Pizza Skulls stay fresh?
When properly stored in an airtight container in the fridge, these pizza skulls will stay fresh for up to 3 days. If you freeze them, they can last up to 2 months!
Can I make these pizza skulls gluten-free?
Yes! You can use gluten-free pizza dough as a substitute. Just ensure all other ingredients you choose are also gluten-free to keep your dish safe for those with dietary restrictions.
Final Thoughts
I hope you find joy in creating these delightful Cheesy Halloween Pizza Skulls! They’re not just a treat; they’re a way to bring a little magic into mealtime during the spooky season. Whether you’re serving them at a party or enjoying them with family, I’m sure they’ll be a hit! Have fun making this recipe and enjoy every delicious bite!
Dinner
Cheesy Halloween Pizza Skulls

If you’re looking to add a dash of fun and flavor to your Halloween festivities, these Cheesy Halloween Pizza Skulls are just the treat you need! Perfect for both kids and adults, these adorable skull-shaped pizzas are filled with gooey cheese, savory toppings, and your choice of flavorful fillings. Easy to prepare and fully customizable, they make a fantastic finger food for parties or cozy family dinners while watching spooky movies. With just a few simple ingredients and steps, you can create delightful bites that will ensure smiles all around. Get ready to impress your guests this Halloween with these tasty treats!
- Prep Time: 20 minutes
- Cook Time: 20 minutes
- Total Time: 40 minutes
- Yield: Makes about 6 servings 1x
- Category: Savory
- Method: Baking
- Cuisine: American
Ingredients
- 13 to 16 ounces of pre-made pizza dough
- 3/4 to 1 cup pizza sauce
- 2 cups shredded mozzarella
- Cooked turkey sausage or ground turkey (8 ounces)
- Mini turkey pepperoni (6 ounces)
- Black olives (sliced)
- Fresh basil
- Baby spinach
- Marinara sauce for dipping
Instructions
- Preheat your oven to 400°F. Spray a mini skull baking tin with cooking spray.
- Roll out the pizza dough on a floured surface until about 1/4 inch thick and cut into rectangles.
- Place each piece of dough into the skull cavities and fill with pizza sauce, mozzarella, cooked turkey sausage, mini pepperoni, olives, spinach, and basil.
- Fold the dough over the fillings and pinch to seal tightly.
- Chill the tray in the fridge while the oven preheats.
- Bake for 16 to 20 minutes or until golden brown.
- Let cool for five minutes before serving warm with marinara sauce.
Nutrition
- Serving Size: 1 serving
- Calories: 230
- Sugar: 3g
- Sodium: 480mg
- Fat: 12g
- Saturated Fat: 5g
- Unsaturated Fat: 7g
- Trans Fat: 0g
- Carbohydrates: 23g
- Fiber: 2g
- Protein: 10g
- Cholesterol: 30mg