Spooky Halloween Marble Cake
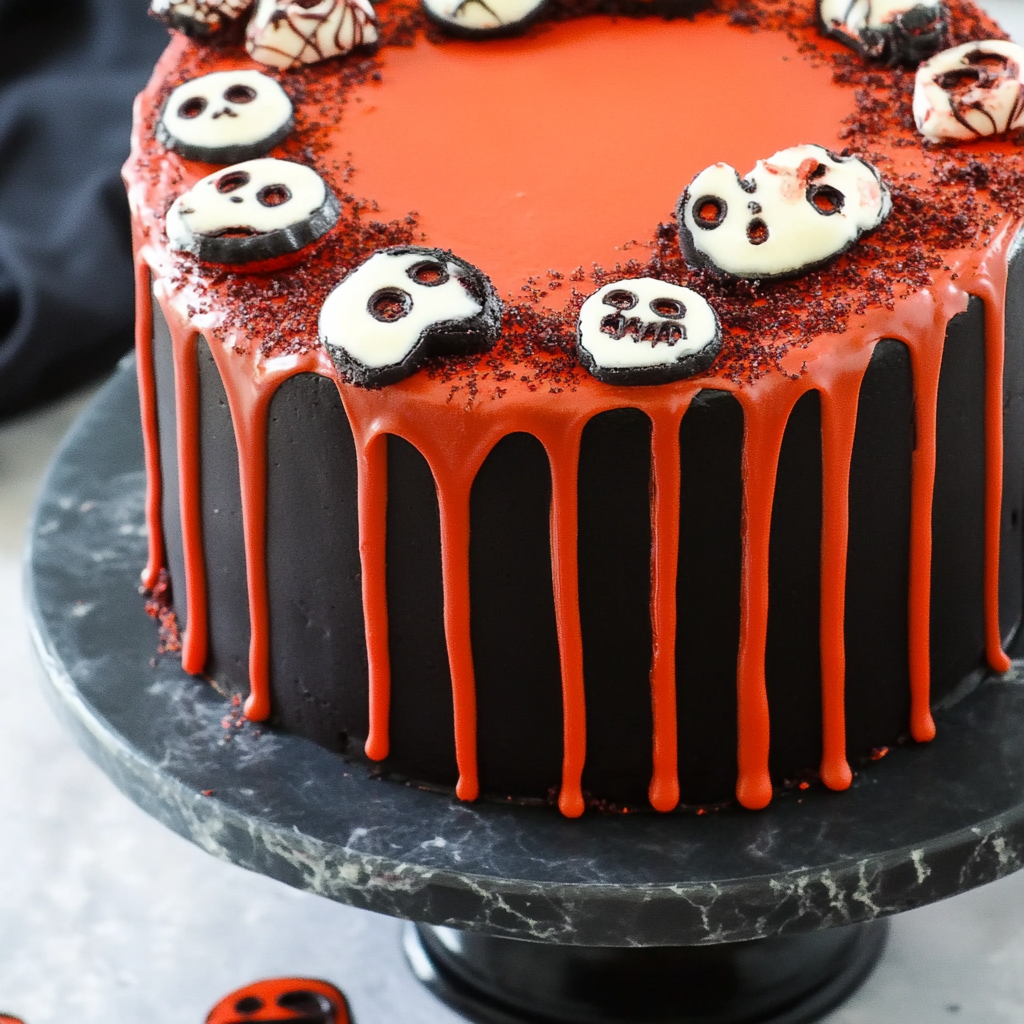
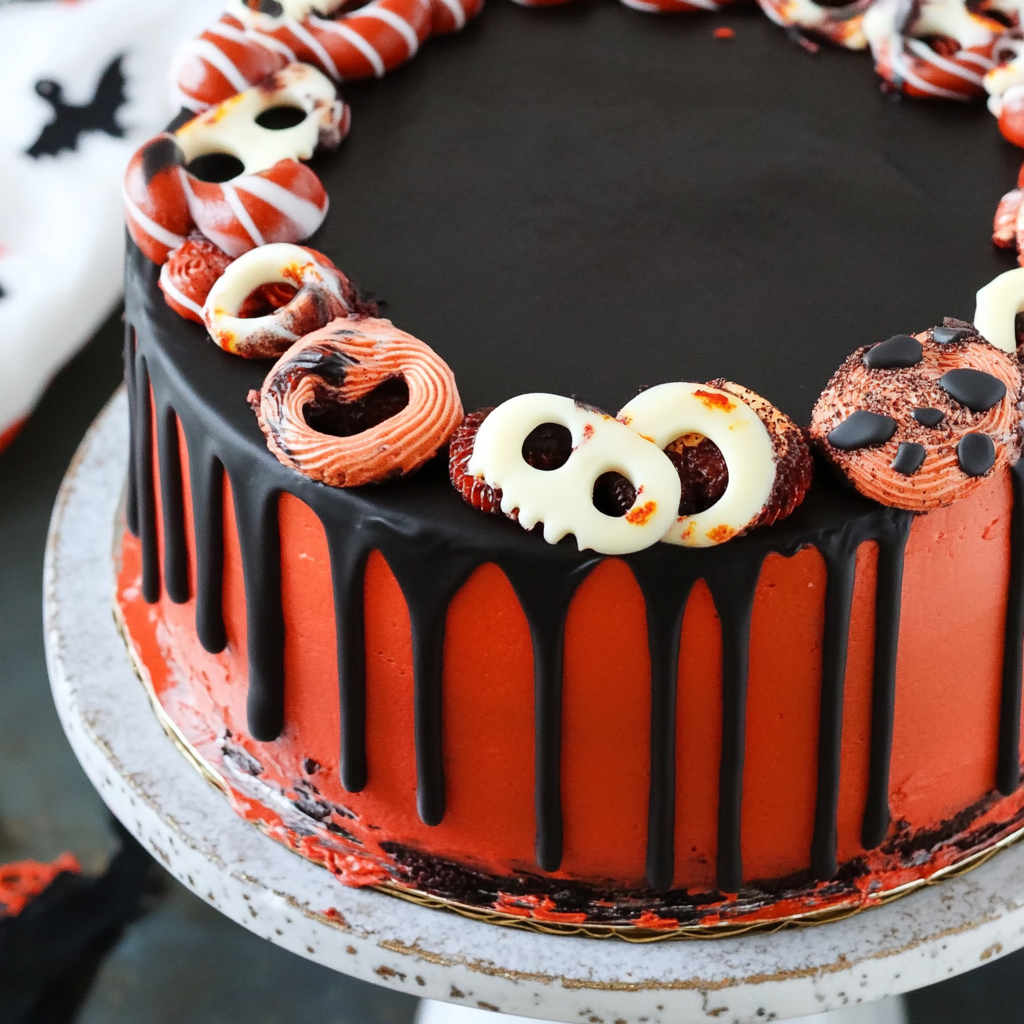
If you’re looking for a show-stopping dessert that perfectly captures the spirit of Halloween, then this Spooky Halloween Marble Cake is just what you need! With its striking red and black marble layers, it’s not only delicious but also a feast for the eyes. This cake is a favorite in my home because it brings everyone together, whether we’re celebrating Halloween or just having fun with family and friends. The drippy red blood icing on top makes it an exciting centerpiece at any gathering!
This recipe is perfect for various occasions—be it a lively Halloween party, a cozy family gathering, or even just a fun baking day with the kids. Plus, who can resist a cake decorated with bloody bones and eyeball sprinkles? It’s sure to be a hit!
Why You’ll Love This Recipe
- Eye-Catching Design: The dramatic colors and spooky decorations make this cake the star of your Halloween festivities!
- Delicious Flavor: The combination of chocolate and buttermilk creates a moist and flavorful cake that everyone will love.
- Family Fun: Decorating this cake can be a fun activity for the whole family, allowing everyone to get creative!
- Make-Ahead Friendly: You can bake the cake in advance and frost it when you’re ready to serve, making party prep easy.
Ingredients You’ll Need
Let’s gather some simple, wholesome ingredients for our Spooky Halloween Marble Cake! Don’t worry; you likely have many of these already in your pantry!
For the Cake
- 2 1/4 cups (293g) all purpose flour
- 2 1/2 tsp baking powder
- 1/4 tsp baking soda
- 1/2 tsp salt
- 1/2 cup (112g) unsalted butter, room temperature
- 1/2 cup vegetable oil
- 1 1/2 cups (310g) sugar
- 1 tbsp vanilla extract
- 4 large eggs
- 1 cup (240ml) buttermilk
- 5 oz bittersweet chocolate (60% cacao), chopped
For the Frosting and Decoration
- 2 1/4 cups (504g) unsalted butter
- 8 cups (920g) powdered sugar
- 1 cup (114g) natural unsweetened cocoa powder
- 2 tsp vanilla extract
- 5-7 tbsp (75-105ml) water/cream
- 1/4 tsp salt
- Black gel icing color
- 4 oz red Wilton candy melts
- 2 tbsp heavy whipping cream
- Sprinkles (see notes)
Variations
One of the best parts about this recipe is its flexibility! Here are some fun variations to consider:
- Add Some Spice: Incorporate spices like cinnamon or nutmeg into the batter for a warm, festive flavor.
- Swap the Colors: Experiment with different gel colors to create a unique marble effect—think green and purple for a different twist!
- Use Different Sprinkles: Instead of bloody eyeballs, try using spooky-themed sprinkles like ghosts or pumpkins to match your party theme.
- Change Up the Chocolate: Use white chocolate instead of bittersweet chocolate for a sweeter base.
How to Make Spooky Halloween Marble Cake
Step 1: Prepare Your Baking Pans
Start by preheating your oven to 350°F (175°C). Grease two round cake pans with butter or vegetable oil and line them with parchment paper. This step ensures that your cakes come out easily once baked.
Step 2: Mix Dry Ingredients
In a mixing bowl, whisk together all-purpose flour, baking powder, baking soda, and salt. This helps evenly distribute the leavening agents and prevents any lumps in your batter.
Step 3: Cream Butter and Sugar
In another large bowl, beat together the room temperature unsalted butter, vegetable oil, and sugar until light and fluffy. This process incorporates air into your mixture, which is essential for a light texture in your cake.
Step 4: Add Eggs and Buttermilk
Mix in the eggs one at a time, ensuring each is fully incorporated before adding the next. Then add in the buttermilk along with vanilla extract. This combination keeps your cake moist while adding wonderful flavor!
Step 5: Melt Chocolate
Melt your chopped bittersweet chocolate gently in a microwave or over a double boiler until smooth. Allow it to cool slightly before adding it to one half of your batter.
Step 6: Create Marble Effect
Divide your batter into two bowls. Color one half with black gel icing color and mix until well combined. In another bowl with half of the mixture, stir in cooled melted chocolate. Now it’s time to create that beautiful marbling effect by alternating scoops of each batter into your prepared pans!
Step 7: Bake the Cakes
Bake your cakes in preheated oven for about 20 minutes or until a toothpick inserted into the center comes out clean. Let them cool in pans for about 10 minutes before transferring them onto wire racks.
Step 8: Prepare Frosting & Decorate
While cakes are cooling down, prepare frosting by beating unsalted butter until creamy. Gradually add powdered sugar and cocoa powder while mixing well after each addition. Adjust consistency with water or cream as needed. Once cooled completely, frost between layers and around sides of cakes before decorating with red icing blood and spooky sprinkles!
Now you have an enchanting Spooky Halloween Marble Cake ready to impress! Enjoy every slice filled with delight this Halloween season!
Pro Tips for Making Spooky Halloween Marble Cake
Creating the perfect spooky treat can be thrilling, and with a few handy tips, you’ll be well on your way to impressing your guests!
- Use room temperature ingredients: This helps your batter mix more evenly, resulting in a lighter and fluffier cake. Cold ingredients can make it harder for the batter to incorporate properly.
- Don’t overmix the batter: Gently fold the batters together when creating the marbling effect. Overmixing can lead to a uniform color rather than the distinct swirls you want.
- Chill your frosting tools: If you’re using gel icing or making a drip effect, chilling your piping tools can help control the flow of the icing and create cleaner lines.
- Bake with a water bath: For an even bake, place your cake pan inside a larger pan filled with hot water. It helps maintain moisture during baking and prevents the edges from cooking too quickly.
- Allow cakes to cool completely: This ensures that your frosting won’t melt off when applied. A warm cake can lead to sliding layers or drippy decorations!
How to Serve Spooky Halloween Marble Cake
Presentation is key when it comes to festive treats! Here are some fun ways to serve this delicious cake at your Halloween gathering.
Garnishes
- Bloody berry sauce: Drizzle a homemade berry sauce around the plate for an extra creepy touch. The red color mimics blood, enhancing the Halloween vibe.
- Creepy candy eyes: Scatter candy eyeballs on top of the cake or around the serving platter for a fun and spooky element that kids will love.
- Chocolate bone sprinkles: Add edible chocolate bones on top of each slice for that eerie yet tasty flair that complements the theme perfectly.
Side Dishes
- Pumpkin spice cupcakes: These mini treats add a seasonal flavor that pairs beautifully with your marble cake while keeping up with the Halloween theme.
- Witch’s brew punch: A refreshing drink made from fruit juices and sparkling water can cleanse the palate after indulgent cake slices. Adding gummy worms as garnish makes it festive!
- Caramel apple slices: Crisp apple slices drizzled with caramel provide a sweet contrast to your rich marble cake. They are easy to grab and eat while mingling at parties.
- Ghostly meringue cookies: Light and airy meringue cookies shaped like ghosts add an adorable touch to your dessert table and are perfect for nibbling alongside richer desserts.
With these tips and serving ideas, your Spooky Halloween Marble Cake will be the star of any gathering!
Make Ahead and Storage
This Spooky Halloween Marble Cake is perfect for meal prep, allowing you to enjoy delightful treats throughout the spooky season without the last-minute stress.
Storing Leftovers
- Keep any leftover cake in an airtight container at room temperature for up to 3 days.
- For longer freshness, store it in the refrigerator where it can last up to a week.
- Ensure that the cake is completely cooled before wrapping it to prevent moisture build-up.
Freezing
- Wrap individual slices or the whole cake tightly in plastic wrap, followed by aluminum foil.
- Label the package with the date and freeze for up to 2 months.
- When ready to enjoy, simply thaw overnight in the refrigerator.
Reheating
- To reheat individual slices, microwave on low power for about 10-15 seconds until warm.
- For larger portions, preheat your oven to 350°F (175°C) and warm the cake for about 10-15 minutes.
- Always check that the cake is warmed through but not dry.
FAQs
Have some questions about making this Spooky Halloween Marble Cake? Here are some common inquiries!
Can I use a different color for my Spooky Halloween Marble Cake?
Absolutely! Feel free to get creative with your color choices. While black and red are festive for Halloween, you can use colors like green or orange for a fun twist!
How can I achieve the best marbling effect in my Halloween Marble Cake?
To get that gorgeous marbled look, pour alternating layers of red and black batter into your cake pan. Use a knife or skewer to gently swirl them together—don’t overdo it; you want beautiful swirls, not a uniform color!
What makes this Spooky Halloween Marble Cake so special?
This cake stands out with its striking colors and festive decorations! The combination of rich chocolate flavors and playful blood icing creates a deliciously spooky dessert perfect for Halloween parties.
Can I make this cake ahead of time for my Halloween party?
Yes! This Spooky Halloween Marble Cake stores well and can be made a few days in advance. Just follow the storage tips above to keep it fresh!
Final Thoughts
I hope you enjoy making this Spooky Halloween Marble Cake as much as I do! It’s not just a treat; it’s a celebration of creativity and fun during one of the most exciting times of the year. Whether you’re hosting a party or just indulging yourself, this cake will surely impress your guests and bring smiles all around. So roll up your sleeves, get baking, and let your spooky side shine!
Spooky Halloween Marble Cake
Create a spooky sensation at your next celebration with this eye-catching Spooky Halloween Marble Cake! With its striking red and black marble layers, this cake is not just a treat for the taste buds but also a feast for the eyes. The delicious combination of chocolate and buttermilk creates a moist flavor-packed cake that pairs perfectly with a drippy red icing reminiscent of ‘blood.’ Ideal for Halloween parties or cozy family gatherings, this cake invites creativity in decorating and serves as an exciting centerpiece that will thrill guests of all ages. Get ready to impress with this delightful dessert!
- Prep Time: 30 minutes
- Cook Time: 20 minutes
- Total Time: 50 minutes
- Yield: Serves approximately 12 slices 1x
- Category: Dessert
- Method: Baking
- Cuisine: American
Ingredients
- 2 1/4 cups all-purpose flour
- 2 1/2 tsp baking powder
- 1/4 tsp baking soda
- 1/2 tsp salt
- 1/2 cup unsalted butter, room temperature
- 1/2 cup vegetable oil
- 1 1/2 cups sugar
- 1 tbsp vanilla extract
- 4 large eggs
- 1 cup buttermilk
- 5 oz bittersweet chocolate, chopped
- 2 1/4 cups unsalted butter
- 8 cups powdered sugar
- 1 cup natural unsweetened cocoa powder
- 2 tsp vanilla extract
- 5–7 tbsp water/cream
- 1/4 tsp salt
- Black gel icing color
- 4 oz red candy melts
- 2 tbsp heavy whipping cream
- Sprinkles
Instructions
- Preheat your oven to 350°F (175°C). Grease two round cake pans and line them with parchment paper.
- In a bowl, whisk together flour, baking powder, baking soda, and salt.
- In a separate bowl, cream together butter, vegetable oil, and sugar until fluffy. Add eggs one at a time, then mix in buttermilk and vanilla extract.
- Melt the bittersweet chocolate and let it cool slightly before adding half to the batter. Divide the batter into two bowls; color one with black gel icing color.
- Alternate scoops of each batter into prepared pans to create a marbled effect.
- Bake for about 20 minutes or until a toothpick inserted comes out clean. Allow to cool before frosting.
Nutrition
- Serving Size: 1 slice (85g)
- Calories: 320
- Sugar: 34g
- Sodium: 180mg
- Fat: 15g
- Saturated Fat: 7g
- Unsaturated Fat: 8g
- Trans Fat: 0g
- Carbohydrates: 44g
- Fiber: 1g
- Protein: 3g
- Cholesterol: 45mg