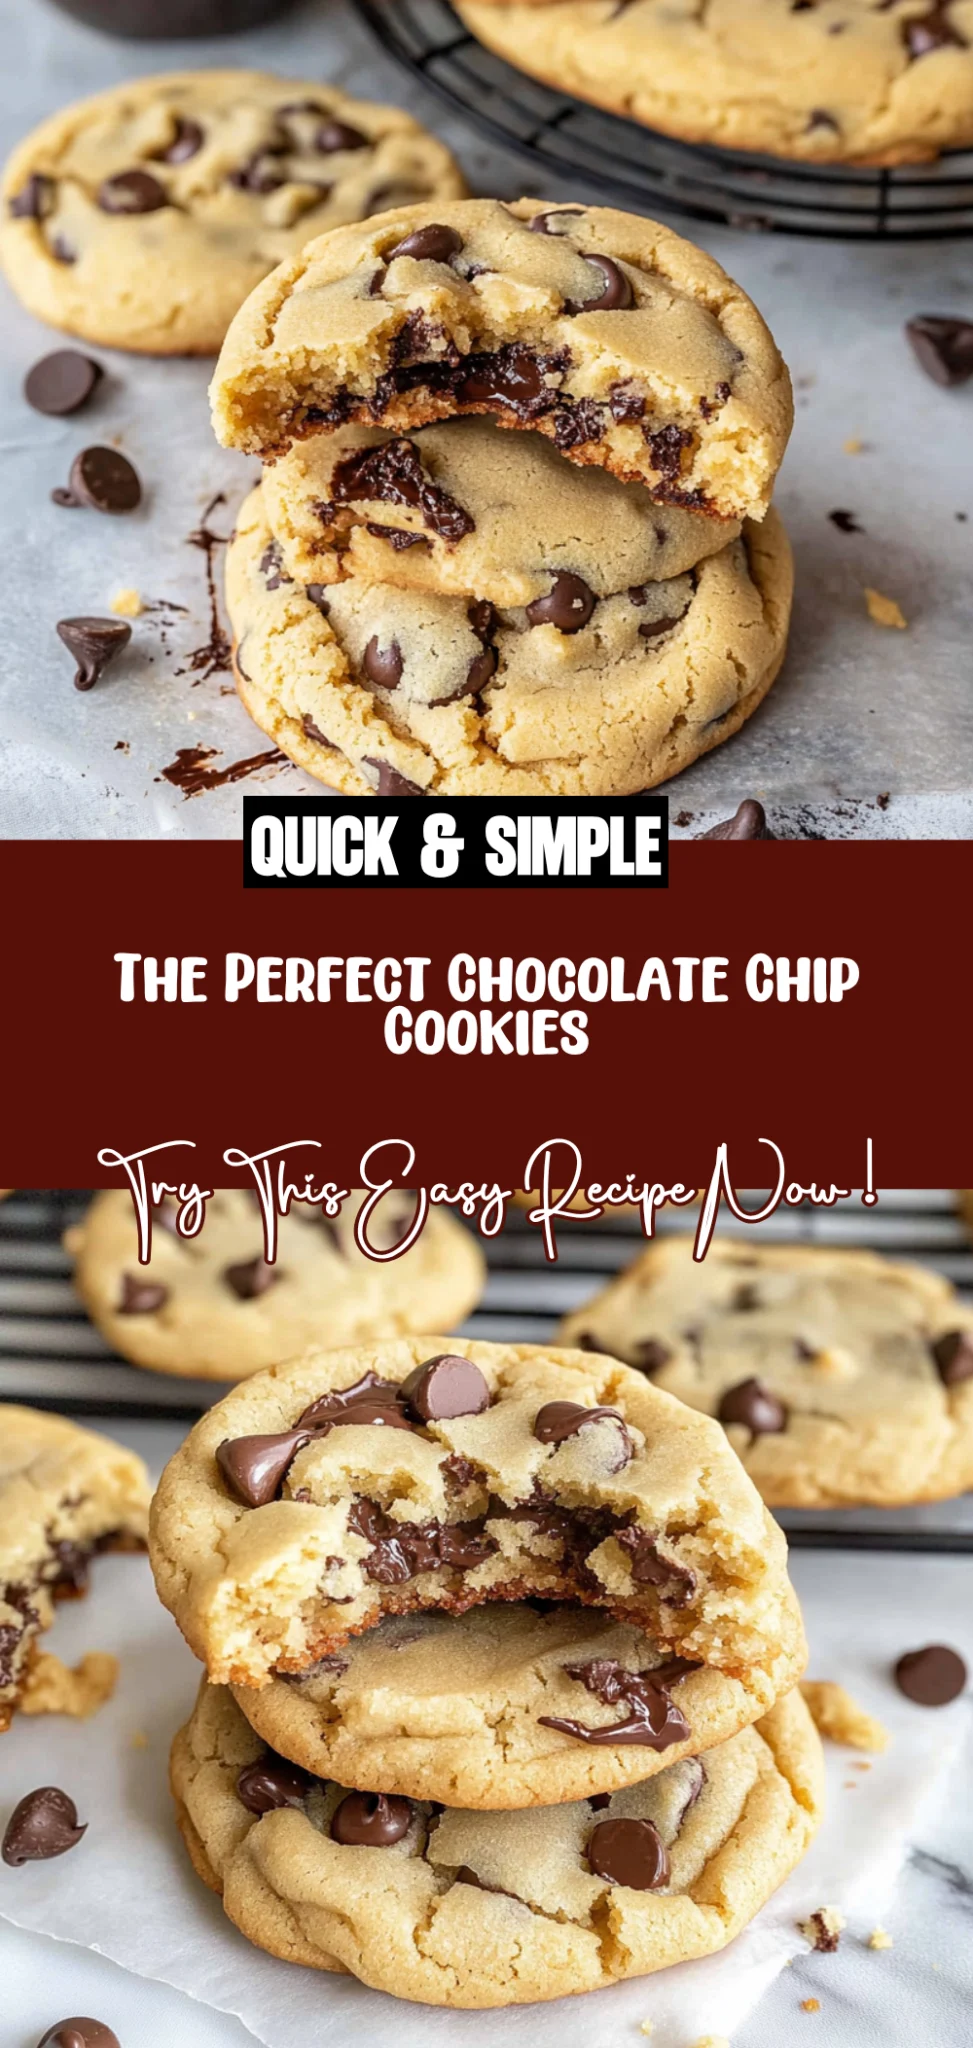
The Perfect Chocolate Chip Cookies: Gooey and Irresistible
If there’s one treat that can make my heart skip a beat, it’s a warm chocolate chip cookie straight from the oven. My obsession began at a little café down the street that had the most incredible cookies – soft, gooey, and perfectly sweet with just the right amount of chocolate. I found myself daydreaming about them constantly, and after a particularly disappointing batch from a store-bought mix, I decided to take matters into my own hands. I wanted to recreate those magical moments at home, but let’s be honest – who wouldn’t want to whip up The Perfect Chocolate Chip Cookies whenever the craving strikes without breaking the bank?
Now, let me tell you about my testing journey. I went through what felt like an Olympic training regimen—sixteen batches in total! (Yes, you read that right.) At first, I thought I could just wing it and throw together a recipe like an amateur magician, but boy was I wrong! Each attempt taught me something new: from tweaking the butter temperature to adjusting the flour ratio. There were cookies that spread like pancakes and some that could’ve doubled as hockey pucks. But with every flop, I got one step closer to my goal of achieving that perfect balance of soft and chewy texture.
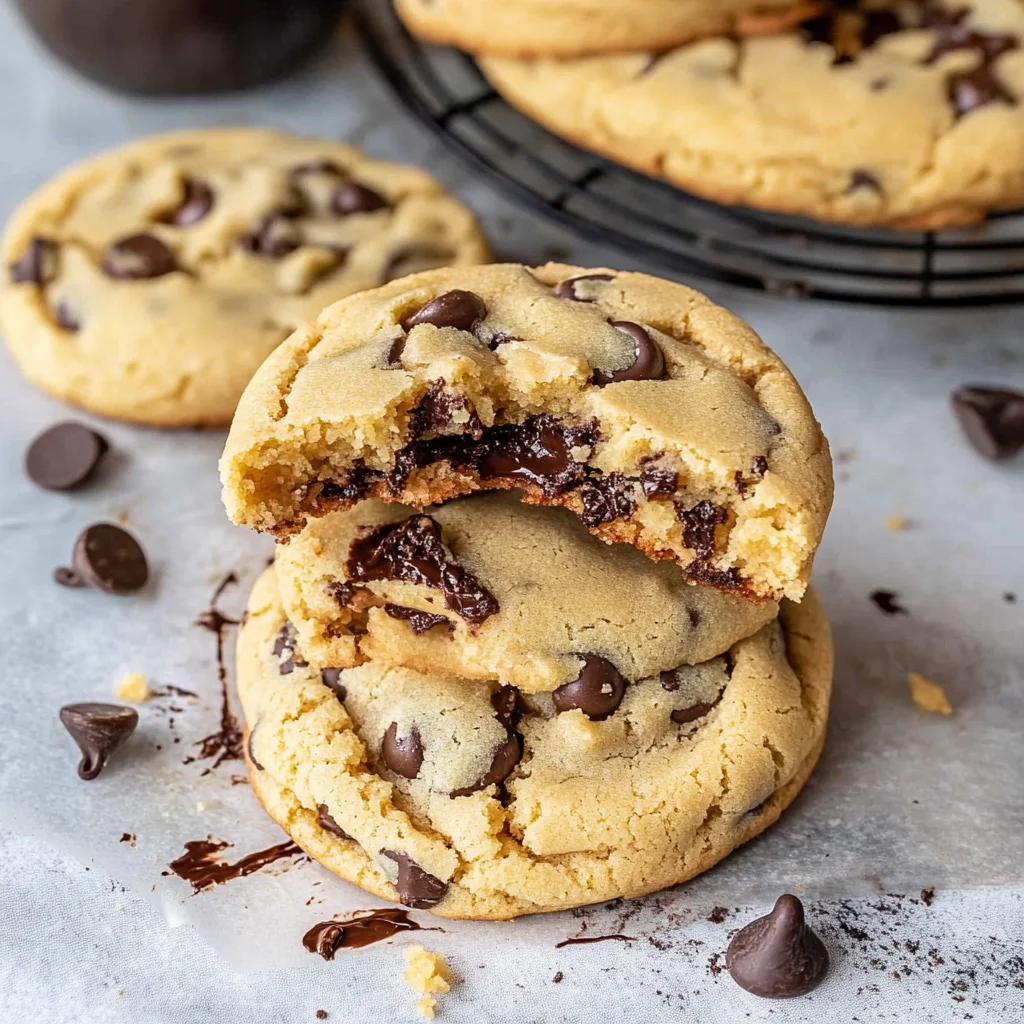
And oh boy, when I finally nailed it – it was worth every crumbly disaster! These cookies turned out to be everything I’d hoped for: deliciously soft and chewy with pools of melted chocolate that create pure bliss in every bite. They’re not just perfect for snacking on while binge-watching your favorite show; they also have an impressive shelf life (if they last that long!). So grab your mixing bowl because you’re about to embark on a delightful baking adventure with The Perfect Chocolate Chip Cookies. Trust me; you won’t regret it!
These The Perfect Chocolate Chip Cookies are….
….the ultimate indulgence for chocolate chip cookie lovers everywhere!
1. They deliver an intense chocolate flavor that’s simply unbeatable, thanks to the generous addition of 2 cups of semi-sweet chocolate chips. This ensures every bite is filled with rich, melty chocolate, making them a true delight for any sweet tooth.
2. Perfectly chewy texture – each cookie has a delightful balance of crisp edges and a soft, chewy center. This is achieved by using a combination of unsalted butter and both granulated and brown sugars, which work together to create that coveted contrast in textures with every bite.
3. Elevated technique – chilling the dough for at least 30 minutes before baking allows the flavors to meld beautifully while ensuring they spread just the right amount in the oven. This small step makes a big difference in achieving cookies that are thick yet perfectly baked through.
4. Budget-friendly delight – making The Perfect Chocolate Chip Cookies at home means you can enjoy gourmet cookies without the bakery price tag. With basic pantry staples like flour and sugar, you can whip up a batch that yields about 24 cookies, making it an economical treat for any occasion.
PS These cookies are BIG. Intentional, so they can be baked long enough to develop a great crispy crust while keeping the inside soft-baked.
Ingredients for the The Perfect Chocolate Chip Cookies
Each ingredient in this dish plays an essential role in flavor and texture. Here’s what you’ll need:
2.25 cups all-purpose flour: Provides structure and a chewy base for the cookies.
1 teaspoon baking soda: Helps the cookies rise and gives them a light texture.
1 teaspoon salt: Enhances sweetness and balances the flavors.
1 cup unsalted butter (softened): Adds richness and contributes to a soft, chewy texture.
0.75 cup granulated sugar: Creates a crisp edge while adding sweetness.
0.75 cup brown sugar (packed): Imparts moisture and a deeper caramel flavor.
1 teaspoon vanilla extract: Infuses warmth and enhances the overall flavor profile.
2 large eggs: Binds the ingredients together and adds moisture for chewiness.
- 2 cups semi-sweet chocolate chips: Provides delicious bursts of chocolatey goodness in every bite.
You must chill the dough. Trust me!
I know, I know—chilling the dough seems like a hassle that adds time to your cookie-making process. I tried to skip it once, thinking I could save some precious minutes, and let’s just say the results were less than impressive. The cookies spread too much and lacked that perfect chewiness we all crave. So trust me when I say, don’t even think about skipping this step!
Chilling the dough allows the flour to fully hydrate and gives the butter time to firm up. Think of it as giving your cookie dough a little spa day! As the dough rests, the flavors meld beautifully, helping all those dry ingredients—like the 2.25 cups of all-purpose flour and baking soda—work in harmony with the wet ingredients for an amazing texture and depth of flavor.
What does chilling the dough do?
- Flavor development — Chilling allows sugar to break down further, creating a more complex taste that can’t be replicated by adding extra ingredients.
- Texture improvement — The fats solidify during chilling, which leads to a chewier texture instead of overly flat cookies.
- Spread control — A chilled dough spreads less during baking due to its firmer consistency, resulting in perfectly shaped cookies.
- Color enhancement — Longer resting times lead to richer browning due to Maillard reactions occurring in the sugars.
- Moisture retention — Allowing the flour time to absorb moisture helps prevent dry cookies, especially with ingredients like 1 cup unsalted butter and eggs.
Different chilling times
- 30 minutes (good) — The cookies will still taste pretty decent but can be slightly flatter and less flavorful than their longer-chilled counterparts.
- 1 hour (better) — A noticeable improvement in both flavor and texture; you’ll have a more satisfying chew!
- ⭐️ 12 hours⭐️ — Best practice! You’ll achieve cookie perfection with deep flavor and ideal chewy texture.
- Beyond 24 hours (diminishing returns) — While still good, you risk losing moisture as the dough can dry out if not properly covered.
Just remember: rushing this step is the most common mistake people make! Dough that hasn’t chilled properly can lead to flat, crispy cookies that lack that soft chewiness we’re after. So please—resist the urge to dive straight into baking!
How to make The Perfect Chocolate Chip Cookies
Are you ready to see how straightforward it is to make the The Perfect Chocolate Chip Cookies of your dreams??
1. PREPARE THE DOUGH
Let’s kick things off by making the dough that will transform into cookie heaven!
1. Preheat – Preheat your oven to 350°F (175°C). This ensures that your cookies bake evenly and thoroughly, resulting in a perfectly soft and chewy texture.
2. Whisk – In a mixing bowl, whisk together the flour, baking soda, and salt. This step is crucial as it helps to distribute the baking soda evenly throughout the flour, ensuring consistent rise and flavor in every bite.
3. Cream – In another bowl, beat the softened butter, granulated sugar, brown sugar, and vanilla extract until creamy. The mixture should become light and fluffy; this process incorporates air, which contributes to the cookies’ delightful texture.
4. Add Eggs – Add the eggs one at a time, mixing well after each addition. This allows each egg to fully incorporate into the batter, ensuring that your cookies are rich and moist.
5. Combine – Gradually add the dry ingredients to the wet ingredients, mixing until just combined. Be careful not to overmix; this keeps your cookies tender rather than tough.
6. Fold – Fold in the chocolate chips gently. You want them evenly distributed without overworking the dough—each bite should be packed with chocolatey goodness!
HANDY TIPS
- 💡 TIP: For extra flavor depth, consider using dark brown sugar instead of light!
- ⚠️ Mix only until combined; overmixing can lead to tough cookies.
2. BAKE
Now comes the exciting part—baking those beautiful dough balls into delicious cookies!
7. Drop – Drop rounded tablespoons of dough onto ungreased baking sheets, spacing them about 2 inches apart. This spacing is essential as it allows room for spreading while baking.
8. Bake – Bake in the preheated oven for 9 to 11 minutes or until the edges are golden brown. Keep an eye on them towards the end; you want soft centers that will firm up as they cool.
9. Cool – Remove from the oven and let the cookies cool on the baking sheet for 5 minutes before transferring to a wire rack to cool completely. This cooling time helps maintain that perfectly chewy texture while allowing them to set.
HANDY TIPS
- 💡 TIP: For smaller cookies that bake quicker (12-14 minutes), use a teaspoon instead of a tablespoon!
- ❓ Why does cooling matter? Because letting them rest prevents them from becoming too hard once fully cooled.
What an incredible journey we’ve just taken together—rich buttery dough transformed into irresistible chocolate chip cookies! You’ll find yourself reaching for these again and again (that’s a lot of cookie bliss!). Make these once, and I wager they will invade your dreams every night too! – Nagi x
FAQ – The Perfect Chocolate Chip Cookies
How long will these cookies keep?
These chocolate chip cookies can last for about 3–5 days when stored properly at room temperature. To maintain their deliciously soft and chewy texture, I recommend placing them in an airtight container. After a few days, they might lose some of their freshness—I’d say they are about 97% as good on day 3 and drop to around 85% by day 5. If you want to prolong their life, consider freezing them!
❄️ Do I really have to chill? YES YOU DO.
Chilling the cookie dough is essential for achieving the perfect texture! While I know it can be tempting to skip this step, chilling for at least 30 minutes helps solidify the fat in the dough, which prevents spreading during baking. If you let them chill longer—up to overnight—that’s even better! This allows the flavors to develop more fully, making every bite taste even richer.
🥶 Can I freeze the cookie dough?
Absolutely! Freezing cookie dough is a great way to have fresh cookies on demand. To freeze, scoop rounded tablespoons of dough onto a baking sheet lined with parchment paper and freeze until solid (about 1-2 hours). Once frozen, transfer the dough balls into a zip-top bag or airtight container. When you’re ready to bake, simply take out however many you want and bake from frozen at 350°F (175°C) for an extra minute or two longer than the original time. No need to thaw!
🌾 Can these be made gluten free?
Yes, you can make these cookies gluten-free by using a 1: 1 gluten-free flour blend. Make sure that your flour blend contains xanthan gum or add about 1/4 teaspoon per cup of flour if it doesn’t—it helps replicate the elasticity of gluten. However, keep in mind that the texture might vary slightly; they might be less chewy but still utterly delicious!
Can I reduce the sugar or substitute with sweeteners?
No, you cannot reduce the sugar without affecting the end result—believe me, I’ve tried! The sugars not only provide sweetness but also contribute to moisture and texture. If you’re looking to use a sweetener like stevia or erythritol instead of granulated or brown sugar, you’ll need to check conversion ratios because they behave differently in baking. In my experience, sticking closer to traditional sugars yields much better results.
Why do I need to mix wet and dry ingredients separately?
Mixing wet and dry ingredients separately is crucial for ensuring an even distribution of ingredients throughout your cookie dough. When you whisk together the dry ingredients (like the 2.25 cups all-purpose flour, baking soda, and salt) before combining them with the wet ones (butter, sugars, eggs), it allows for proper incorporation of air and prevents clumping. This way, each cookie bakes evenly—no one wants a lumpy cookie!
🍪 Can I add other mix-ins or flavors?
Definitely! You can customize these cookies easily by adding nuts like walnuts or pecans (about 1 cup), shredded coconut, or even swapping half of the chocolate chips for white chocolate or peanut butter chips. Play around with flavors too! A pinch of cinnamon or espresso powder can elevate your cookies beautifully—just don’t go overboard; we’re aiming for chocolate chip perfection here!
Troubleshooting
I will continue to add more to this Troubleshooting section as I start seeing questions coming through from people who have made the recipe.
Troubleshooting tips
“My cookies were too thin and flat! 😭”
- This could be due to using melted butter instead of softened butter. Melted butter causes the dough to spread more during baking, resulting in flat cookies.
- Another reason might be that you didn’t measure your flour correctly. Too little flour can lead to a runny dough, causing it to spread too much in the oven.
I bet they were still YUM though!
“My cookies came out too dry and crumbly! 😩”
- Overmixing the dough after adding the dry ingredients can lead to dry cookies. This activates the gluten in the flour, making them tough rather than soft and chewy.
- Additionally, if you packed the brown sugar too tightly or used too much flour, it can absorb excess moisture and make your cookies dry.
I bet they were still YUM though!
“The edges of my cookies are burnt while the center is undercooked! 🔥”
- If your oven temperature is too high, it can cause the edges to cook faster than the center. Always use an oven thermometer to ensure accuracy.
- Also, if your cookie dough balls are too large or spaced too closely on the tray, they may bake unevenly. Make sure to drop rounded tablespoons and space them about 2 inches apart!
I bet they were still YUM though!
“My cookies baked unevenly and some are misshapen! 🤔”
- This might happen if you didn’t let the dough chill for a bit before baking or if your baking sheets were not level in the oven. Uneven surfaces can lead to strange shapes as they bake.
- Using ungreased baking sheets can also affect how evenly your cookies bake; make sure you’re using a suitable surface for even heat distribution.
I bet they were still YUM though!
The Perfect Chocolate Chip Cookies
Ingredients
Method
- Preheat your oven to 350°F (175°C).
- In a mixing bowl, whisk together the flour, baking soda, and salt.
- In another bowl, beat the softened butter, granulated sugar, brown sugar, and vanilla extract until creamy.
- Add the eggs one at a time, mixing well after each addition.
- Gradually add the dry ingredients to the wet ingredients, mixing until just combined.
- Fold in the chocolate chips.
- Drop rounded tablespoons of dough onto ungreased baking sheets, spacing them about 2 inches apart.
- Bake in the preheated oven for 9 to 11 minutes, or until the edges are golden brown.
- Remove from the oven and let the cookies cool on the baking sheet for 5 minutes before transferring to a wire rack to cool completely.