Chocolate Peanut Butter Swirl Cookies: Irresistibly Gooey…
A little while back, I found myself lounging in a cozy café that had the most divine Chocolate Peanut Butter Swirl Cookies on display. I couldn’t resist the siren call of those rich cookies, with their inviting swirls of chocolate and peanut butter. After one heavenly bite, I knew I had to recreate them at home—not just because they were delicious but also because I thought I could make them even better (and save a few bucks while I was at it!). Plus, who wouldn’t want to indulge in a batch of warm cookies without having to leave the house?
Let me tell you, perfecting my version of Chocolate Peanut Butter Swirl Cookies wasn’t as easy as it sounds. It took me a whopping six attempts—yes, six!—to get the balance just right. At first, my cookies were either too dry or too gooey, and let’s just say there were some epic kitchen fails along the way (I still can’t look at a spatula without cringing). Each try brought me closer to what I envisioned—a cookie that was soft, chewy, and bursting with that irresistible swirl of flavors.
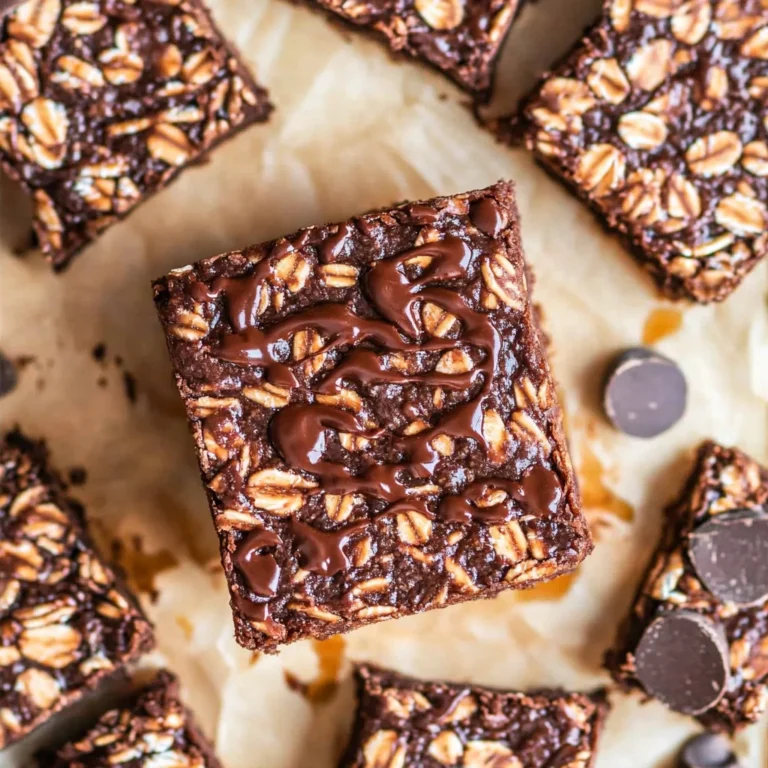
But oh boy, was it worth every minute! The final result is a delightfully rich cookie that practically melts in your mouth, with luscious pockets of chocolate and peanut butter swirling together in perfect harmony. They’ve got this amazing texture that’s both chewy and slightly crispy on the edges—just how I like it! I can hardly contain my excitement for you to try these; trust me when I say your taste buds are in for an absolute treat!
These Chocolate Peanut Butter Swirl Cookies are….
….the ultimate indulgence for peanut butter lovers everywhere!
1. They deliver a decadent flavor that perfectly balances rich chocolate and nutty peanut butter. By combining creamy peanut butter with semi-sweet chocolate chips, each bite is an explosion of sweet and salty goodness that elevates your cookie experience to new heights.
2. Irresistible texture – crisp edges with a soft, chewy center. The generous amount of unsalted butter and the perfect flour-to-butter ratio create a cookie that has the ideal contrast between a crunchy exterior and a tender, melt-in-your-mouth interior.
3. A key technique lies in the incorporation of brown sugar alongside granulated sugar, which adds depth to the cookies’ flavor profile. This method not only enhances moisture retention but also contributes to that subtly caramelized taste that makes every bite unforgettable.
4. Exceptional value – these cookies are simple to make at home, saving you both time and money compared to gourmet bakeries. With accessible ingredients like butter, eggs, and pantry staples, you can whip up a batch of these Chocolate Peanut Butter Swirl Cookies anytime the craving strikes without breaking the bank.
PS These cookies yield about 24 deliciously rich treats, making them perfect for sharing or indulging all week long!
Ingredients for the Chocolate Peanut Butter Swirl Cookies
Each ingredient in this dish plays an essential role in flavor and texture. Here’s what you’ll need:
- 1 cup unsalted butter (softened): Provides a rich, creamy base that enhances the cookie’s texture.
- 1 cup granulated sugar: Contributes sweetness and helps achieve a perfectly chewy bite.
- 1 cup brown sugar (packed): Adds moisture and a hint of caramel flavor for depth.
- 2 large eggs: Binds the ingredients together while adding richness to the dough.
- 2 teaspoons vanilla extract: Infuses a warm, aromatic note that complements the chocolate and peanut butter.
- 3 cups all-purpose flour: Forms the structure of the cookies, giving them body and stability.
- 1 teaspoon baking soda: Acts as a leavening agent to provide lift and a light texture.
- 1 teaspoon salt: Balances sweetness and enhances the overall flavor profile.
- 1 cup creamy peanut butter: Delivers a smooth, nutty flavor that pairs beautifully with chocolate.
- 1 cup semi-sweet chocolate chips: Adds melty pockets of chocolate goodness for a decadent finish.
You MUST Cream the Butter and Sugars. No Skipping!
I’ll be honest: I tried to cut corners, thinking I could skip the creaming step in this recipe. But after a few less-than-ideal batches, I learned the hard way that there’s simply no substitute for properly creaming the butter and sugars. The results were flat, crumbly cookies that tasted good but didn’t have that perfect texture we all crave. 😅
Creaming the butter and sugars isn’t just about combining ingredients; it’s a critical step that incorporates air into the mixture, which is essential for creating light and fluffy cookies. Think of it like whipping egg whites for a meringue—the more air you incorporate, the better the rise! With our rich cookie base made from unsalted butter, granulated sugar, and brown sugar, proper creaming ensures your Chocolate Peanut Butter Swirl Cookies achieve that delightful chewy center and a beautifully golden exterior.
What does creaming do?
- Flavour enhancement: The process of creaming helps develop complex flavours by melting the sugars slightly and allowing them to caramelize during baking.
- Texture improvement: This technique creates a light crumb structure, giving your cookies that delightful chewiness rather than turning them into dense hockey pucks.
- Color development: Properly creamed mixtures result in even browning as they bake, leading to those perfectly golden edges we all love.
- Consistency control: A well-creamed dough leads to a uniform consistency throughout each cookie, ensuring each bite is equally delicious with that divine swirl of chocolate and peanut butter.
- Shelf life extension: Incorporating air into the dough helps retain moisture during baking, allowing your cookies to stay fresher for longer.
Different creaming times
- 1 minute (fair) — barely integrates ingredients; cookies will be denser and lack ideal texture.
- 2 minutes (good) — starts to incorporate air; cookies are better but still not quite fluffy.
- ⭐️ 3 minutes ⭐️ — optimal; achieves light and fluffy consistency with better flavour development.
- 4 minutes+ (too long) — risks over-creaming; can lead to greasy cookies with an undesirable texture.
Remember, skipping or rushing through the creaming process is the most common mistake people make when baking these cookies. If you want that perfect balance of chewy and crispy in your Chocolate Peanut Butter Swirl Cookies, take your time here—don’t shortchange yourself!
How to make Chocolate Peanut Butter Swirl Cookies

Are you ready to see how straightforward it is to make the Chocolate Peanut Butter Swirl Cookies of your dreams??
1. PREPARE THE OVEN AND BAKING SHEET
Let’s kick things off by getting your kitchen ready for these delectable cookies!
1. Preheat – Preheat the oven to 350°F (175°C) and line a baking sheet with parchment paper. This step is crucial as it ensures your cookies bake evenly and don’t stick to the pan.
2. Cream – In a mixing bowl, cream together the softened butter, granulated sugar, and brown sugar until light and fluffy. This process incorporates air into the mixture, resulting in a tender cookie texture.
HANDY TIPS
- Make sure your butter is at room temperature for easier creaming. It should be soft but not melted!
- If you want an extra rich flavor, consider browning your butter before adding sugars!
2. MIX THE COOKIE DOUGH
Now it’s time to combine all the delicious ingredients that make up our cookie base!
3. Add – Add the eggs and vanilla extract to the butter mixture and mix until well combined. The eggs add moisture, while the vanilla provides a lovely aroma and flavor.
4. Whisk – In a separate bowl, whisk together the flour, baking soda, and salt. This helps evenly distribute the leavening agent throughout the flour.
5. Combine – Gradually add the dry ingredients to the wet ingredients, mixing until just combined. Avoid overmixing; you want a tender cookie!
HANDY TIPS
- For perfectly sized cookies, use a cookie scoop! It helps create uniform shapes for even baking.
- If you prefer chewier cookies, let the dough rest for 30 minutes before baking.
3. PREPARE THE SWIRL
Time to bring in that irresistible chocolate-peanut butter goodness!
6. Melt – In a microwave-safe bowl, melt the chocolate chips in 30-second intervals, stirring in between until smooth. Melting in short bursts prevents overheating and burning.
7. Combine – Add the creamy peanut butter to the melted chocolate and stir until well combined. This creates that dreamy swirl effect we’re after!
HANDY TIPS
- Use high-quality chocolate chips for a richer flavor!
- If you like it crunchy, try using chunky peanut butter instead of creamy.
4. COMBINE AND BAKE
The final steps are where all your hard work pays off—let’s get them in the oven!
8. Drop – Drop spoonfuls of cookie dough onto the prepared baking sheet, leaving space between each cookie to allow for spreading during baking.
9. Spoon – Spoon a small amount of the chocolate peanut butter mixture on top of each cookie dough ball for that signature swirl.
10. Swirl – Use a toothpick or knife to swirl the chocolate and peanut butter together gently; this adds visual appeal and extra flavor.
11. Bake – Bake in the preheated oven for 10-12 minutes or until the edges are golden brown—your kitchen will smell divine!
12. Cool – Allow cookies to cool on the baking sheet for a few minutes before transferring to a wire rack to cool completely.
HANDY TIPS
- If you love gooey centers, underbake them slightly; they’ll continue cooking as they cool.
- Store leftover cookies in an airtight container for up to one week (if they last that long!).
Make these once, and I wager they will invade your dreams every night too! – Nagi x
FAQ – Chocolate Peanut Butter Swirl Cookies
How long will these cookies keep?
These Chocolate Peanut Butter Swirl Cookies can stay fresh for about 5 days when stored in an airtight container at room temperature. If you want them to last a bit longer, refrigerating them can extend their shelf life to around 7-10 days, although they might lose some of their delightful texture. On day 3, they’re still about 97% as good as the day you baked them, but by day 7, they dip to around 85% — still delicious, but not quite as fresh.
❄️ Do I really have to chill? YES YOU DO.
In this recipe, chilling isn’t necessary for the cookie dough itself; however, it can help if your kitchen is particularly warm. If your butter is too soft when you mix it with the sugars, the cookies might spread too much while baking. If that happens, just pop the dough in the fridge for about 30 minutes before baking. Remember, I’ve tested this and found that a little chill time helps maintain those lovely thick cookie shapes!
🥶 Can I freeze these cookies?
Absolutely! To freeze these cookies, you can either freeze the cookie dough or the baked cookies. For the dough: scoop out individual cookie portions onto a baking sheet lined with parchment paper and freeze until firm. Then transfer them to a zip-top bag and store for up to 3 months. When ready to bake, no need to thaw — just add an extra minute or two to the baking time! For baked cookies: once cooled completely, stack them with parchment paper in between layers and place in an airtight container or freezer bag.
🌾 Can these be made gluten-free?
Yes! You can make these cookies gluten-free by substituting the all-purpose flour with a gluten-free all-purpose flour blend that contains xanthan gum. I recommend using a blend that you trust; I personally prefer one from Bob’s Red Mill or King Arthur Flour. The texture may vary slightly but will still yield delicious results! Just remember to check if your chocolate chips are gluten-free as well.
🥄 Can I reduce the sugar or substitute with sweeteners?
Nope! You cannot reduce the sugar in this recipe without affecting the final product significantly; trust me, I’ve tried various sugar levels and found that sticking to 1 cup granulated sugar and 1 cup brown sugar gives you that perfect balance of sweetness and texture. If you want a lower-sugar option, consider using a sugar substitute like erythritol or monk fruit sweetener specifically designed for baking. Just ensure it measures similarly to sugar.
🔍 Why do we cream together butter and sugars?
Creaming together softened butter with granulated and brown sugars is crucial because it incorporates air into the mixture, which helps create light and fluffy cookies. This process also dissolves the sugars partially so they help retain moisture during baking. If you rush this step or skip it altogether, your cookies may turn out dense rather than delightfully chewy and soft — definitely not what we’re going for!
🍫 Can I add other mix-ins or flavors?
Absolutely! While the chocolate-peanut butter swirl is divine on its own, feel free to customize these cookies with additional mix-ins such as chopped nuts (e.g., walnuts or pecans), dried fruit (like cranberries), or even white chocolate chips for a fun twist! Just be cautious not to overload them; aim for about 1 cup total of additional ingredients so they maintain their structure while baking.
Troubleshooting
I will continue to add more to this Troubleshooting section as I start seeing questions coming through from people who have made the recipe.
Troubleshooting tips
“My cookies were not as thick as yours! 😩”
- You may have added too much flour if you didn’t measure it correctly. Flour can compact, leading to a denser dough. Make sure to spoon the flour into your measuring cup and level it off with a knife for accuracy.
- If you overmixed your dough after adding the dry ingredients, it could cause the cookies to spread too much during baking. Mix just until combined for best thickness.
- I bet they were still YUM though!
“My cookies came out flat and sad! 😭”
- It’s possible that your butter was too soft or melted when you creamed it with the sugars. Softened butter should leave an indentation when pressed but should not be greasy.
- If you didn’t chill your dough before baking, that could lead to excessive spreading. Try chilling it for at least 30 minutes next time!
- I bet they were still YUM though!
“The surface of my cookies split and had massive crevices! 😱”
- Overbaking is often the culprit here; even a minute or two can make a difference! Keep an eye on them and take them out once the edges are golden brown.
- If your oven temperature is too high, it can cause rapid expansion, resulting in cracks. Using an oven thermometer can help ensure accurate baking temperatures.
- I bet they were still YUM though!
“My cookies turned out too dry! 😩”
- You might have added too much flour, which can lead to dryness in the finished product. Remember, leveling off your flour is crucial!
- If you baked them for too long, that could also dry them out. Make sure to check for that perfect golden edge next time.
- I bet they were still YUM though!