Pear Blue Cheese Salad: A Flavor Explosion Awaits!
I first fell in love with the idea of a Pear Blue Cheese Salad during a cozy dinner at a little bistro tucked away in my neighborhood. The combination of sweet, juicy pears and the sharp tang of blue cheese was like a flavor explosion that danced on my palate. It was one of those moments where I thought, “I need to recreate this at home!” But let’s be honest, eating out can get pricey, and I wanted to enjoy this delightful dish whenever the craving hit—without breaking the bank.
After a few attempts that ended in less than stellar results (let’s just say I learned the hard way that not all blue cheeses are created equal), I finally settled into a rhythm. It took me about five tries to get that perfect balance between sweetness and tanginess while ensuring the walnuts added just the right amount of crunch. Each iteration taught me something new about flavor pairing and ingredient quality, and I’ll admit, there were moments when I questioned my culinary skills—who knew salad could be so complicated?
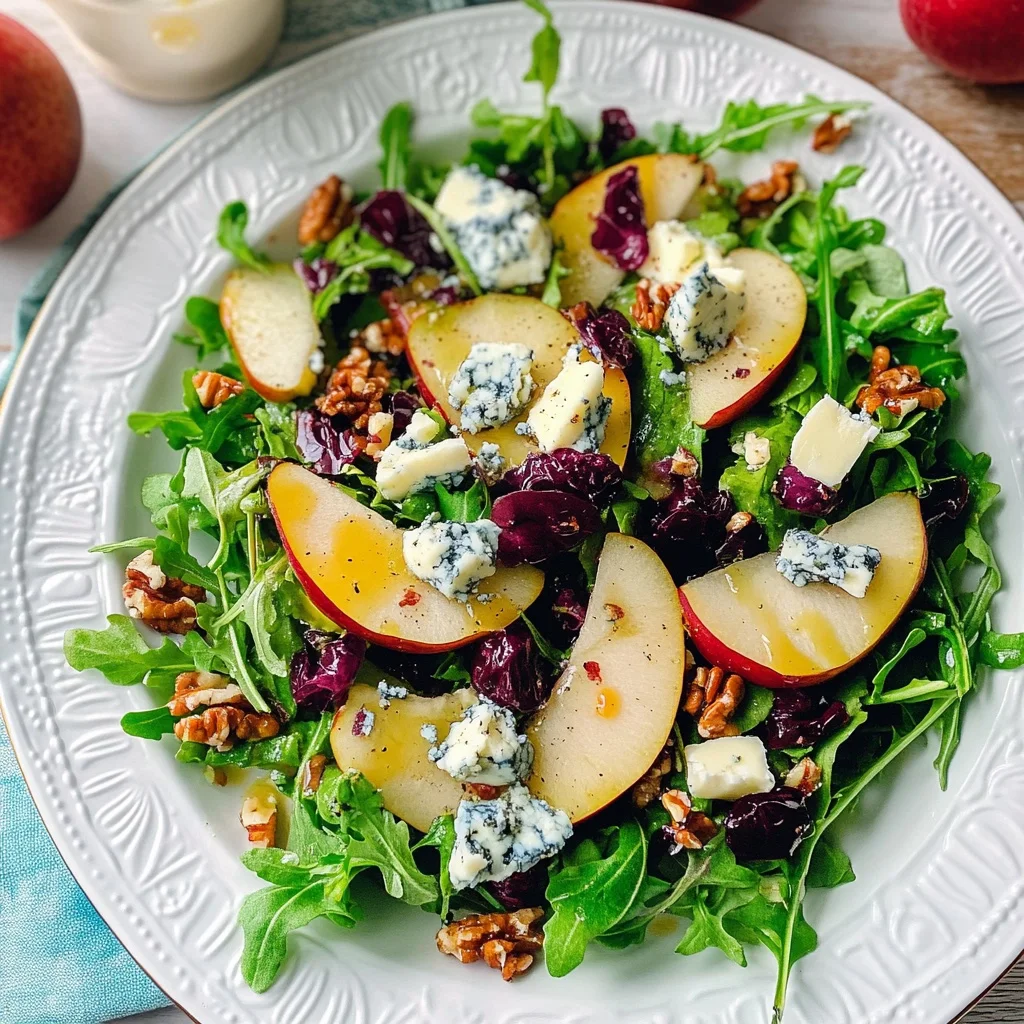
But oh boy, was it worth it! The final version of my Pear Blue Cheese Salad is nothing short of a masterpiece: crisp greens topped with luscious slices of ripe pears, rich blue cheese crumbles, and crunchy walnuts, all drizzled with a light vinaigrette that ties everything together beautifully. The texture is spot on—crunchy, creamy, and oh-so-satisfying. Trust me; once you try this salad, you’ll wonder how you ever lived without it! So grab your ingredients and let’s make some magic happen!
These Pear Blue Cheese Salad are….
…an exquisite blend of flavors and textures that will elevate your salad game to new heights!
1. They deliver a sweet and savory harmony that is truly irresistible, thanks to the juicy pears paired with tangy blue cheese. The natural sweetness of the ripe pears perfectly complements the bold flavor of the cheese, creating a delightful contrast that keeps every bite interesting.
2. Crunchy and creamy contrast – the toasted walnuts add a satisfying crunch that enhances this salad’s overall experience. Their rich, nutty flavor pairs beautifully with the soft, crumbly blue cheese, ensuring each forkful is a textural delight.
3. A simple yet effective dressing technique – by whisking together honey, balsamic vinegar, and olive oil, I created a vinaigrette that beautifully coats every ingredient without overpowering them. This balance allows the fresh flavors of the mixed greens and fruits to shine through while adding just the right amount of zest.
4. A budget-friendly option – making this Pear Blue Cheese Salad at home allows you to enjoy gourmet flavors without breaking the bank. With just a handful of ingredients, you can create a dish that’s not only delicious but also easy on your wallet compared to dining out.
PS This salad serves about four as a side dish or two as a hearty main. Perfect for sharing or keeping all to yourself!
Ingredients for the Pear Blue Cheese Salad
Each ingredient in this dish plays an essential role in flavor and texture. Here’s what you’ll need:
4 cups mixed greens (such as arugula and spinach): Provides a fresh, peppery base that complements the sweetness of the pears.
2 medium pears (sliced): Adds a juicy sweetness that balances the tangy blue cheese.
1 cup blue cheese (crumbled): Imparts a bold, creamy flavor that elevates the salad.
1 cup walnuts (toasted and chopped): Contributes a crunchy texture and nutty richness.
1 tablespoon honey: Offers a touch of natural sweetness to enhance the vinaigrette.
2 tablespoons balsamic vinegar: Brings acidity and depth, tying together all the flavors.
3 tablespoons olive oil: Acts as a smooth base for the dressing, adding richness.
1 pinch salt: Enhances all the flavors without overpowering them.
- 1 pinch black pepper: Adds a subtle warmth and complexity to the dish.
Don’t Skip Toasting the Walnuts — Trust Me!
I’ll be honest, I thought I could just toss those walnuts in raw and call it a day. After all, they’re already crunchy, right? But after a few attempts (and some seriously sad salads), I learned that toasting is non-negotiable for achieving that nutty depth of flavor that elevates this Pear Blue Cheese Salad from good to unforgettable.
Toasting the walnuts unlocks their natural oils and enhances their flavor profile. Imagine biting into a salad where the walnuts taste like they’ve been kissed by fire — it’s like the difference between eating raw dough and freshly baked bread. This simple step perfectly complements the sweet pears and tangy blue cheese, creating a harmonious blend of flavors.
What does toasting the walnuts do?
- Flavor — Toasting brings out a rich, nutty taste that raw walnuts simply don’t have, adding depth to every bite.
- Texture — The heat from toasting creates a delightful crunch that contrasts beautifully with the soft pears and creamy blue cheese.
- Aroma — The nutty fragrance released during toasting enhances the overall sensory experience of the salad.
- Colour — Toasted walnuts develop a golden-brown hue, making your salad visually appealing and inviting.
- Shelf Life — Toasted nuts can last longer without going rancid compared to raw ones, meaning you can prepare them ahead of time for future salads.
Different toasting times
- 1 minute (good) — Nuts are barely warm; some flavor improvement but still predominantly raw-tasting.
- 3 minutes (better) — A noticeable improvement in aroma and flavor, but they might still lack that perfect crunch.
- 5 minutes (great) — Ideal! Nuts are golden-brown with robust flavor and texture; this is where magic happens!
- Beyond 6 minutes (risky) — They can quickly go from perfectly toasted to burnt. Keep a close eye!
Don’t underestimate this step! The most common mistake is thinking raw walnuts are just as good. If you skip toasting, you’ll miss out on that essential nutty flavor that ties everything together in this Pear Blue Cheese Salad. Trust me; your taste buds will thank you!
How to make Pear Blue Cheese Salad

Are you ready to see how straightforward it is to make the Pear Blue Cheese Salad of your dreams??
1. PREPARE THE SALAD
Let’s start with a fresh and vibrant base that sets the stage for all those delicious flavors!
1. Combine – In a large salad bowl, combine the 4 cups of mixed greens with the sliced pears. Make sure to toss them gently so that the greens don’t bruise and the pears are evenly distributed throughout.
2. Top – Add the crumbled blue cheese and toasted walnuts on top of the greens and pears. The crunch from the walnuts and creamy texture of the blue cheese will create a delightful contrast that elevates this salad!
HANDY TIPS
- 💡 TIP: For added crunch, consider using different types of nuts like pecans or almonds; just make sure they’re toasted for maximum flavor!
- ❓ Why does toasting walnuts matter? Because it enhances their natural oils, giving them a richer flavor that complements the blue cheese beautifully.
2. MAKE THE DRESSING
Now, let’s whip up a quick dressing that ties all these incredible ingredients together!
3. Whisk – In a small bowl, whisk together 1 tablespoon of honey, 2 tablespoons of balsamic vinegar, and 3 tablespoons of olive oil along with a pinch of salt and pepper until well combined. You want it to be slightly thickened but still pourable, creating a lovely glaze that clings to your salad.
HANDY TIPS
- 💡 TIP: If you prefer a tangier dressing, feel free to increase the balsamic vinegar to 3 tablespoons!
- ⚠️ Important — Ensure your olive oil is good quality; it makes a noticeable difference in flavor!
3. COMBINE AND SERVE
The final step is where all those flavors come together in perfect harmony!
4. Drizzle – Drizzle the dressing over your salad mixture and toss gently to combine everything without breaking down the greens or pears.
5. Serve – Serve immediately for the freshest taste! This salad is best enjoyed right after it’s dressed so you can savor every crunchy bite!
Make this salad once, and I bet you’ll crave its refreshing combination again and again! Happy cooking! – Nagi x
FAQ – Pear Blue Cheese Salad
🚫 How long can I store the salad for?
You can store the Pear Blue Cheese Salad in the fridge for up to 2 days. However, I recommend consuming it within 24 hours for the best flavor and texture. After day one, the mixed greens will start to wilt, resulting in a salad that’s about 70% as good on day two. If you must store it longer, consider keeping the dressing separate until you’re ready to eat.
⏲️ Can I prepare this salad ahead of time?
Yes, you can prepare components ahead of time! I suggest slicing the pears and mixing the greens in advance, but add the blue cheese and walnuts just before serving to keep them fresh and crunchy. The dressing can be made a day in advance and stored in an airtight container in the fridge for up to 5 days. Just give it a good shake before drizzling over your salad!
❄️ Can I freeze this salad?
No, freezing this salad is not recommended. The texture of mixed greens, pears, and blue cheese does not hold up well after thawing. Simply put, you’ll end up with a soggy mess! Instead, make it fresh when you’re ready to enjoy it; salads are best served crisp and vibrant.
🌱 Is there a way to make this salad dairy-free?
Absolutely! To make this Pear Blue Cheese Salad dairy-free, simply omit the blue cheese and replace it with a dairy-free alternative such as crumbled tofu or a nut-based cheese. You can also toss in some avocado for creaminess or increase your walnut quantity for added texture and flavor.
🔄 What can I use instead of blue cheese?
If you’re not a fan of blue cheese or want to switch it up, there are plenty of options! Here are some alternatives:
- Feta cheese: Crumbled feta brings a salty tang similar to blue cheese.
- Goat cheese: Creamy goat cheese offers a rich flavor that pairs beautifully with pears.
- Parmesan: Shaved Parmesan is a milder option that still adds depth.
Just remember that each substitute will alter the overall taste slightly!
🤔 Why do I need to whisk the dressing separately?
Whisking the dressing separately ensures that all ingredients are well combined and emulsified before adding them to the salad. If you pour all ingredients directly over your greens without mixing first, you’ll likely end up with uneven seasoning and clumps of honey at the bottom of your bowl — trust me, I’ve been there! A good emulsification keeps everything balanced and delicious.
🧪 How many times did you test this recipe?
I tested this Pear Blue Cheese Salad at least seven times! Each time, I adjusted ingredient ratios and combinations until it was just right. The delicate balance of sweet pears against tangy blue cheese is quite particular; even small tweaks can change things dramatically. So yes, I’m mildly obsessed — but who wouldn’t be with flavors like these? 😅
🍏 Can I add other fruits to this salad?
Definitely! Adding fruits like sliced apples or berries can enhance both flavor and color. In fact, I often toss in pomegranate seeds during winter for a burst of sweetness and crunch! Just keep in mind that different fruits have varying levels of sweetness; adjust your vinaigrette accordingly if you want to maintain balance in flavors.
Troubleshooting
I will continue to add more to this Troubleshooting section as I start seeing questions coming through from people who have made the recipe.
Troubleshooting tips
“My salad looks too wilted and sad 😭”
- This could be due to using mixed greens that were not fresh. Wilted greens can occur if they’ve been stored improperly or for too long. Always use crisp, fresh greens to ensure a vibrant salad!
- Another reason might be that you added the dressing too early. If the dressing sits on the greens for a while before serving, it can cause them to wilt. Remember to dress your salad right before you’re ready to eat!
I bet it still tasted great, though!
“My pears are mushy and brown! 😩”
- Overripe pears can turn mushy quickly, especially when sliced and mixed with dressing. Make sure to choose firm pears that are ripe but not overly soft.
- Additionally, if you sliced the pears too far in advance, they may have oxidized and browned. To keep them fresh, slice them just before adding them to the salad or toss them in a little lemon juice.
I’m sure they were still delicious despite their looks!
“My blue cheese is clumping together! 🤔”
- This usually happens when the cheese is too warm or hasn’t been crumbled properly. If your blue cheese is at room temperature, it can stick together more than desired. Try chilling it for a bit before crumbling.
- Also, if you’re using pre-crumbled blue cheese from a package, sometimes it can clump due to packaging moisture. Freshly crumbled cheese often breaks apart more easily.
Don’t worry; it all ends up in the same delicious bowl!
“The dressing is way too thick! How do I fix it? 🤷♀️”
- If your dressing turned out thicker than expected, it could be because you added too much honey relative to the vinegar and oil. Honey can thicken dressings significantly.
- You can try whisking in a bit of warm water or additional olive oil until you reach your desired consistency.
Even if it was thick, I bet it still coated those greens beautifully!
Pear Blue Cheese Salad
Ingredients
Method
- In a large salad bowl, combine the mixed greens and sliced pears.
- Add the crumbled blue cheese and toasted walnuts on top.
- In a small bowl, whisk together honey, balsamic vinegar, olive oil, salt, and pepper until well combined.
- Drizzle the dressing over the salad and toss gently to combine.
- Serve immediately.