Buffalo Chicken Stuffed Peppers: Spicy & Guilt-Free Delight
I first stumbled upon the idea of stuffing bell peppers with buffalo chicken during a late-night craving for something spicy and comforting. I was at this little dive bar that had the most amazing buffalo chicken wings, but let’s be honest—those are never going to fit into my low-carb, dairy-free lifestyle. So, I thought, why not recreate that fiery flavor in a healthier format? Plus, making it at home means I can control the ingredients and save some cash along the way. Who doesn’t love a good excuse to get creative in the kitchen while saving a few bucks?
It took me a solid week of trial and error to nail down my Buffalo Chicken Stuffed Peppers – Dairy Free & Low Carb recipe. I’m talking about multiple rounds of taste-testing that left me questioning my culinary skills more times than I’d like to admit! Each attempt was a lesson in balancing bold flavors with the right texture—you know, trying to find that sweet spot where the peppers don’t turn into mush but still provide that satisfying crunch. Let’s just say there were some unfortunate pepper casualties along the way!
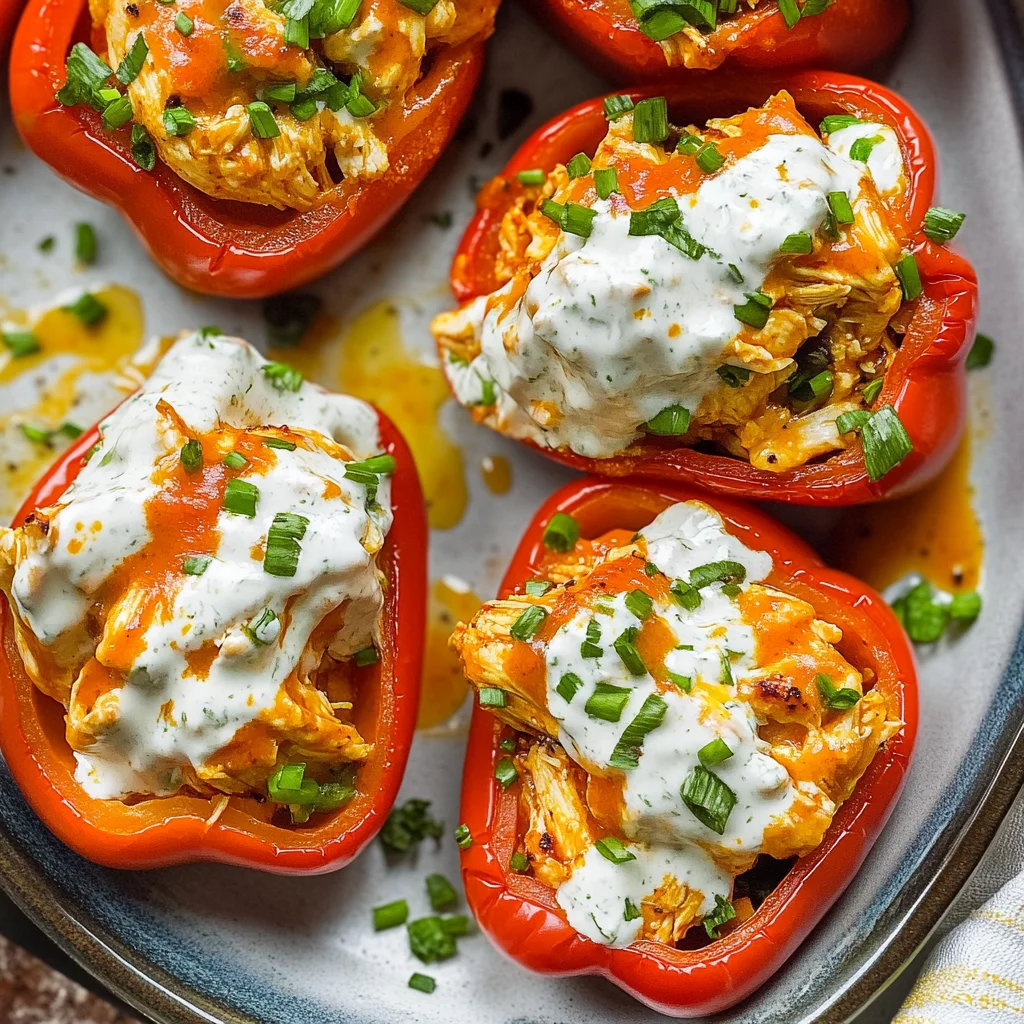
But boy, was it worth it! The final result is nothing short of spectacular: tender bell peppers cradling spicy, flavorful buffalo chicken that’ll have your taste buds dancing. The combination of juicy chicken and crisp peppers creates an irresistible contrast, while being completely dairy-free and low-carb makes it guilt-free too. I can’t wait for you to dive into this dish—you’re going to love it as much as I do!
These Buffalo Chicken Stuffed Peppers – Dairy Free & Low Carb are…
….the ultimate flavor-packed meal that will leave you craving more!
1. They deliver an explosive flavor profile that perfectly balances the heat of buffalo sauce with the savory essence of shredded chicken. The use of a dairy-free buffalo sauce means everyone can enjoy this spicy delight without compromising on taste, ensuring every bite is both bold and satisfying.
2. Expect a fantastic texture that contrasts the tender stuffing with the crispness of the bell pepper shell. The peppers retain their crunch while providing a sturdy vessel for the juicy buffalo chicken and cauliflower rice filling, creating a delightful eating experience.
3. This recipe features a simple yet effective technique of combining cooked shredded chicken with cauliflower rice, which not only enhances the dish’s low-carb credentials but also adds an unexpected layer of heartiness. The method allows for quick assembly while ensuring each pepper is packed full of flavor and nutrition.
4. You’ll appreciate the value aspect as these stuffed peppers are made from accessible ingredients, making them perfect for budget-conscious meals. With rotisserie chicken as a time-saver and fresh veggies at the base, this dish offers a healthy, homemade alternative to takeout without breaking the bank.
PS These Buffalo Chicken Stuffed Peppers are generously sized; they make for a hearty meal that’s perfect for lunch or dinner!
Ingredients for the Buffalo Chicken Stuffed Peppers – Dairy Free & Low Carb
Each ingredient in this dish plays an essential role in flavor and texture. Here’s what you’ll need:
4 medium bell peppers (any color, tops cut off and seeds removed): These serve as a vibrant and crunchy vessel for the spicy filling.
2 cups cooked shredded chicken (preferably rotisserie chicken): Provides hearty protein and absorbs the bold buffalo flavor.
1 cup buffalo sauce (dairy-free variety): Delivers that signature spicy kick essential to buffalo dishes.
1 cup cauliflower rice (fresh or frozen): Adds a low-carb base while bringing a subtle texture that complements the chicken.
1 teaspoon garlic powder: Enhances the overall flavor with aromatic depth.
1 teaspoon onion powder: Contributes a mild sweetness and savory note to balance the spice.
1 teaspoon salt: Elevates all the flavors, making each bite more robust.
1 teaspoon pepper: Adds a touch of warmth and complexity to the stuffing.
You Must Preheat the Oven. Seriously!
I have to confess: I tried to skip preheating the oven, thinking I could save a few minutes. Spoiler alert: it didn’t work! The peppers came out unevenly cooked, and let’s just say my hopes of a beautifully roasted filling went up in smoke. Trust me when I say that this step is non-negotiable.
Preheating the oven is like warming up your car on a chilly morning; it ensures everything gets going at the right temperature from the start. When you pop those Buffalo Chicken Stuffed Peppers into a hot oven, the heat envelops them evenly, allowing the flavors to meld beautifully and ensuring that they bake to perfection. If you throw them in a cold oven, you’re risking soggy bottoms and lackluster flavors—nobody wants that!
What does preheating do?
- Flavor development — Starting with a hot oven allows for the initial sizzle of the filling, which enhances caramelization and deepens flavor.
- Texture improvement — The peppers roast properly, developing that ideal tender-crisp texture instead of becoming mushy.
- Color enhancement — Baking at a consistent temperature promotes beautiful browning on the tops of your stuffed peppers.
- Even cooking — Preheating ensures every part of your dish cooks uniformly, preventing any surprises with raw filling.
- Cooking time accuracy — Recipes are designed based on preheated ovens; skipping this step can lead to inaccurate cooking times.
Different preheating times
- 0 minutes (poor) — If you skip preheating altogether, expect unevenly cooked stuffed peppers with a mushy texture and lackluster flavor.
- 5 minutes (fair) — A quick preheat might help but won’t give you even baking results; edges may cook faster than the center.
- 10 minutes (good) — This will get your oven warm enough for decent cooking but may still leave some parts undercooked.
- 15 minutes (best) — Fully preheated and ready for action! You’ll get perfectly cooked peppers with deeply developed flavors.
Don’t even think about skipping this crucial step. The most common mistake I see is people tossing their stuffed peppers in without waiting for the oven to heat fully—trust me, if you want those buffalo chicken flavors to shine through, don’t play fast and loose with this technique!
How to make Buffalo Chicken Stuffed Peppers – Dairy Free & Low Carb

Are you ready to see how straightforward it is to make the Buffalo Chicken Stuffed Peppers – Dairy Free & Low Carb of your dreams??
1. PREPARE THE PEPPERS
First, we need to get our bell peppers ready for their spicy filling!
Bold action label: Preheat – Preheat your oven to 375°F (190°C). This ensures that the peppers will cook evenly and come out perfectly tender.
Bold action label: Cut – Carefully cut the tops off the bell peppers and remove the seeds. You want them hollowed out, so they can hold all that delicious buffalo chicken mixture!
HANDY TIPS
- Choose colorful bell peppers for a vibrant presentation! They all taste great, but I love using a mix for visual appeal.
- If you have larger peppers, you might need more filling, so keep an eye on proportions.
2. MAKE THE FILLING
Now it’s time to whip up that mouthwatering buffalo chicken filling!
Bold action label: Combine – In a mixing bowl, combine the shredded chicken, buffalo sauce, cauliflower rice, garlic powder, onion powder, salt, and pepper. Mix until everything is well incorporated—this should create a spicy and fragrant filling that’s both creamy and satisfying.
HANDY TIPS
- For an extra kick, consider adding some minced jalapeños or hot sauce to the mixture!
- Make sure to use a dairy-free buffalo sauce if you’re keeping it dairy-free—there are plenty of delicious options available now.
3. STUFF THE PEPPERS
Let’s get stuffing!
Bold action label: Fill – Take each bell pepper and fill it generously with the buffalo chicken mixture. Don’t be shy; pack it in there! This is where all the flavor comes from.
HANDY TIPS
- If you’re worried about overfilling, remember that the filling can settle slightly while baking.
- For smaller portions, consider using mini bell peppers—they’ll bake faster too!
4. BAKE
Time for some oven magic!
Bold action label: Place – Place the stuffed peppers in a baking dish and cover them with foil. This helps them steam and prevents drying out during cooking.
Bold action label: Bake – Bake in the preheated oven for 25 minutes. You’ll know they’re almost done when your kitchen starts smelling amazing!
Bold action label: Uncover & Brown – Remove the foil and bake for an additional 5 minutes to brown the tops just slightly. This step adds a lovely texture!
HANDY TIPS
- Keep an eye on them during those last 5 minutes; you want them golden brown but not burnt!
- If you like extra crispy tops, pop them under the broiler for a minute—just watch closely!
5. SERVE
The moment you’ve been waiting for has arrived!
Bold action label: Remove – Carefully remove the stuffed peppers from the oven and let them cool slightly before serving. They’ll be hot!
Bold action label: Garnish – Garnish with sliced avocado and chopped green onions before serving—these add freshness that complements the spicy filling beautifully.
Aren’t these Buffalo Chicken Stuffed Peppers just mouthwatering? You’ve whipped up a fantastic low-carb meal that’s bursting with flavor in just 45 minutes! Make these once, and I wager they will invade your dreams every night too! – Nagi x
FAQ – Buffalo Chicken Stuffed Peppers – Dairy Free & Low Carb
🌶️ How long will these stuffed peppers keep in the fridge?
Buffalo Chicken Stuffed Peppers can be stored in the fridge for up to 4 days. After that, I noticed they start losing their fresh flavor and texture—around 85% as good on day 5. To store them, simply place the stuffed peppers in an airtight container. When reheating, I recommend covering them with a damp paper towel to retain moisture.
⏳ Can I skip letting the stuffed peppers rest after baking?
No, you can’t skip it! Allowing the stuffed peppers to rest for about 5-10 minutes after baking is essential. This resting period helps redistribute the juices inside and makes it easier to cut or serve without everything falling apart. Trust me, it’s worth the wait!
❄️ Can I freeze these buffalo chicken stuffed peppers?
Absolutely! You can freeze these stuffed peppers before or after baking. If freezing before baking, just stuff the peppers and wrap them tightly in plastic wrap followed by aluminum foil to prevent freezer burn. They can last up to 3 months in the freezer. When you’re ready to cook them, thaw overnight in the fridge and bake as directed (you might need to add a few extra minutes). If you’ve already baked them, let them cool completely before freezing and reheat directly from frozen or thaw first.
🌱 Are these stuffed peppers suitable for special diets?
Yes! These Buffalo Chicken Stuffed Peppers are dairy-free and low-carb, making them a great option for those following a paleo or ketogenic diet. The use of cauliflower rice instead of traditional rice keeps carbs low while still providing a satisfying texture. If you’re looking for a gluten-free meal, you’re in luck—this recipe checks that box too!
🔄 Can I substitute rotisserie chicken with something else?
You can definitely substitute rotisserie chicken if you prefer! Cooked shredded turkey works beautifully if you want a leaner option. Alternatively, you could use leftover grilled chicken or even canned chicken if you’re in a pinch—just make sure to drain it well. 💡 If you’re looking for a vegetarian option, try using lentils or chickpeas mixed with buffalo sauce instead.
🤔 Why do I have to cover the peppers with foil while baking?
Covering the stuffed peppers with foil while they bake helps steam them gently, ensuring that they cook evenly without drying out. This technique also allows all those delicious flavors to meld together beautifully. After 25 minutes of covered baking, removing the foil adds that lovely browned top that makes these peppers irresistible!
🎨 Can I customize this recipe with different ingredients?
Absolutely! The beauty of these stuffed peppers is how versatile they are. You can add extras like black beans or corn for more texture and flavor—just remember this may slightly increase carb count! You could also swap out buffalo sauce for BBQ sauce if you prefer something sweeter or mix in some diced vegetables like zucchini or mushrooms for added nutrition. Get creative! 😄
Troubleshooting
I will continue to add more to this Troubleshooting section as I start seeing questions coming through from people who have made the recipe.
Troubleshooting tips
“My stuffed peppers turned out too mushy! 😩”
- If you used frozen cauliflower rice, it may have released excess moisture during cooking, making your filling soggy. Next time, try squeezing out any extra moisture from the cauliflower rice before mixing it in.
- Overcooking can also lead to mushy peppers. Make sure to stick to the recommended baking times and check for doneness a few minutes early if your peppers are on the smaller side.
I bet they were still YUM though!
“My stuffed peppers collapsed and look wonky! 😢”
- This can happen if your bell peppers are too thin or overstuffed. Make sure to choose medium-sized peppers with sturdy walls and avoid packing them too tightly with filling.
- Additionally, if your filling is too wet from excess buffalo sauce or cauliflower rice, it can make the peppers unstable. Adjust the ingredient proportions if necessary next time!
I bet they were still YUM though!
“The tops of my stuffed peppers didn’t brown like yours! 🔥”
- If you covered the baking dish tightly with foil, it may have trapped steam and prevented browning. Try loosening the foil slightly or removing it earlier in the baking process next time for that perfect golden top.
- Also, ensure your oven is properly preheated to 375°F (190°C) so that everything cooks evenly—an oven thermometer can help with this!
I bet they were still YUM though!
“The filling was too dry and crumbly! 😟”
- Using overly dry shredded chicken or not enough buffalo sauce can lead to a drier filling. Make sure you’re using moist rotisserie chicken and adjust the amount of buffalo sauce based on your taste preference.
- If you find yourself using leftover chicken that might be drier than fresh, consider adding a splash of broth or an extra drizzle of buffalo sauce while mixing.
I bet they were still YUM though!
Buffalo Chicken Stuffed Peppers - Dairy Free & Low Carb
Ingredients
Method
- Preheat the oven to 375°F (190°C).
- Cut the tops off the bell peppers and remove the seeds.
- In a mixing bowl, combine the shredded chicken, buffalo sauce, cauliflower rice, garlic powder, onion powder, salt, and pepper.
- Fill each bell pepper with the buffalo chicken mixture.
- Place the stuffed peppers in a baking dish and cover with foil.
- Bake in the preheated oven for 25 minutes.
- Remove the foil and bake for an additional 5 minutes to brown the tops.
- Remove from the oven and let cool slightly.
- Garnish with sliced avocado and chopped green onions before serving.