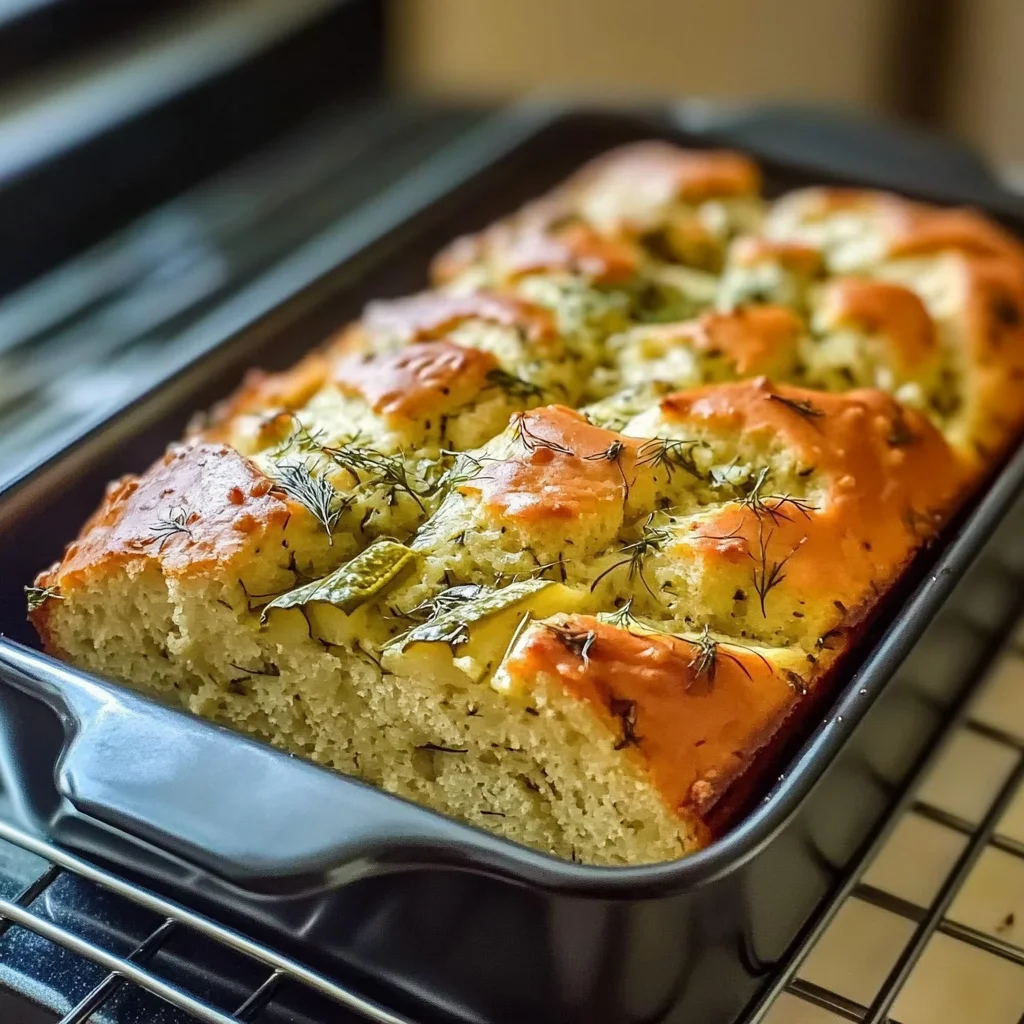
Dill Pickle Bread Recipe: Tangy and Irresistible Delight
I first stumbled upon the idea of Dill Pickle Bread at a quirky little café that prided itself on unique flavor combinations. One bite of their dill pickle-infused loaf had me hooked; the tangy, savory notes danced on my tongue, making me crave it long after I left. I knew I had to recreate this delightful bread at home—not just to save some cash, but because I wanted to put my own spin on it and make it even better than what I’d tasted.
After what felt like a never-ending series of baking sessions—I’m talking about six failed attempts and a kitchen that looked like a flour bomb went off—I finally landed on the perfect recipe. Each iteration was a lesson learned: too dense, too bland, not enough dill! I was determined to achieve that ideal balance of flavors and textures, and honestly, there were times I thought I’d be better off sticking to store-bought bread. But here we are!
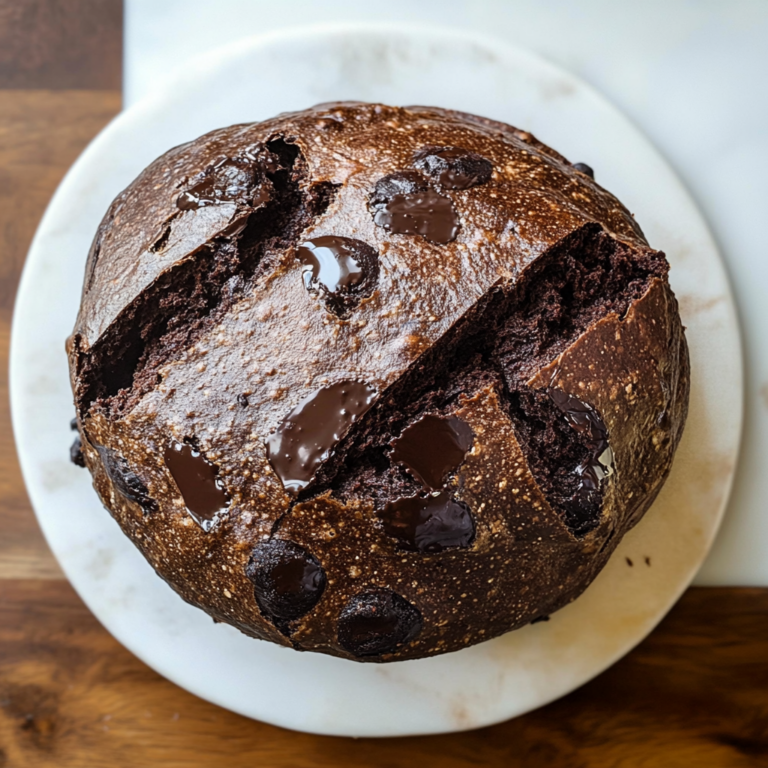
The payoff was absolutely worth it! The final result is a savory bread infused with the tangy flavor of dill pickles, perfect for sandwiches or as a side dish that steals the show. It’s got this wonderfully soft crumb with a slightly crispy crust, and the flavor? Oh boy, it’s like a pickle party in your mouth! So grab those pickles and let’s get baking—I can’t wait for you to experience this Dill Pickle Bread Recipe!
These Dill Pickle Bread are….
…a game-changer in the world of savory bread!
1. They deliver a tangy flavor explosion that’s simply irresistible, thanks to the generous addition of dill pickle juice. This unique ingredient infuses the bread with a delightful acidity, balancing the rich notes from the buttermilk and creating a flavor profile that elevates every bite.
2. Irresistibly soft texture – this bread boasts a tender crumb that is both fluffy and moist. The combination of all-purpose flour and buttermilk ensures that it rises beautifully while maintaining a light texture, making each slice perfect for sandwiches or enjoyed on its own.
3. A simple yet effective technique is key to achieving maximum flavor and texture. Mixing the wet ingredients with the dry just until combined allows for minimal gluten development, resulting in a soft loaf that doesn’t become tough — just one of my favorite tips to keep in mind when baking!
4. Incredible value – this Dill Pickle Bread Recipe is budget-friendly and quick to make at home, especially when you consider how much you would pay for a specialty loaf at a bakery. With basic pantry staples like flour and baking powder, plus those beloved dill pickles, you can whip up this delicious bread without breaking the bank.
PS This recipe yields one loaf that’s perfect for slicing into generous pieces, whether you’re crafting sandwiches or serving it alongside your favorite soups!
Ingredients for the Dill Pickle Bread
Each ingredient in this dish plays an essential role in flavor and texture. Here’s what you’ll need:
2 cups all-purpose flour: Provides the structure and base for the bread.
1 tablespoon baking powder: Helps the bread rise, creating a light texture.
1 teaspoon baking soda: Works with the acidity of pickle juice for extra lift.
1 teaspoon salt: Enhances the overall flavor of the bread.
1 cup buttermilk (or milk with vinegar): Adds moisture and a subtle tang.
1 large egg (beaten): Binds the ingredients together and enriches the dough.
1/2 cup dill pickle juice: Infuses the bread with that signature dill flavor.
1 cup dill pickles (chopped): Adds texture and bursts of tangy goodness.
1/4 cup fresh dill (chopped): Enhances the fresh herbaceous notes in the bread.
1/2 cup shredded cheese (optional): Introduces a creamy richness if desired.
You Must Let the Bread Cool. No Exceptions!
I’ll be honest: I tried to skip the cooling time because I was too eager to sink my teeth into that warm, dill pickle-infused goodness. But every single time, I ended up with a dense, gummy slice that felt more like a brick than the fluffy treat it should be. Trust me, I learned the hard way that patience is key!
Allowing the bread to cool not only improves its texture but also helps to lock in the flavors. Think of it like letting a good steak rest after cooking; if you slice it too early, all those juicy flavors just run away. In this case, letting the Dill Pickle Bread cool allows steam to escape and the loaf to firm up nicely, making for perfect slices rather than a squished mess.
What does cooling do?
- Texture: Cooling helps the bread set, resulting in a lighter and less gummy crumb. This allows each bite to have that perfect airy quality.
- Flavor: As the bread cools, flavors deepen and meld together, enhancing the overall taste experience beyond just fresh-baked warmth.
- Slice Integrity: Proper cooling ensures that when you slice into your loaf, each piece holds together beautifully instead of falling apart or squishing down.
- Moisture Retention: Allowing it to cool properly can help maintain moisture in the bread, preventing dryness later on.
- Aroma: Cooling aids in allowing those lovely dill and pickle aromas to fully develop and disperse as the bread rests.
Different cooling times
- 10 minutes (good) — This is the bare minimum. The bread will still be warm but may be too soft for perfect slicing without becoming mushy.
- 30 minutes (better) — A decent compromise; this gives enough time for some steam to escape while still being warm enough for immediate enjoyment.
- 1 hour (best) — Optimal cooling time allows for proper texture development and flavor melding; you’ll get those beautiful slices!
- Beyond 1 hour (excellent) — The bread continues to set and improve in flavor; however, beware of letting it sit out too long or it might dry out.
If you think you can get away with skipping the cooling step because you’re just too excited to eat this Dill Pickle Bread, think again! The most common mistake is diving in too early and ending up with a gummy mess instead of perfectly sliced perfection. Don’t say I didn’t warn you!
How to make Dill Pickle Bread

Are you ready to see how straightforward it is to make the Dill Pickle Bread of your dreams??
1. PREPARE THE OVEN
Before you start mixing, let’s get that oven ready!
PREHEAT – Preheat the oven to 350°F (175°C). This temperature is perfect for baking the bread evenly, ensuring a golden crust while keeping the inside moist and fluffy.
2. MIX DRY INGREDIENTS
Now it’s time to combine the dry components for that perfect texture!
WHISK – In a mixing bowl, whisk together the flour, baking powder, baking soda, and salt until fully combined. This step is crucial as it helps aerate the mixture, leading to a lighter bread.
HANDY TIPS
- Use a whisk instead of a spoon to ensure no lumps remain in your flour mixture.
- Make sure to measure your flour correctly; too much can lead to dense bread.
3. COMBINE WET INGREDIENTS
Let’s bring together all those delicious wet ingredients!
MIX – In another bowl, mix the buttermilk, beaten egg, and dill pickle juice until well combined. The buttermilk adds richness and moisture, while the pickle juice infuses that tangy flavor we love.
HANDY TIPS
- If you don’t have buttermilk, simply add 1 tablespoon of vinegar to regular milk and let it sit for 5 minutes!
- Ensure your egg is at room temperature for better blending with other wet ingredients.
4. COMBINE MIXTURES
It’s time to unite both mixtures and add some crunch!
POUR – Pour the wet ingredients into the dry ingredients and stir until just combined. Be careful not to overmix; a few lumps are okay! FOLD – Gently fold in the chopped dill pickles and any optional ingredients like fresh dill or cheese if you’re using them. This will add additional flavor and texture!
HANDY TIPS
- Chopping your dill pickles into small pieces ensures they’re evenly distributed throughout the bread.
- If adding cheese, shredded cheddar or mozzarella works beautifully!
5. BAKE THE BREAD
Let’s bake this savory delight!
POUR – Pour the batter into a greased loaf pan and smooth the top with a spatula for even cooking. BAKE – Bake for about 45 minutes or until a toothpick inserted into the center comes out clean. You’ll know it’s done when the top is golden brown and fragrant!
HANDY TIPS
- If you notice the top browning too quickly, cover it loosely with aluminum foil halfway through baking.
- Letting it bake fully will enhance its flavor profile—don’t rush this part!
6. COOL AND SERVE
Final steps before indulging in your creation!
COOL – Allow the bread to cool in the pan for about 10 minutes, then transfer it to a wire rack to cool completely before slicing. This cooling period helps set its structure so you can enjoy perfect slices.
HANDY TIPS
- For best slicing results, use a serrated knife once cooled!
- You can serve it warm or at room temperature; both are delicious options!
Make this Dill Pickle Bread once, and I guarantee it’ll become a staple in your home—perfect for sandwiches or just on its own! – Nagi x
FAQ – Dill Pickle Bread
🌟 How long will Dill Pickle Bread keep?
Dill Pickle Bread can be stored at room temperature for about 2-3 days. After that, it starts to lose its freshness and flavor—around 80% as good on day 4, declining further to about 60% by day 5. To keep it fresher for longer, I recommend storing it in an airtight container or wrapping it tightly in plastic wrap. If you notice any signs of mold or off smells, don’t hesitate to toss it!
❄️ Can I freeze Dill Pickle Bread?
Yes, you can absolutely freeze Dill Pickle Bread! Once it’s completely cooled, slice the bread (if you prefer) and wrap each piece tightly in plastic wrap followed by aluminum foil or place them in a freezer-safe bag. It should maintain its quality for up to 3 months in the freezer. To thaw, simply leave it at room temperature for a few hours or pop slices in the toaster for a quick warm-up.
🥛 Can I substitute buttermilk with something else?
If you don’t have buttermilk on hand, no worries! You can easily make a substitute by mixing 1 cup of regular milk with 1 tablespoon of vinegar or lemon juice. Let it sit for about 5-10 minutes until it curdles slightly. This will mimic the acidity of buttermilk and help achieve that moist texture we love in this bread. I’ve tried it both ways and honestly, the difference is negligible!
🌾 Is there a gluten-free option for this bread?
Yes, this recipe can be adapted to be gluten-free! I recommend using a high-quality gluten-free all-purpose flour blend instead of the standard all-purpose flour. Make sure your baking powder and baking soda are also gluten-free. The texture might be slightly different—maybe a bit denser—but still delicious! Just remember to check those labels—some blends work better than others.
🔄 Can I add ingredients like nuts or different cheeses?
Absolutely! Dill Pickle Bread is quite versatile when it comes to add-ins. You can fold in chopped walnuts or pecans for a nice crunch, or try different types of cheese like feta or cheddar if you’re feeling adventurous. Just remember that adding too many wet ingredients might alter the texture slightly, so keep an eye on your batter consistency.
⏰ Do I really need to let the bread cool before slicing?
Yes, you do need to let the bread cool completely before slicing! If you cut into it while it’s still hot, you’ll likely end up with a gummy texture rather than nice clean slices—trust me, I’ve been there! Allowing it to cool on a wire rack helps set the crumb and makes slicing much easier. Patience is key here; your future self will thank you!
🔍 How many times did you test this recipe?
I tested this Dill Pickle Bread recipe nine times (yes, I know — I’m a little mad! 😅) to ensure the perfect balance of flavors and texture. Each iteration brought me closer to that ideal savory loaf infused with dill pickle goodness that holds up beautifully whether you’re making sandwiches or serving it as a side dish. So rest assured, it’s been thoroughly vetted for your enjoyment!
Troubleshooting
I will continue to add more to this Troubleshooting section as I start seeing questions coming through from people who have made the recipe.
Troubleshooting tips
“My bread came out too flat! 😩”
- You may have overmixed the batter. Mixing too much can cause the gluten in the flour to develop too much, resulting in a dense and flat loaf.
- Alternatively, you might not have used enough baking powder. If your baking powder is old or not measured accurately, it won’t provide enough leavening for a good rise.
- Don’t worry; it still tastes great as a savory pancake!
“My bread is too dry and crumbly! 😭”
- This can happen if you added too much flour. Make sure to measure your flour correctly by spooning it into the measuring cup and leveling it off with a knife instead of scooping straight from the bag.
- Additionally, if you didn’t use enough buttermilk, the moisture level would drop, leading to dryness. Ensure you’re adding the full cup specified.
- I bet it was still YUM though!
“The top of my bread is cracked and uneven! 😳”
- A common cause for cracking is opening the oven door too soon while baking. This can create a sudden temperature change that makes the top split.
- Also, if your oven runs hot, it might be cooking the outside faster than the inside, causing cracking. Use an oven thermometer to double-check your temperature.
- That said, I’m sure it still looks scrumptious on the inside!
“My bread turned out way too dark! 🔥”
- If your oven temperature was set higher than 350°F (175°C), this could lead to over-browning before the inside is fully cooked. Always ensure your oven is properly calibrated.
- Another reason could be using dark pans which absorb more heat. Consider switching to light-colored bakeware next time for even cooking.
- Even with a darker crust, I bet it was still delicious!
“My bread feels gummy in the middle! 😬”
- This often means you underbaked it. Make sure to bake until a toothpick inserted in the center comes out clean; sometimes, ovens vary in actual temperature.
- You might also have added too many wet ingredients or not incorporated them well enough with the dry ones. Make sure everything is combined just right!
- No worries; I’m sure that flavor was still delightful!
Dill Pickle Bread
Ingredients
Method
- Preheat the oven to 350°F (175°C).
- In a mixing bowl, whisk together the flour, baking powder, baking soda, and salt.
- In another bowl, mix the buttermilk, beaten egg, and dill pickle juice until well combined.
- Pour the wet ingredients into the dry ingredients and stir until just combined. Fold in the chopped dill pickles and optional ingredients if using.
- Pour the batter into a greased loaf pan and smooth the top. Bake for 45 minutes or until a toothpick inserted into the center comes out clean.
- Allow the bread to cool in the pan for 10 minutes, then transfer to a wire rack to cool completely before slicing.