Thai Pumpkin Curry: Creamy Comfort in a Bowl
I first fell in love with Thai pumpkin curry during a cozy dinner at my favorite little Thai restaurant. The moment that creamy concoction hit my taste buds, I was hooked—the perfect balance of sweet pumpkin, fragrant spices, and silky coconut milk was pure comfort in a bowl. After finishing my meal, I couldn’t shake the craving for days and decided to take on the challenge of recreating it at home. Let’s be real, though: I’m always on the lookout for ways to make my favorite dishes even better (and cheaper), so I thought, why not try my hand at this one?
Let me tell you, perfecting my version of Thai pumpkin curry was no walk in the park. I lost count after six attempts—each one a bit more disastrous than the last. From accidentally using too much chili to forgetting to add the coconut milk entirely (oops!), there were definitely moments when I questioned my culinary skills! But with each iteration, I aimed to achieve that dream-like creaminess and depth of flavor that had me swooning at the restaurant.
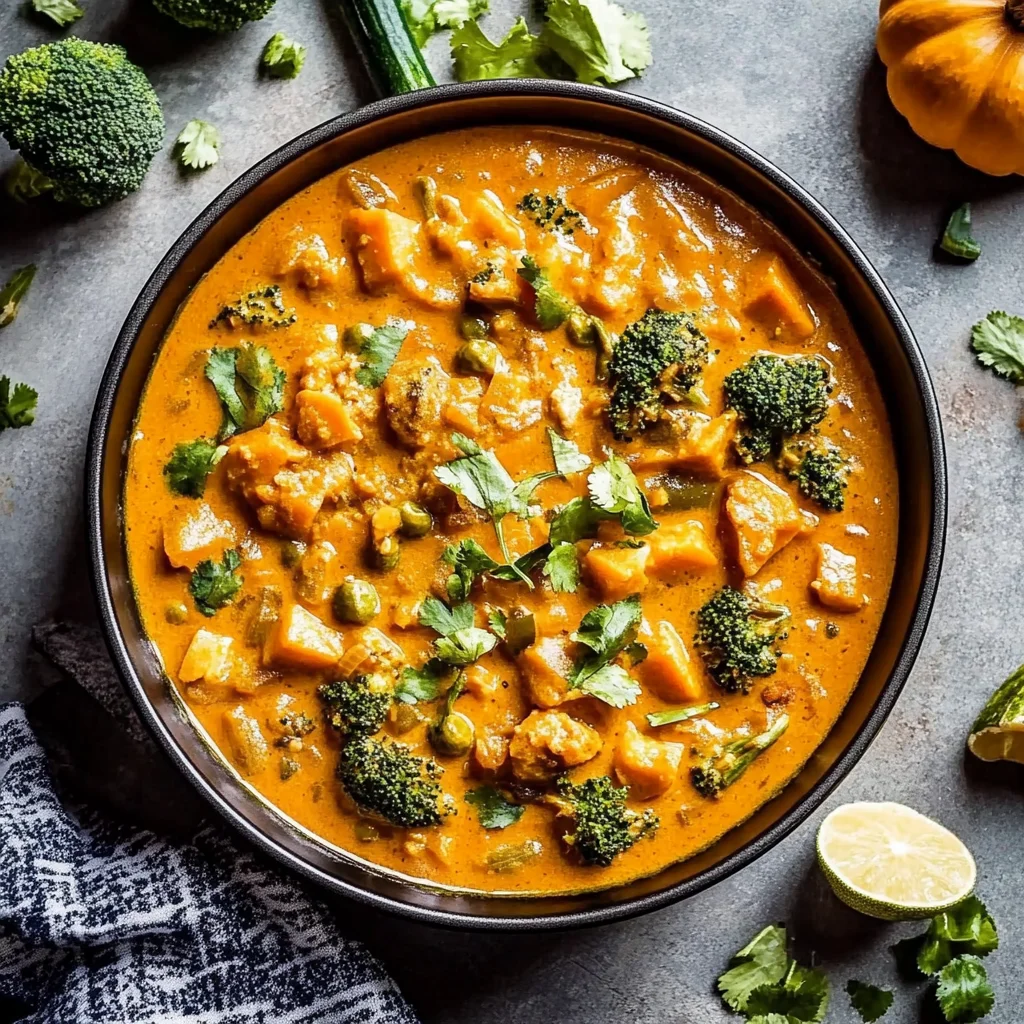
But oh boy, was it worth it in the end! My Thai pumpkin curry turned out to be an absolute triumph—a rich and creamy dish that beautifully showcases the sweetness of pumpkin paired with aromatic spices. The texture is luxuriously smooth, and every spoonful bursts with layers of flavor that will warm your soul. I can’t wait for you to dive into this delightful recipe; trust me, your taste buds are in for a treat!
These Thai Pumpkin Curry are….
…a vibrant explosion of flavors and textures that will transport your taste buds straight to Thailand!
1. They deliver a sweet and savory balance that’s truly irresistible, thanks to the natural sweetness of the pumpkin combined with the aromatic red curry paste. The pumpkin not only enriches the dish with its creamy texture but also enhances the overall flavor profile, making each bite a delightful experience.
2. The silky-smooth consistency is achieved through the perfect combination of coconut milk and well-cooked vegetables. When you bite into this curry, the pumpkin softens beautifully while the sliced bell peppers add subtle crunch, creating a satisfying contrast that elevates your dining experience.
3. A key cooking technique is simmering everything together in vegetable broth, which allows the vegetables to meld harmoniously with the rich curry base. This method ensures that each piece of onion and carrot fully absorbs the spices, resulting in layers of flavor that you won’t find in typical store-bought curries.
4. This recipe offers incredible value, as it uses simple ingredients that are easy to find and budget-friendly. Unlike takeout options, which can be pricey and filled with preservatives, my Thai Pumpkin Curry is both nutritious and delicious, making it a perfect choice for a wholesome homemade meal.
PS This recipe yields about 4 servings, making it perfect for family dinners or meal prep for busy weekdays!
Ingredients for the Thai Pumpkin Curry
Each ingredient in this dish plays an essential role in flavor and texture. Here’s what you’ll need:
2 cups Pumpkin (peeled and cubed): Provides natural sweetness and a creamy texture.
1 cup Bell pepper (sliced): Adds vibrant color and a slight crunch.
1 cup Carrot (sliced): Contributes sweetness and a tender bite.
1 cup Onion (chopped): Builds a savory base with aromatic depth.
2 tablespoons Red curry paste: Infuses the dish with rich, spicy flavor.
1 can Coconut milk (full-fat): Creates a luscious, creamy sauce that balances spices.
1 cup Vegetable broth: Adds moisture and enhances the overall flavor profile.
2 tablespoons Soy sauce (or tamari for gluten-free): Introduces umami depth and saltiness.
1 tablespoon Brown sugar (or coconut sugar): Balances flavors with subtle sweetness.
1 teaspoon Lime juice (freshly squeezed): Brightens the dish with a zesty note.
1 teaspoon Salt (to taste): Enhances all the flavors harmoniously.
1 tablespoon Fresh cilantro (chopped): Offers a fresh, herbaceous finish.
- 1 tablespoon Chili flakes (optional): Adds a kick of heat for spice lovers.
You Must Sauté the Onion Until Translucent. No Shortcuts!
I’ll be honest — I thought I could skip this step and just throw everything into the pot. But after a few lackluster attempts, I quickly learned that sautéing the onion isn’t just some extra step; it’s the magic wand that transforms this Thai Pumpkin Curry from good to spectacular. Trust me, I tried to find a shortcut, and every time, my curry was a little sadder for it! 🤦♀️
Sautéing the onion until translucent allows it to release its natural sugars and develop a sweet, rich flavor without bitterness. Think of it like caramelizing — it’s all about coaxing out those delightful flavors that create a deep base for your curry. Without this crucial step, your pumpkin, bell peppers, and carrots might end up tasting a bit flat, lacking the warmth and depth that makes this dish so comforting.
What Does Sautéing Do?
- Flavour: Deepens overall taste by developing sweetness in the onion.
- Aromatics: Creates an inviting aroma that enhances the dish’s appeal.
- Base Layer: Forms a solid flavor foundation for the pumpkin and other vegetables to build upon.
- Texture: Softens the onion for a pleasant mouthfeel, avoiding any raw crunchiness.
- Color: Adds a touch of golden hue, making the curry visually enticing.
Different Sautéing Times
- 1 minute (fair) — Just starting to soften but still raw; lacks aromatic depth.
- 3 minutes (good) — Onions are softened but not fully translucent; some sweetness begins to develop.
- ⭐️ 5 minutes⭐️ — Perfectly translucent; you can smell that sweet aroma developing!
- 7 minutes or more (great) — Onions turn golden with intense sweetness; adds fantastic complexity to your curry.
Just remember, don’t rush this step! The most common mistake is thinking you can skip sautéing altogether or not cooking long enough. You’ll miss out on vital flavor development that elevates your Thai Pumpkin Curry from simple to sensational!
How to make Thai Pumpkin Curry

Are you ready to see how straightforward it is to make the Thai Pumpkin Curry of your dreams??
1. PREPARE THE VEGETABLES
Let’s kick things off by getting our veggies ready for this vibrant curry!
1. Chop – Start by chopping the pumpkin, bell pepper, carrot, and onion into bite-sized pieces. Make sure the pumpkin is cubed evenly so it cooks uniformly and becomes tender in the simmering process.
2. Set aside – Once chopped, set aside the vegetables. This will make your cooking process smoother as you can focus on each step without interruption!
HANDY TIPS
- Choose a pumpkin that feels heavy for its size; it usually means it’s fresh and full of flavor!
- If you’re short on time, pre-cut vegetables from your local market can save you some prep work.
2. COOK THE CURRY
Now we’re diving into the heart of the dish — cooking up that delicious curry!
3. Heat – In a large pot, heat a little oil over medium heat and add the chopped onion. Sauté until translucent, which should take about 3–4 minutes. This step builds a fragrant base for your curry.
4. Add – Next, add the red curry paste to the pot and cook for 1-2 minutes until fragrant. This is when your kitchen will start smelling heavenly!
5. Stir in – Incorporate the pumpkin, bell pepper, and carrot into the pot and cook for another 5 minutes. Stirring occasionally ensures that all those lovely flavors meld together nicely.
6. Pour in – Now, pour in the coconut milk and vegetable broth, bringing everything to a gentle simmer.
7. Reduce & simmer – Lower the heat and let it simmer for 20 minutes until the pumpkin is tender but not mushy. You’ll know it’s done when a fork easily pierces through the pumpkin cubes!
HANDY TIPS
- Want extra creaminess? Use light coconut milk if you prefer a lighter version while still keeping that rich taste!
- For added depth, consider adding a pinch of turmeric or ginger when sautéing the onions.
3. SEASON AND SERVE
The final touches will elevate your curry to new heights!
8. Stir in – Add soy sauce, brown sugar, lime juice, and salt to taste into the pot, adjusting seasoning as needed. This balance of salty, sweet, and tangy flavors really brings everything together!
9. Serve hot – Serve your curry hot, garnished with freshly chopped cilantro and chili flakes if desired for an extra kick! Enjoy every creamy spoonful of this comforting meal.
HANDY TIPS
- For a spice lover’s twist, try adding sliced fresh chili peppers during cooking!
- This curry pairs beautifully with jasmine rice or quinoa — perfect for soaking up all that delicious sauce!
You’ve just created a rich and creamy Thai Pumpkin Curry that’s bursting with flavor! It’s truly a comforting meal packed with goodness from all those vibrant vegetables and spices. Make this once, and I wager it will invade your dreams every night too! – Nagi x
FAQ – Thai Pumpkin Curry
🥣 How long will this Thai pumpkin curry keep in the fridge?
This Thai pumpkin curry will keep well in the fridge for about 4-5 days. However, I recommend consuming it within 3 days for the best flavor and quality, as it’s still around 97% as good on day 3! Just make sure to store it in an airtight container to prevent it from absorbing other odors.
⏰ Can I skip the simmering time?
No, you cannot skip the simmering time! The simmering process is crucial for developing flavors and ensuring that the pumpkin becomes tender. I’ve tested it numerous times, and trust me — if you rush this step, you’ll end up with crunchy pumpkin pieces instead of that delicious creamy texture we’re after. Aim for a solid 20 minutes of simmering for the best results!
❄️ Can I freeze Thai pumpkin curry for later?
Yes, you can absolutely freeze this curry! To do so, let it cool completely before transferring it to freezer-safe containers. It will maintain its quality for up to 3 months. When you’re ready to enjoy it again, simply thaw overnight in the fridge and reheat gently on the stove or in the microwave. Just a quick note ⚠️: freezing may affect the texture of some vegetables like bell peppers, but the flavor will still be delightful!
🌱 Is this recipe vegan and gluten-free?
Yes! This Thai pumpkin curry is both vegan and gluten-free. Simply use tamari instead of soy sauce if you need a gluten-free option. All other ingredients are plant-based, so it’s perfect for those following a vegan diet. If you’re looking to add more protein, consider tossing in some chickpeas or tofu!
🔄 What can I substitute for red curry paste?
If you don’t have red curry paste on hand, you can use yellow curry paste as an alternative; however, it will result in a milder flavor profile. You could also make a homemade version using chili powder mixed with ginger, garlic, and a bit of turmeric. But honestly? I highly recommend sticking with red curry paste if possible — it’s what makes this dish sing!
🥕 Why do I sauté the onion before adding other vegetables?
Sautéing the onion first helps to develop its sweetness and enhances its flavor through caramelization. This step adds depth to your curry that raw onions just can’t provide. I’ve tried skipping this step before (yes, I know), and let me tell you — it was not worth it! Start with sautéing those onions for a perfect base every time.
🌶️ Can I add more vegetables or customize this recipe?
Absolutely! This recipe is super versatile. You can add any vegetables you like; zucchini or snap peas would be great additions! Just remember to adjust cooking times appropriately based on what you choose to include — firmer vegetables may need longer cooking times while softer ones will require less. Feel free to get creative!
Troubleshooting
I will continue to add more to this Troubleshooting section as I start seeing questions coming through from people who have made the recipe.
Troubleshooting tips
“My curry is too watery! 😩”
- You may have added too much vegetable broth or coconut milk. The ratio of liquid to pumpkin should be balanced to achieve that creamy consistency. If you want it thicker next time, reduce the amount of liquid by about 1/4 cup.
- Not letting it simmer long enough can also result in excess liquid. Make sure to allow the curry to simmer for the full 20 minutes so that the pumpkin can break down and thicken the sauce.
I bet it was still YUM though!
“My pumpkin isn’t tender enough! 😟”
- If your pumpkin cubes are cut larger than bite-sized pieces, they will take longer to cook through. Aim for uniform pieces about 1-inch in size for even cooking.
- Another reason could be not simmering long enough; if you don’t let it cook for the full 20 minutes, those hearty cubes won’t soften properly.
I bet it was still YUM though!
“The color of my curry is too pale! 😱”
- This could happen if you didn’t use enough red curry paste. It’s key to achieving that vibrant color—don’t be shy adding a bit more if you prefer a richer look!
- Also, if your onions weren’t cooked until translucent before adding other ingredients, they may not have contributed their full flavor and color potential.
I bet it was still YUM though!
“My curry tastes too salty! 😳”
- If you used soy sauce with salt added and then also added salt on top, that could easily make the dish overly salty. Next time, taste as you go and adjust accordingly.
- You might have also used a different brand of red curry paste that contains more sodium. Keep this in mind when adjusting your seasoning!
I bet it was still YUM though!
Thai Pumpkin Curry
Ingredients
Method
- Chop the pumpkin, bell pepper, carrot, and onion into bite-sized pieces.
- Set aside the chopped vegetables.
- In a large pot, heat a little oil over medium heat and sauté the onion until translucent.
- Add the red curry paste and cook for 1-2 minutes until fragrant.
- Stir in the pumpkin, bell pepper, and carrot, cooking for another 5 minutes.
- Pour in the coconut milk and vegetable broth, bring to a simmer.
- Reduce heat and let it simmer for 20 minutes until the pumpkin is tender.
- Stir in the soy sauce, brown sugar, lime juice, and salt. Adjust seasoning to taste.
- Serve hot, garnished with fresh cilantro and chili flakes if desired.