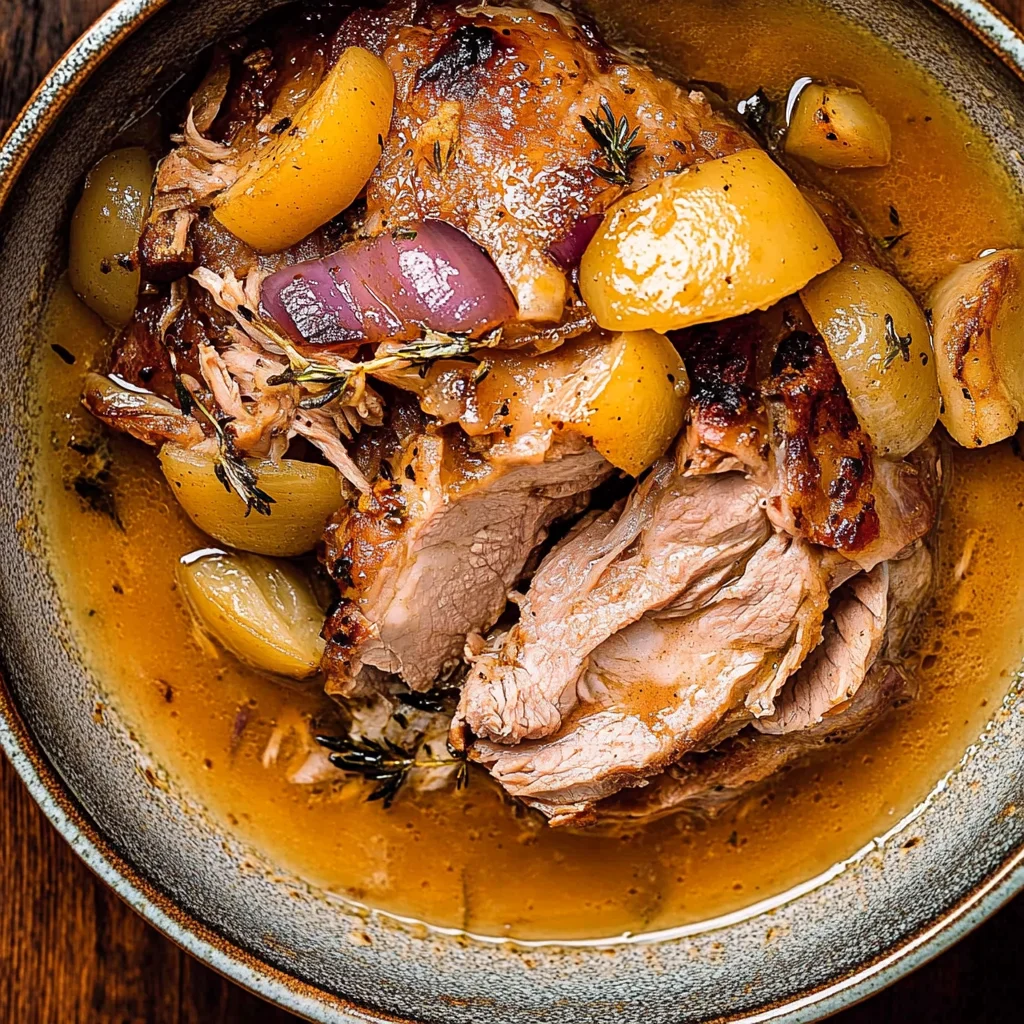
Apple Cider Braised Pork Shoulder: Fall’s Best Comfort Dish
I first stumbled upon the idea of Apple Cider Braised Pork Shoulder during a cozy fall dinner at a rustic little restaurant tucked away in the countryside. The rich aroma wafting from the kitchen was enough to make anyone weak in the knees, and when that tender, succulent pork hit my plate, I knew I had to recreate it at home. It was one of those moments when you think, “I can do better than this,” especially considering how expensive dining out can get. Plus, there’s something genuinely satisfying about turning simple ingredients into a comforting masterpiece in your own kitchen.
Let me tell you, perfecting this recipe was no walk in the park — I lost count of how many times I tried to nail it down, but I think it was around six or seven attempts (who’s counting?). Each time, I found myself tweaking the balance of flavors or adjusting the cooking time because I wanted that melt-in-your-mouth texture and depth of flavor that would make me feel like a culinary genius. There were definitely a few mishaps along the way — like that one time I forgot to add salt and ended up with a dish that tasted like sad memories. But hey, perseverance is key!
In the end, all those trials were absolutely worth it! My Apple Cider Braised Pork Shoulder turned out to be nothing short of spectacular, with its perfectly tender meat soaking up all that sweet and tangy cider goodness. The combination of rich flavors and melt-in-your-mouth texture makes this dish an absolute showstopper for any gathering or just a cozy night in. Trust me, once you take your first bite, you’ll be hooked! So grab your apron and let’s get cooking — you’re going to love this!
These Apple Cider Braised Pork Shoulder are….
….the ultimate comfort food that will have your taste buds singing!
1. They deliver an incredible depth of flavor from the combination of apple cider and fresh thyme. The sweetness of the cider beautifully balances the savory notes of the pork, creating a symphony of taste that lingers long after the last bite. I can’t get enough of how each ingredient enhances the others, resulting in a dish that’s bursting with flavor.
2. The melt-in-your-mouth tenderness is simply unbeatable, thanks to slow braising. Cooking the pork shoulder low and slow allows the fat to render perfectly, keeping it juicy and tender throughout. When I took my first forkful, I was amazed by how easily it fell apart, making every bite a delightful experience.
3. A key technique that elevates this dish is searing the pork shoulder before braising. This step creates a beautiful crust that locks in moisture and infuses the meat with rich umami flavors. I’ve found that taking the time to sear really transforms an ordinary braise into something extraordinary.
4. This recipe offers great value, as it’s made with affordable ingredients that yield a generous amount of food. Using a 3-pound pork shoulder means there’s plenty to feed a crowd or enjoy leftovers throughout the week. In my opinion, it’s hard to find such a comforting meal at this price point anywhere else!
PS This Apple Cider Braised Pork Shoulder yields enough for 6 hearty servings, so it’s perfect for family gatherings or meal prep for busy weeknights!
Ingredients for the Apple Cider Braised Pork Shoulder
Each ingredient in this dish plays an essential role in flavor and texture. Here’s what you’ll need:
- 3 pounds pork shoulder (bone-in, trimmed): This cut provides rich flavor and tenderness as it braises.
- 2 teaspoons salt (divided): Enhances the overall taste and helps to tenderize the meat.
- 1 teaspoon black pepper (freshly ground): Adds a warm spice that complements the sweetness of the cider.
- 1 tablespoon olive oil (for searing): Creates a golden crust and depth of flavor through caramelization.
- 2 cups apple cider (preferably fresh): Infuses the pork with sweet and tangy notes while keeping it moist.
- 1 cup chicken broth (low sodium): Balances flavors and adds moisture during the braising process.
- 1 medium onion (sliced): Contributes sweetness and depth, enriching the braising liquid.
- 3 cloves garlic (minced): Imparts aromatic richness that elevates the dish’s savory profile.
- 2 sprigs fresh thyme (or 1 teaspoon dried): Introduces earthy herbal notes that enhance the overall flavor.
- 4 medium carrots (peeled and cut into chunks): Adds natural sweetness and texture to the dish.
- 2 stalks celery (cut into chunks): Provides a subtle crunch and enhances the aromatic base of the braise.
- 2 medium apples (cored and sliced): Offers additional sweetness and complements the apple cider beautifully.
Searing the Pork: Don’t Skip This Step!
I’ll be honest—I tried to skip the searing step. I thought, “Hey, it’s just braising; what could go wrong?” But after one too many batches of sad-looking pork, I learned my lesson. Searing is a must! It adds that gorgeous crust and flavor you just can’t replicate by simply tossing everything in the pot.
So why is this little extra step so crucial? Think of it like grilling your steak before finishing it in the oven—the caramelization from the high heat creates those complex flavors and rich color on the meat. In this case, searing the pork shoulder not only locks in moisture but also enhances the overall taste of your dish, making every bite irresistible.
What does Searing do?
- Flavor — The Maillard reaction occurs during searing, creating deep, savory notes that infuse into the meat and sauce.
- Texture — A beautifully browned crust forms on the outside, providing a delightful contrast to the tender interior of the pork.
- Color — Searing gives your dish an appetizing golden-brown hue that makes it visually appealing.
- Moisture Retention — The outer layer seals in juices, resulting in a succulent pork shoulder that doesn’t dry out during braising.
- Aromatics Activation — As you scrape up those browned bits later for your braising liquid, you’re incorporating concentrated flavors directly into your dish.
Different Searing Times
- 1 minute per side (barely okay) — You’ll get some color but miss out on the full flavor development; it will taste bland compared to properly seared pork.
- 3 minutes per side (good) — Decent browning starts to happen; enough flavor to notice but still not quite optimal.
- 5 minutes per side (great) — Now we’re talking! You achieve a lovely crust with rich flavors beginning to emerge.
- 7+ minutes per side (best) — Perfectly caramelized surface with maximum flavor depth; this is what you want for ultimate deliciousness!
Be warned: if you don’t sear your pork shoulder adequately, you’ll end up with a lackluster dish that’s missing that essential depth of flavor. Trust me—you don’t want to skip this step!
How to make Apple Cider Braised Pork Shoulder

Are you ready to see how straightforward it is to make the Apple Cider Braised Pork Shoulder of your dreams??
1. PREPARE THE PORK
Start with a solid foundation for your delicious braise!
Bold action label: Preheat – Preheat the oven to 300°F (150°C). This low and slow cooking method ensures your pork shoulder becomes melt-in-your-mouth tender.
Bold action label: Season – Season the pork shoulder generously with 1 teaspoon of salt and black pepper on all sides. This will enhance the flavor, making every bite irresistible.
HANDY TIPS
- Use fresh, high-quality pork shoulder for the best flavor and tenderness.
- If you’re short on time, you can season the pork shoulder a few hours in advance to allow the flavors to penetrate deeper.
2. SEAR THE PORK
Time to build some beautiful color and flavor!
Bold action label: Heat – In a Dutch oven, heat 1 tablespoon of olive oil over medium-high heat until shimmering. This is crucial for achieving that perfect sear.
Bold action label: Sear – Sear the pork shoulder until browned on all sides, about 8-10 minutes total. Look for a deep golden-brown crust; this caramelization adds layers of flavor to your dish.
HANDY TIPS
- Don’t overcrowd the pot; sear in batches if necessary to ensure an even browning.
- Keep an eye on the heat — you want a nice sizzle but not so hot that the oil smokes!
3. ADD AROMATICS
Let’s layer in those fantastic flavors!
Bold action label: Remove – Carefully remove the seared pork from the pot and set aside. You’ll be incorporating all that great fond left behind!
Bold action label: Sauté – Add sliced onion and minced garlic to the pot, sautéing until softened, about 3-4 minutes. The aroma will be heavenly!
Bold action label: Stir – Stir in 2 cups of apple cider, 1 cup of low-sodium chicken broth, and thyme, scraping up any browned bits from the bottom. This will create a rich and flavorful braising liquid.
HANDY TIPS
- For an extra flavor boost, use fresh apple cider instead of store-bought.
- Make sure to scrape up those tasty browned bits — they hold so much flavor!
4. BRAISE THE PORK
Now we let time do its magic!
Bold action label: Return – Return the pork to the pot and add carrots, celery, and apples around it. These vegetables will soak up all that delicious flavor as they cook down.
Bold action label: Cover & Transfer – Cover with a lid and transfer to the preheated oven. Braise for 2-3 hours, until the pork is fork-tender. You’ll know it’s done when it easily pulls apart with a fork!
HANDY TIPS
- If using smaller pork cuts like pork butt or picnic roast, adjust cooking time accordingly (they may take less time).
- Check during cooking — if the liquid level seems low, add a splash more chicken broth.
5. SERVE
The grand finale is here!
Bold action label: Rest – Remove the pot from the oven and let the pork rest for about 10 minutes before slicing. This helps retain juices for maximum flavor!
Bold action label: Serve – Serve slices of succulent pork shoulder topped with braising liquid and vegetables for a comforting meal that’s sure to impress.
What an incredible journey into comfort food bliss this has been! You’ve just created a mouthwatering Apple Cider Braised Pork Shoulder that’s perfect for family gatherings or cozy nights in—easy peasy! Make this once, and I wager it will invade your dreams every night too! – Nagi x
FAQ – Apple Cider Braised Pork Shoulder
🍏 Can I make this recipe ahead of time?
Absolutely! You can prepare the Apple Cider Braised Pork Shoulder a day in advance. After cooking, allow the pork to cool completely and then store it in an airtight container in the refrigerator for up to 3 days. When you’re ready to serve, simply reheat gently on the stovetop or in the oven at a low temperature until warmed through. This not only saves you time but also allows the flavors to meld even further—what’s not to love?
❄️ Can I freeze the leftovers?
Yes, you can freeze the braised pork shoulder! Let it cool completely before transferring it to a freezer-safe container or heavy-duty freezer bags. It will keep well for about 3 months. To thaw, just move it to the refrigerator overnight and reheat on low heat when you’re ready to enjoy it again. Just a heads-up: The texture may slightly change after freezing, but it will still be delicious!
🌾 Is this recipe gluten-free?
Yes, this Apple Cider Braised Pork Shoulder is naturally gluten-free! The ingredients used—pork shoulder, apple cider, chicken broth (just make sure it’s labeled gluten-free), onions, garlic, carrots, celery, and apples—contain no gluten. If you’re serving this dish to someone with gluten intolerance or celiac disease, always double-check your broth and seasonings for any hidden gluten sources.
🔄 Can I substitute apple cider with something else?
While I highly recommend using apple cider for its unique flavor profile that complements the pork beautifully, if you find yourself without any on hand, you can substitute with apple juice. However, be aware that apple juice is sweeter than cider—so consider reducing other sweet elements in your dish if possible. Alternatively, a mix of half apple juice and half chicken broth can work too!
🥕 Why do I need to sear the pork shoulder first?
Searing is an essential step that enhances flavor! By browning the pork shoulder before braising, you create a rich crust that adds depth through caramelization. This process also locks in moisture—ensuring that your pork remains juicy during cooking. Trust me; skipping this step would mean missing out on all those delicious flavors!
⏰ How long should I let the pork rest after cooking?
Letting the braised pork rest for 10 minutes after removing it from the oven is crucial! This resting period allows the juices within the meat to redistribute evenly throughout. If you skip this step and slice immediately, you risk losing those flavorful juices onto your cutting board instead of keeping them within each tender slice of pork.
🥘 What vegetables can I add for extra flavor?
Feel free to customize your vegetable mix based on your preferences or what you have on hand! Some great additions include parsnips for sweetness or potatoes for heartiness. Just remember to cut them into similar sizes as carrots and celery so they cook evenly alongside the pork. It’s all about making this dish YOUR own!
Troubleshooting
I will continue to add more to this Troubleshooting section as I start seeing questions coming through from people who have made the recipe.
Troubleshooting tips
“The pork came out tough and dry! 😭”
- You might have overcooked the pork shoulder. Braising for too long can lead to a texture that is drier than desired, especially if it exceeds 3 hours.
- Not using enough liquid could also cause this issue. If the braising liquid doesn’t cover the pork adequately, it won’t stay moist during cooking.
- I bet they were still YUM though!
“My braising liquid is way too watery! 😕”
- You might have added too much chicken broth or apple cider by mistake. Stick to the specified 1 cup of chicken broth and 2 cups of apple cider for the right balance.
- If you didn’t let it reduce properly after sautéing the onion and garlic, that could also leave you with a thinner sauce.
- I bet they were still YUM though!
“The pork is not browning properly! 🔥”
- You may not be using high enough heat when searing. Make sure your olive oil is hot enough before adding the pork; look for shimmering oil!
- If your pork shoulder was too wet from excess moisture or marinade, it can also prevent proper browning, leading to a lackluster crust.
- I bet they were still YUM though!
“My vegetables turned mushy and lost their shape! 😩”
- Adding the carrots, celery, and apples too early in the braising process can lead to them breaking down completely. They should be added at the same time as the pork.
- If you’re braising for longer than recommended, check on them periodically to avoid overcooking.
- I bet they were still YUM though!
Apple Cider Braised Pork Shoulder
Ingredients
Method
- Preheat the oven to 300°F (150°C).
- Season the pork shoulder with salt and pepper on all sides.
- In a Dutch oven, heat olive oil over medium-high heat.
- Sear the pork shoulder until browned on all sides, about 8-10 minutes total.
- Remove the pork and set aside. Add onion and garlic to the pot, sautéing until softened, about 3-4 minutes.
- Stir in apple cider, chicken broth, and thyme, scraping up any browned bits from the bottom.
- Return the pork to the pot and add carrots, celery, and apples.
- Cover and transfer to the oven. Braise for 2-3 hours, until the pork is fork-tender.
- Remove the pork from the oven and let it rest for 10 minutes before slicing.
- Serve with the braising liquid and vegetables.