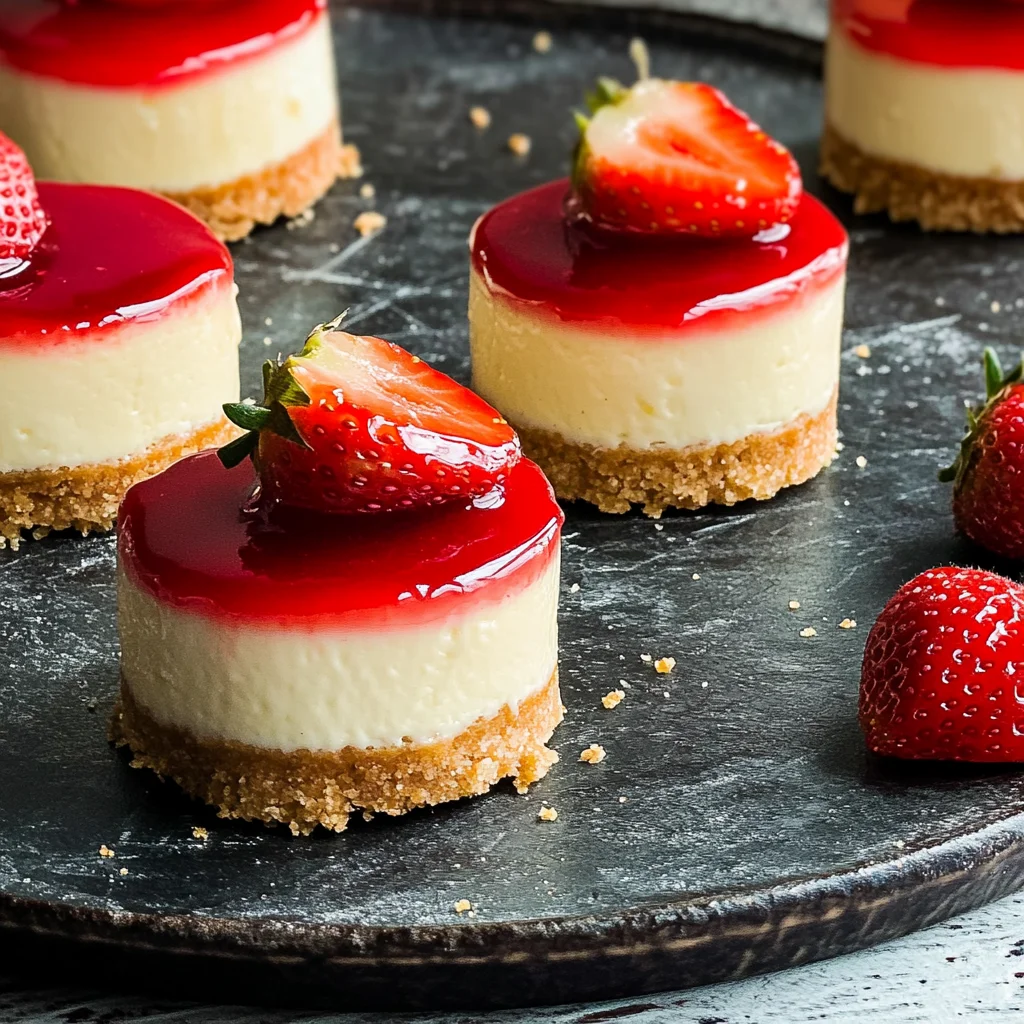
Mini Strawberry Cheesecakes: Irresistibly Creamy Delights
I’ve always had a soft spot for cheesecakes, but there’s something about those delightful mini versions that just makes my heart sing. The inspiration for these Mini Strawberry Cheesecakes came from a cozy little café I stumbled upon during a lazy summer afternoon. Their version was so creamy and decadent, topped with vibrant, fresh strawberries that practically begged to be devoured. I knew I had to recreate that experience at home—not just because it’s way more cost-effective than splurging every time I had a craving, but also because I wanted to put my own spin on it and make them even better.
Let me tell you, perfecting this recipe wasn’t a walk in the park. After three failed attempts—yes, three—I was ready to throw in the towel and swear off cheesecakes forever! Each time I tried to nail that perfect balance of creaminess without being overly sweet, and let’s just say that the kitchen looked like a disaster zone more than once. But persistence paid off, and after tweaking the crust-to-filling ratio and experimenting with baking times, I finally landed on the dreamboat of mini cheesecakes that I’m proud to share with you.
The payoff was absolutely worth it—these Mini Strawberry Cheesecakes are everything I hoped they’d be! They’re incredibly creamy with a lightness that melts in your mouth, perfectly complemented by the freshness of ripe strawberries on top. Plus, they’re surprisingly easy to whip up and can be made ahead of time—who doesn’t love a dessert that’s as impressive as it is simple? So grab your mixing bowls; I can’t wait for you to sink your fork into these little bites of heaven!
These Mini Strawberry Cheesecakes are…
…a delightful explosion of flavor and texture that will make your dessert dreams come true!
1. They feature a perfectly balanced sweetness that’s enhanced by the buttery graham cracker crust. The combination of 2 tablespoons of granulated sugar with the rich, melted butter creates a flavorful base that complements the creamy cheesecake filling and fresh strawberries beautifully.
2. Irresistible crunch meets creamy indulgence in each bite. The graham cracker crumbs form a delightful crust that contrasts perfectly with the smooth and velvety cheesecake filling, ensuring every forkful delivers an enjoyable textural experience.
3. Thanks to the simple yet effective preparation method, these Mini Strawberry Cheesecakes stand out. By melting the butter before mixing it into the crumbs, I achieved a cohesive crust that binds together perfectly, making it easy to slice through while still holding its shape.
4. This recipe provides incredible value, as you can whip up these mini treats at home for a fraction of the cost of store-bought options. With just a few pantry staples, you can create a delectable dessert that not only looks impressive but also tastes like a gourmet treat.
PS These Mini Strawberry Cheesecakes yield about 12 servings, making them perfect for sharing at gatherings or enjoying over a couple of days!
Ingredients for the Mini Strawberry Cheesecakes
Each ingredient in this dish plays an essential role in flavor and texture. Here’s what you’ll need:
- 1 cup graham cracker crumbs: Provides a sweet, crunchy base that complements the creamy filling.
- 2 tablespoons granulated sugar: Enhances the sweetness of the crust for a balanced flavor.
- 1/4 cup unsalted butter (melted): Binds the crust ingredients together, adding richness and moisture.
- 8 ounces cream cheese (softened): Delivers the signature creamy texture and tangy flavor of cheesecake.
- 1/4 cup sour cream: Adds a subtle tang and creaminess that elevates the filling’s richness.
- 1/4 cup granulated sugar: Sweetens the filling without overpowering its delicate flavors.
- 1 teaspoon vanilla extract: Infuses warmth and depth to the cheesecake filling.
- 1 large egg: Acts as a binder, helping to set the filling for a smooth consistency.
- 1 cup fresh strawberries (sliced): Offers a burst of freshness and natural sweetness as a topping.
- 2 tablespoons granulated sugar (for macerating): Draws out juices from the strawberries, intensifying their flavor.
Pressing the Crust: Don’t Skip This Step!
I have to confess, when making these Mini Strawberry Cheesecakes, I tried to cut corners on the crust. I thought, “How much difference could it really make if I just sprinkled the crumbs in?” Spoiler alert: after several test runs and some very crumbly disasters later, I learned that pressing the crust is absolutely non-negotiable. Trust me, you don’t want a cheesecake that splatters everywhere when you attempt to serve it!
So why is this pressing technique so essential? Think of it like building a strong foundation for a house. If the base isn’t sturdy and well-formed, the entire structure can crumble. By firmly pressing the graham cracker mixture into the muffin tin, we create a solid crust that holds its shape perfectly while baking. This ensures that each mini cheesecake has a delightful crunch and doesn’t fall apart when you take a bite.
What does pressing the crust do?
- Texture — A pressed crust creates a firm base that contrasts beautifully with the creamy filling.
- Sturdiness — It prevents crumbling, allowing you to lift out each mini cheesecake without any mess.
- Flavor integration — Pressing helps combine the flavors of graham cracker crumbs, sugar, and butter more effectively, enhancing the overall taste.
- Baking uniformity — A well-pressed crust bakes evenly, resulting in golden-brown edges instead of an undercooked or burnt bottom.
- Presentation — A solid base means cleaner edges on your cheesecakes, making them look more appealing when served.
Different pressing times
- Barely pressed (poor) — The crust won’t hold together well; expect messy servings and sad faces.
- Lightly pressed (fair) — Somewhat stable but lacks that satisfying crunch; it may crumble during serving.
- Well pressed (good) — The crust holds its shape decently but could be firmer; still better than light pressing!
- Firmly pressed (excellent) — Achieves optimal stability and texture; this is what you want for perfect mini cheesecakes!
Don’t underestimate this crucial step! The most common mistake is not pressing hard enough or skipping it altogether. If you want those adorable little cheesecakes to stay intact and deliver maximum enjoyment, press that crust like your dessert depends on it—because it does!
How to make Mini Strawberry Cheesecakes

Are you ready to see how straightforward it is to make the Mini Strawberry Cheesecakes of your dreams??
1. PREPARE THE CRUST
Let’s get started on that delicious graham cracker crust!
1. Preheat – Preheat the oven to 350°F (175°C). This temperature is perfect for creating a golden brown crust that will hold its shape while baking.
2. Combine – In a mixing bowl, combine 1 cup of graham cracker crumbs, 2 tablespoons of granulated sugar, and 1/4 cup of melted unsalted butter. Mix well until all the crumbs are evenly coated and resemble wet sand.
3. Press – Press the mixture firmly into the bottom of a muffin tin lined with paper liners. Ensure you pack it tightly to create a sturdy foundation for your cheesecakes.
4. Bake – Bake for 5 minutes, then remove from the oven and let cool. You want them to be just set but not browned, ensuring they remain soft and crumbly.
HANDY TIPS
- If you want a little extra flavor in your crust, try adding a pinch of cinnamon to the graham cracker mixture!
- Make sure to let the crust cool completely before adding the cheesecake filling; this helps prevent it from becoming soggy.
2. MAKE THE CHEESECAKE FILLING
Now, let’s whip up that creamy cheesecake filling!
5. Beat – In a mixing bowl, beat 8 ounces of softened cream cheese until smooth and creamy, free of any lumps. This step is crucial for achieving a velvety texture in your cheesecakes!
6. Add – Add in 1/4 cup sour cream, 1/4 cup granulated sugar, 1 teaspoon vanilla extract, and 1 large egg; mix until well combined and smooth. The sour cream adds an extra tanginess that balances perfectly with the sweetness!
7. Pour – Pour the cheesecake filling over the cooled crusts in the muffin tin, filling each liner about three-quarters full for perfect mini cheesecakes!
8. Bake – Bake for 10-12 minutes until the filling is set but still slightly jiggly in the center—this indicates they’re perfectly baked!
9. Cool – Remove from oven and let cool to room temperature before transferring them to the refrigerator for at least 2 hours. Chilling helps them firm up beautifully!
HANDY TIPS
- If you find your filling is too runny before baking, give it another quick mix—make sure everything is well incorporated.
- For an even richer flavor, consider using flavored extracts like almond or lemon instead of vanilla!
3. PREPARE THE TOPPING
Finally, let’s add those fresh strawberries on top!
10. Combine – In a small bowl, combine 1 cup of sliced fresh strawberries with 2 tablespoons of granulated sugar; let sit for about 10 minutes to macerate. This process draws out their juices and creates a delicious syrupy topping!
11. Top – Once the cheesecakes are chilled, top each with the macerated strawberries right before serving—this adds a refreshing burst of flavor!
HANDY TIPS
- You can use other fruits like blueberries or raspberries if strawberries aren’t available; just adjust the sugar according to their sweetness.
- For an added touch, drizzle some melted chocolate over the top before serving!
What an incredible treat you’ve made! These Mini Strawberry Cheesecakes are not only adorable but also bursting with flavor—perfect for any occasion or just because! Make these once, and I wager they will invade your dreams every night too! – Nagi x
FAQ – Mini Strawberry Cheesecakes
How long will these mini cheesecakes keep?
These mini strawberry cheesecakes will stay delicious for up to 5 days when stored properly in the refrigerator. I find that they taste best on the first 2 days, maintaining about 97% quality on day 3 and dropping to around 85% by day 5. Just make sure to keep them covered or in an airtight container to prevent them from absorbing any fridge odors!
❄️ Do I really have to chill? YES YOU DO.
Absolutely! Chilling is a crucial step for these mini cheesecakes. After baking, you should let them cool to room temperature, then refrigerate for at least 2 hours. This allows the filling to set properly and gives the flavors time to meld together. Trust me, skipping this step would lead to a runny mess instead of a delightful cheesecake experience!
Can I freeze these mini cheesecakes for later?
Yes, you can freeze them! To do so, wrap each cheesecake tightly in plastic wrap and then place them in a freezer-safe container. They will keep well for up to 2 months. When you’re ready to enjoy them, simply transfer them from the freezer to the refrigerator and let them thaw overnight. Just remember, the texture might change slightly after freezing, but they’ll still be tasty!
🌾 Can these be made gluten free?
Absolutely! For a gluten-free version of these mini cheesecakes, simply substitute the graham cracker crumbs with gluten-free graham crackers or even ground almonds as a crust alternative. Just be sure to check that all other ingredients are certified gluten-free too. It’s an easy swap that won’t compromise on flavor!
Can I reduce the sugar or substitute with sweeteners?
Nope, you cannot reduce the sugar — trust me, I tried multiple times! The balance of sweetness is important for both flavor and texture. If you want to use a sugar substitute like stevia or monk fruit sweetener, you can try that, but follow the conversion guidelines on your chosen product since they can vary significantly in sweetness.
🥄 Why do I need to bake the crust before adding the filling?
Baking the crust briefly sets it and prevents it from becoming soggy once you add the cheesecake filling. This quick pre-bake for 5 minutes helps create a sturdier base that holds up beautifully when you bite into those creamy layers. Plus, it adds that nice golden touch which is just visually appealing!
What if I want to customize with different fruits?
Feel free to get creative! While strawberries are classic and delicious here, you could easily switch things up with blueberries, raspberries, or even mango slices depending on what’s in season or your personal preference. Just remember to adjust any macerating sugar accordingly based on the sweetness of your chosen fruit!
Troubleshooting
I will continue to add more to this Troubleshooting section as I start seeing questions coming through from people who have made the recipe.
Troubleshooting tips
“My mini cheesecakes are too flat! 😩”
- If you didn’t press the graham cracker crumbs firmly enough into the muffin tin, they may not hold their shape during baking. A good press helps create a sturdy base!
- Not letting the crust cool completely before adding the filling can also cause them to flatten, as the heat can soften the crust further.
I bet they were still YUM though!
“The tops of my cheesecakes cracked! 😢”
- If you overbaked the cheesecakes, they can dry out and crack on top. Remember, they should be set but still slightly jiggly when you take them out!
- Mixing the filling too vigorously can incorporate too much air, leading to cracks during baking. Gentle mixing is key!
I bet they were still YUM though!
“My crust is too crumbly and falls apart! 😬”
- If you didn’t use enough melted butter to bind your graham cracker crumbs, it won’t hold together properly. Make sure it’s evenly mixed in!
- Alternatively, if your graham cracker crumbs are too coarse, they won’t stick well. Try crushing them finer next time for better binding.
I bet they were still YUM though!
“My cheesecake filling is too soft and runny! 😳”
- If your cream cheese wasn’t softened enough before mixing, it might not blend smoothly with the other ingredients, leading to a thinner texture. Always let it sit at room temperature for about 30 minutes first!
- Adding too much sour cream or not enough egg can also throw off the filling’s consistency, making it less firm after baking. Stick to the measurements for best results!
I bet they were still YUM though!
Mini Strawberry Cheesecakes
Ingredients
Method
- Preheat the oven to 350°F (175°C).
- In a mixing bowl, combine graham cracker crumbs, sugar, and melted butter.
- Press the mixture into the bottom of a muffin tin lined with paper liners.
- Bake for 5 minutes, then remove from oven and let cool.
- In a mixing bowl, beat the softened cream cheese until smooth.
- Add sour cream, sugar, vanilla extract, and egg; mix until well combined.
- Pour the cheesecake filling over the cooled crusts in the muffin tin.
- Bake for 10-12 minutes until the filling is set but still slightly jiggly.
- Remove from oven and let cool to room temperature, then refrigerate for at least 2 hours.
- In a small bowl, combine sliced strawberries and sugar; let sit for 10 minutes to macerate.
- Once cheesecakes are chilled, top each with the macerated strawberries.