Arugula Pear Salad: A Delightful Brunch Surprise
I first stumbled upon the idea for this Arugula Pear Salad during a cozy brunch at a small café that had an uncanny ability to turn simple ingredients into culinary magic. The combination of peppery arugula and sweet pears was such a delightful surprise, but what really captured my heart was the tangy vinaigrette that brought everything together in perfect harmony. Inspired by this dish, I couldn’t help but think, “I can make this at home!” Plus, I wanted to save some cash while impressing my friends with my culinary skills—because who doesn’t love a good salad that looks fancy but is easy on the wallet?
After several attempts (and a few questionable dressing mishaps), I finally nailed down the recipe after what felt like an eternity of taste-testing—seriously, my family probably thought I was trying out for a salad-making reality show! Each version had its quirks; sometimes the pears were too ripe, or the walnuts decided to be more chewy than crunchy. I was on a mission to achieve that perfect balance of flavors and textures that made the original so special, and let me tell you, it wasn’t always pretty. But hey, if at first you don’t succeed, just keep eating salads until you do!
In the end, it was absolutely worth every failed attempt! This Arugula Pear Salad turned out to be a refreshing explosion of flavor—the pepperiness of the arugula perfectly complements the sweetness of the pears, while crunchy walnuts add a delightful texture that keeps you coming back for more. The tangy vinaigrette ties it all together like a bow on a gift. I’m genuinely thrilled to share it with you because trust me, once you try this salad, you’ll be wondering why you didn’t make it sooner. Let’s dive in and get our salad game on!
These Arugula Pear Salad are…
…a delightful medley of flavors and textures that truly elevate your salad game!
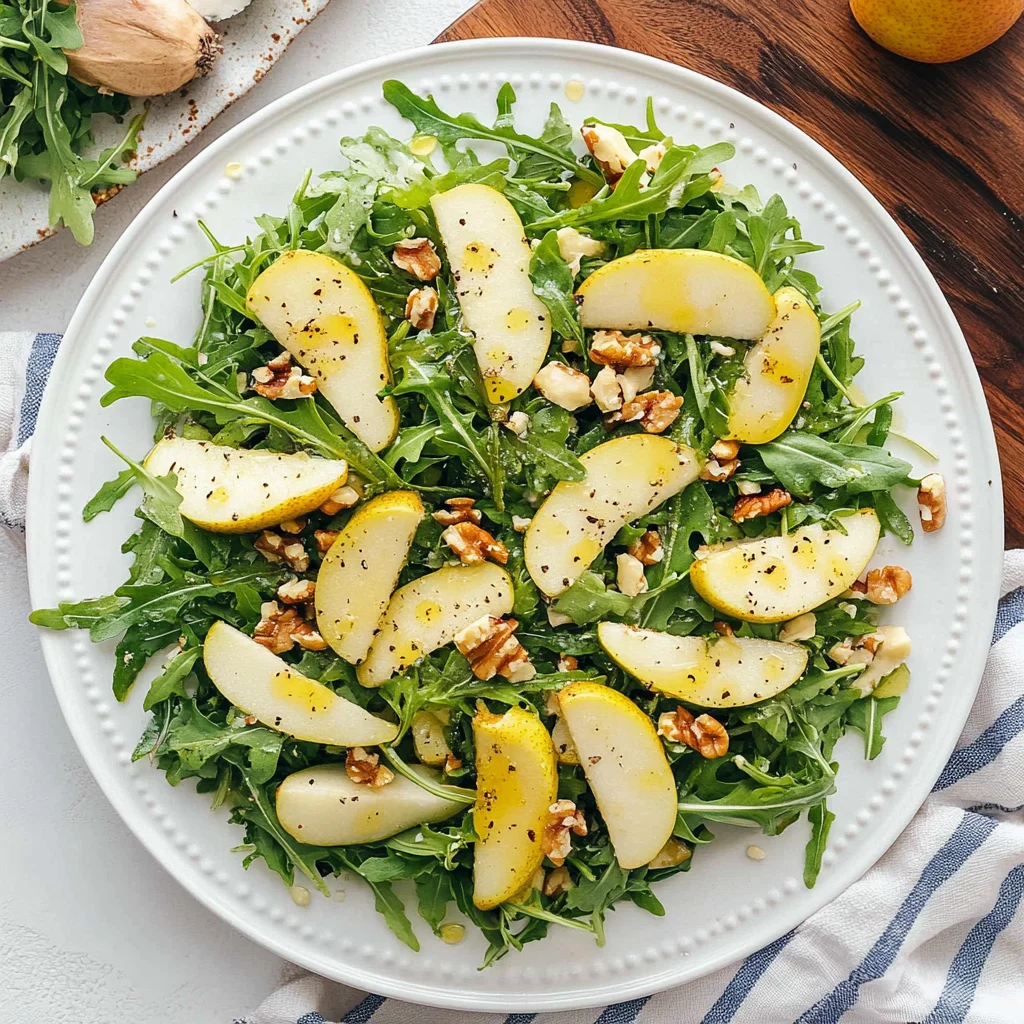
1. They deliver an explosion of flavor with the perfect balance of peppery arugula and sweet, juicy pears. The freshness of the arugula contrasts beautifully with the natural sweetness of the pears, creating a salad that is both refreshing and satisfying, making each bite a delightful surprise.
2. Irresistible crunch – the toasted walnuts add a satisfying crunch that complements the tender arugula and soft pear slices. This contrast in texture not only provides a pleasant mouthfeel but also enhances the overall eating experience, ensuring that every forkful is exciting and enjoyable.
3. A key technique involves toasting the walnuts before adding them to the salad. This simple step elevates their flavor, bringing out rich, nutty notes that perfectly harmonize with the other ingredients. It’s this extra attention to detail that transforms a basic salad into something extraordinary.
4. Incredibly cost-effective – making this Arugula Pear Salad at home means you can enjoy gourmet flavors without breaking the bank. With easily accessible ingredients like arugula and pears, you can whip up this impressive dish for a fraction of what you’d pay at a restaurant, all while enjoying fresh, high-quality components.
PS This salad is best enjoyed fresh but can be prepped ahead; just keep the vinaigrette separate until serving to maintain its crispness!
Ingredients for the Arugula Pear Salad
Each ingredient in this dish plays an essential role in flavor and texture. Here’s what you’ll need:
4 cups arugula: Provides a peppery bite and vibrant color.
2 medium pears: Adds natural sweetness and a juicy contrast.
1/2 cup walnuts: Introduces a satisfying crunch and nutty depth.
1/4 cup feta cheese: Contributes creaminess and a tangy flavor.
3 tablespoons olive oil (extra virgin): Acts as the base for the vinaigrette, enriching the salad.
1 tablespoon balsamic vinegar: Adds a sweet-tart zing that elevates the flavors.
1 teaspoon honey: Enhances sweetness and balances acidity.
1/2 teaspoon Dijon mustard: Provides a subtle sharpness that ties the dressing together.
1 pinch salt: Enhances all the flavors for a more vibrant taste.
1 pinch black pepper: Adds a hint of spice to awaken the palate.
You Must Toast the Walnuts. Trust Me!
I’ll be honest: when I first made this Arugula Pear Salad, I thought, “Can’t I just skip toasting the walnuts? They’re already good as is!” Spoiler alert: I tried, and I was wrong. The difference between toasted and un-toasted walnuts is so stark that it transformed my salad from ordinary to extraordinary. Trust me, don’t be like my past self—toast those walnuts!
Toasting the walnuts isn’t just a fancy touch; it’s a game-changer for flavor and texture. Think of it like roasting vegetables: when you expose them to heat, they caramelize, enhancing their natural sweetness and adding depth. In this salad, the toasted walnuts bring a warm nuttiness that perfectly complements the peppery arugula and sweet pears. Without that crucial step, you might end up with a salad that’s flat and one-dimensional.
What does toasting the walnuts do?
- Flavor — Toasting intensifies the nutty flavor of walnuts, adding richness that elevates the overall taste of the salad.
- Texture — The crunchiness of toasted walnuts contrasts beautifully with the tender arugula and juicy pears, creating a satisfying bite.
- Aroma — The nutty aroma released during toasting makes your kitchen smell divine and adds an inviting element to your dish.
- Color — Toasted walnuts take on a golden brown hue that enhances visual appeal, making your salad more appetizing.
- Freshness — Toasting helps preserve freshness by reducing moisture in the nuts, preventing them from becoming stale or soggy in your salad.
Different toasting times
- 1–2 minutes on medium heat (good) — Nuts are warmed but may lack robust flavor; they’ll still get the job done in a pinch.
- 3–5 minutes until lightly golden (better) — This is where you want to be! Nuts are fragrant and crunchy with enhanced nuttiness.
- 6–8 minutes for deep toast (best) — Nuts develop a rich, intense flavor; however, watch closely to prevent burning!
- Beyond 10 minutes (caution advised) — Risky business! They can quickly go from perfectly toasted to charred. Trust me; you don’t want burnt walnuts ruining your beautiful salad.
Be careful not to skip this step! The most common mistake is thinking you can use raw walnuts instead of taking just a few extra minutes to toast them. If you do, you’ll miss out on that essential depth of flavor that truly brings this Arugula Pear Salad together. Don’t let that happen—toast those walnuts!
How to make Arugula Pear Salad

Are you ready to see how straightforward it is to make the Arugula Pear Salad of your dreams??
1. PREPARE THE SALAD
Let’s start off by building a delicious base for our salad!
1. Combine – In a large salad bowl, combine the washed and dried arugula with the sliced pears. This peppery green pairs perfectly with the sweet and juicy pears, creating a delightful contrast in flavors. Toss them gently together so they mix evenly without bruising the arugula.
2. Add Toppings – Next, sprinkle the toasted walnuts and crumbled feta cheese on top of the arugula and pears. The walnuts should be crispy and crunchy, adding a lovely texture, while the feta gives a creamy, tangy bite that enhances every forkful.
HANDY TIPS
- If you prefer a sweeter touch, consider using caramelized walnuts instead of toasted ones for an extra layer of flavor.
- For added freshness, try including thinly sliced red onions or fresh herbs like basil or mint!
2. MAKE THE VINAIGRETTE
Now it’s time to whip up a zesty vinaigrette that brings everything together!
3. Whisk Together – In a small bowl, whisk together the extra virgin olive oil, balsamic vinegar, honey, Dijon mustard, salt, and black pepper until well combined. This step is crucial because it emulsifies the dressing and ensures all those vibrant flavors meld beautifully together! The mixture should become slightly thickened and glossy.
HANDY TIPS
- If you like a more robust flavor, feel free to add more Dijon mustard or even a pinch of garlic powder to give your vinaigrette an extra kick!
- Make this vinaigrette in advance; it can be stored in the fridge for up to 5 days!
3. DRESS THE SALAD
Finally, let’s bring this salad to life with our homemade dressing!
4. Drizzle – Drizzle the vinaigrette over the salad just before serving. This ensures that your ingredients remain crisp and fresh!
5. Toss Gently – Toss gently to combine all the elements without crushing any of the delicate arugula or pears. You want every bite to be a delightful mix of flavors!
6. Serve Immediately – Serve immediately for peak freshness and enjoy this vibrant dish as a starter or light meal.
What you’ve just created is not only aesthetically pleasing but also packed with nutrients! Enjoy every crunchy bite of this Arugula Pear Salad – I know I will be making it again soon! – Nagi x
FAQ – Arugula Pear Salad
🥗 How long can I store the Arugula Pear Salad?
The Arugula Pear Salad is best enjoyed fresh, but if you have leftovers, they can be stored in an airtight container in the refrigerator for up to 2 days. However, I must warn you that the quality decreases significantly. On day one, it remains about 90% as good, but by day two, you’re looking at around 70%. The arugula will start to wilt, and the pears may become mushy. If you can, eat it right away for maximum crunch and flavor!
⏳ Can I make this salad ahead of time?
While you can prepare some components ahead of time, I don’t recommend dressing the salad until just before serving. You can slice your pears and toast your walnuts a few hours in advance; just toss them with a bit of lemon juice to prevent browning on the pears. If you dress it too early, the arugula will become soggy — and nobody wants a sad salad!
❄️ Can I freeze the Arugula Pear Salad?
Freezing this salad isn’t a great idea due to its fresh ingredients. The arugula and pears don’t hold up well when frozen; they’ll turn into a mushy mess upon thawing. However, if you’re adamant about storing it for later, consider freezing just the vinaigrette. It can be kept in an airtight container for up to 3 months. When you’re ready to use it, simply thaw it in the fridge overnight.
🌱 Is there a way to make this salad vegan?
Absolutely! To make this salad vegan-friendly, simply omit the feta cheese or replace it with a plant-based alternative. There are some excellent dairy-free feta options available now that mimic the tangy flavor and crumbly texture really well. Additionally, ensure that your honey is replaced with maple syrup or agave nectar for sweetness in the vinaigrette.
🔄 Can I substitute any ingredients in this recipe?
Yes! If you’re not fond of pears or they’re out of season, apples are a fantastic substitute — they add a nice crunch and sweetness too! You might also consider using different nuts like pecans or almonds instead of walnuts for varied flavors. As for cheese alternatives, goat cheese would work beautifully if you’re craving something creamier.
🤔 Why do we whisk the vinaigrette separately?
Whisking the vinaigrette separately ensures that all ingredients emulsify properly — that means they blend together smoothly without separating. By combining olive oil with vinegar first before adding other ingredients like honey and mustard allows those flavors to marry beautifully. Trust me; I tested pouring everything straight into the salad bowl once — it resulted in an oily mess that wasn’t nearly as flavorful!
🥬 What if I want to add more toppings to my salad?
Feel free to customize this salad with additional toppings! Dried cranberries or pomegranate seeds add a lovely burst of color and sweetness, while thinly sliced red onions can give it some zing. You could even throw in some avocado slices for creaminess or grilled chicken for protein if you’re looking for a heartier meal. The possibilities are endless — get creative!
Troubleshooting
I will continue to add more to this Troubleshooting section as I start seeing questions coming through from people who have made the recipe.
Troubleshooting tips
“My arugula is wilting and looks sad! 😢”
- The arugula might have been exposed to moisture for too long before serving. If you wash it but don’t dry it properly, excess water can cause the leaves to wilt.
- Another possibility is that the salad was dressed too early. Dressing can make the greens soggy if left to sit too long before serving.
I bet your salad still tasted refreshing though!
“The pears in my salad were mushy! 🍐”
- Overripe pears can lead to a mushy texture. Make sure to choose firm pears that are ripe but not overly soft when sliced.
- If you sliced them too far in advance, they may have oxidized and softened. Try slicing them just before adding them to the salad next time.
I’m sure they were still sweet and flavorful!
“My walnuts burned during toasting! 🔥”
- It’s easy for walnuts to go from perfectly toasted to burnt very quickly. If you toasted them on high heat or left them unattended, they may have cooked unevenly.
- Always toast nuts over low to medium heat and keep a close eye on them—stirring frequently helps too!
At least they added a crunchy texture, right?
“My vinaigrette turned out too thick! 🤔”
- If you whisked the vinaigrette vigorously for too long, the emulsification process might have made it thicker than desired.
- Another factor could be using too much Dijon mustard, which can thicken up the mixture as well. Adjusting proportions next time will help achieve a lighter consistency.
No worries, it’s still a delicious dressing!
Arugula Pear Salad
Ingredients
Method
- In a large salad bowl, combine the arugula and sliced pears.
- Add the toasted walnuts and crumbled feta cheese on top.
- In a small bowl, whisk together olive oil, balsamic vinegar, honey, Dijon mustard, salt, and black pepper until well combined.
- Drizzle the vinaigrette over the salad and toss gently to combine.
- Serve immediately.