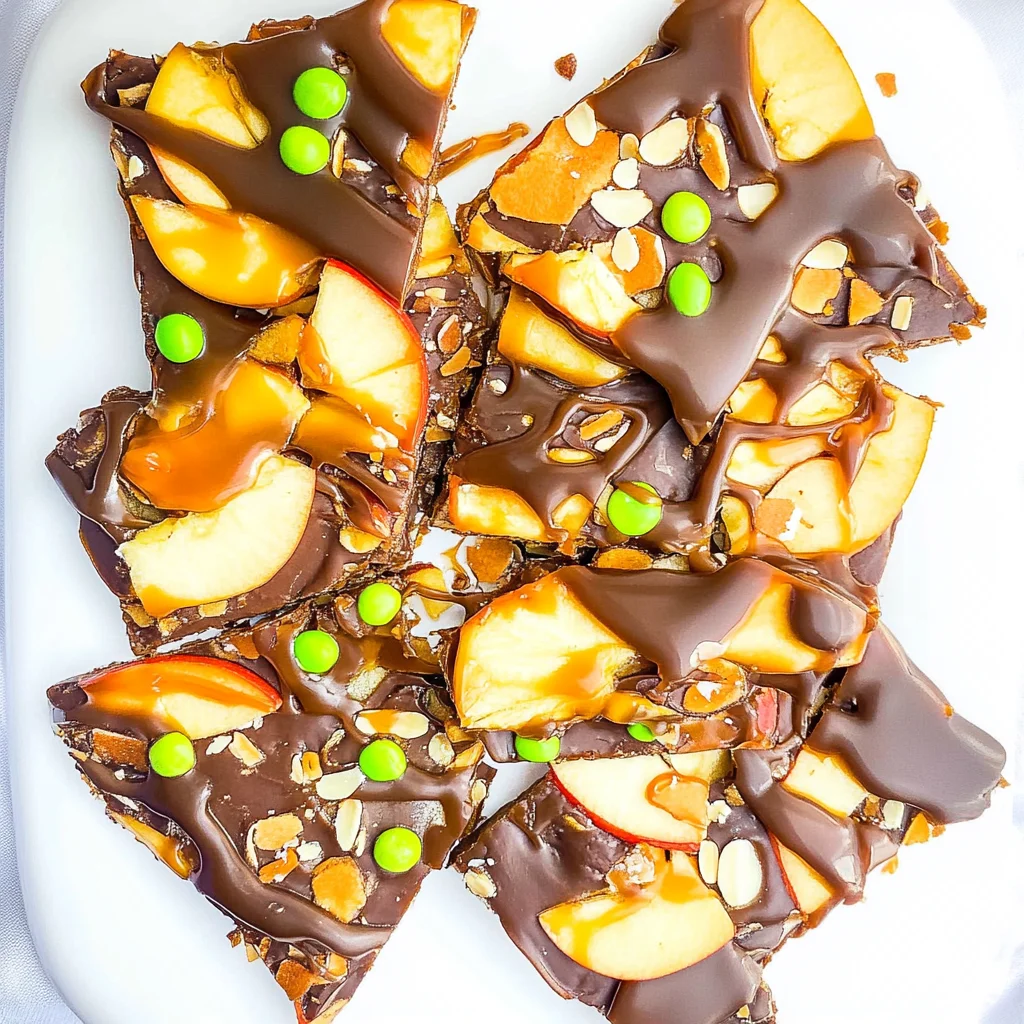
Caramel Apple Bark: A Delicious Fall Treat You’ll Love
It all started one crisp autumn afternoon when I stumbled upon a charming little café that had the most delightful treat on display: a Caramel Apple Bark that looked like fall wrapped in chocolate. With its glossy caramel sheen and the promise of crunchy apple bits peeking through, I couldn’t resist. But after savoring my first bite, I knew I had to recreate this masterpiece at home. Not only was it a bit pricey for my budget, but I also thought, “I can do better!” Plus, who could say no to homemade treats that are not just delicious but also made with love?
Let me tell you, perfecting my version of Caramel Apple Bark wasn’t exactly a walk in the park. It took me a handful of attempts — okay, more like five (yes, I lost count!) — before I finally nailed it. Each round involved tweaking ratios of chocolate to caramel and experimenting with apple varieties while trying to avoid the dreaded “too gooey” or “too hard” disasters. There were moments of triumph when things clicked and moments of despair when my bark turned into a chocolate puddle that even my dog wouldn’t touch. But through sheer stubbornness (and maybe a few too many late-night snacks), I finally landed on a recipe that made my taste buds sing.
And oh boy, was it worth every misstep! The final result is an absolutely scrumptious blend of sweet and salty goodness, where smooth chocolate meets chewy caramel and crisp apple pieces for that perfect crunch. With its delightful texture and irresistible flavor profile, this Caramel Apple Bark is not just an ideal treat for fall snacking; it’s bound to impress anyone lucky enough to get their hands on it! So grab your ingredients and let’s make some magic happen — trust me, you won’t regret taking this delicious plunge!
These Caramel Apple Bark are…
….the ultimate sweet indulgence that captures the essence of fall in every crunchy bite!
1. They deliver an irresistible flavor fusion of rich dark chocolate and creamy caramel, enhanced by the tartness of Granny Smith apples. The combination of bittersweet chocolate chips and buttery caramel candies creates a delightful contrast that keeps you reaching for more.
2. Textural bliss – each bite offers a satisfying crunch from the chocolate base and a chewy layer of caramel, all topped with crisp apple pieces and nuts. The balance between the smooth chocolate and the crunchy nuts adds an exciting dimension to this treat that makes every mouthful memorable.
3. The technique of layering is key to achieving this dessert’s charm. By melting the chocolate first and then pouring it into a prepared pan, I ensure a perfectly even spread that sets up beautifully, allowing for easy slicing into decadent squares without any mess.
4. Exceptional value – this recipe is simple to make at home, allowing you to enjoy gourmet flavors without breaking the bank. With just a handful of accessible ingredients, you can whip up a batch of Caramel Apple Bark that rivals any confection from your favorite shop!
PS These treats yield about 16 generous squares, perfect for sharing—or keeping all to yourself!
Ingredients for the Caramel Apple Bark
Each ingredient in this dish plays an essential role in flavor and texture. Here’s what you’ll need:
2 cups dark chocolate chips (or semi-sweet chocolate chips): Provides a rich, sweet base that complements the other flavors.
1 cup caramel candies (unwrapped): Adds gooey sweetness and a luxurious texture.
2 tablespoons heavy cream: Creates a smooth, creamy consistency in the caramel layer.
1 medium apple (diced, preferably Granny Smith): Introduces a crisp tartness that balances the sweetness.
1 teaspoon lemon juice: Prevents the apple from browning, keeping it fresh and vibrant.
1/2 cup chopped nuts (such as pecans or walnuts): Offers a crunchy contrast to the soft caramel and chocolate.
- 1/4 cup sea salt (for sprinkling): Enhances all the flavors with a touch of savory brightness.
You must chill the bark for at least 2 hours. Trust me!
I know, I know — waiting can be torture, especially when you’ve got that deliciously sweet and crunchy Caramel Apple Bark calling your name. I tried to rush it once, thinking “how different could it be if I just take a little nibble now?” Spoiler alert: it wasn’t pretty! The chocolate was still soft, and all my toppings slid right off. Lesson learned — patience is key!
Chilling the bark may seem like an unnecessary step, but it’s absolutely crucial for achieving that heavenly snap when you break it apart. Think of it like letting a cake cool before frosting; if you dive in too soon, the structure isn’t set, and everything will fall apart. Allowing the Chocolate Layer to fully chill creates a sturdy foundation that perfectly complements the gooey caramel and crunchy toppings.
What does chilling the bark do?
- Improved texture — Chilling allows the chocolate to set properly, creating a firm and satisfying snap instead of a messy melt.
- Enhanced flavor — The flavors meld together beautifully as they cool, making each bite more harmonious and delicious.
- Better appearance — A well-chilled bark has a glossy finish; rushing this step can lead to dull-looking chocolate that’s far less appealing.
- Longer shelf life — Properly chilled bark stays fresh longer without becoming sticky or separating, so you can enjoy your treat for days!
- Easier cutting — Fully chilled bark breaks apart cleanly into pieces without crumbling or tearing, ensuring that each piece looks as good as it tastes.
Different chilling times
- 30 minutes (fair) — Barely enough time; the chocolate is still soft, leading to uneven pieces and potential messiness.
- 1 hour (good) — Better than nothing! The outside firms up but the inside may still be too soft for ideal breaking.
- 2 hours (great) — The perfect amount of time for a balanced texture; chocolate is firm yet not rock hard.
- Beyond 3 hours (excellent) — Great for lasting freshness but risk of being overly hard; might need to let sit at room temperature briefly before cutting.
Don’t skip this crucial chilling step! The most common mistake I see is people rushing to break into their bark before it’s fully set. If you do this, you’ll end up with a gooey mess instead of those satisfying crispy pieces we all crave. Trust me on this one!
How to make Caramel Apple Bark

Are you ready to see how straightforward it is to make the Caramel Apple Bark of your dreams??
1. PREPARE THE BAKING SHEET
First things first, let’s get our workspace ready!
Bold Action Label: LINE – Line a baking sheet with parchment paper and set it aside. This will prevent the bark from sticking and makes for easy cleanup later!
HANDY TIPS
- Use a rimmed baking sheet if you have one; it helps contain any overflow from the caramel.
- If you don’t have parchment paper, lightly greasing the sheet with cooking spray will also work.
2. MELT THE CHOCOLATE
Now, let’s melt that chocolate into a velvety layer of deliciousness!
Bold Action Label: MELT – In a double boiler or microwave-safe bowl, melt the dark chocolate chips until smooth. Stir frequently to avoid overheating—chocolate can seize up if it gets too hot!
HANDY TIPS
- If using a microwave, heat in 30-second intervals and stir in between to achieve that silky consistency.
- Semi-sweet chocolate chips also work beautifully if you prefer a slightly sweeter bark.
3. SPREAD THE CHOCOLATE
This is where it all starts to come together!
Bold Action Label: POUR – Pour the melted chocolate onto the prepared baking sheet and spread it evenly with a spatula. Aim for about 1/4 inch thickness for optimal crunchiness once set!
HANDY TIPS
- Tap the baking sheet gently on your countertop after spreading to eliminate air bubbles.
- Don’t worry about perfection; rustic edges give it character!
4. PREPARE THE CARAMEL
Get ready for that gooey goodness!
Bold Action Label: COMBINE – In a small saucepan, combine the caramel candies and heavy cream over low heat, stirring until melted and smooth. This should take about 5 minutes—keep an eye on it so nothing burns!
HANDY TIPS
- If your caramel seems too thick, add an extra splash of cream to loosen it up.
- For an extra flavor kick, try adding a pinch of sea salt into the caramel while melting.
5. ADD CARAMEL AND APPLES
It’s time to layer on those delightful flavors!
Bold Action Label: DRIZZLE – Drizzle the melted caramel over the chocolate layer and sprinkle the diced apple evenly on top. The tartness of Granny Smith apples pairs perfectly with the sweet caramel!
HANDY TIPS
- Toss your diced apples in lemon juice before adding them; this prevents browning and keeps them looking fresh.
- Feel free to mix in some cinnamon with your apples for added warmth.
6. ADD TOPPINGS
Let’s elevate this bark with some crunchy goodness!
Bold Action Label: SPRINKLE – Sprinkle the chopped nuts and sea salt over the caramel and apple layer. The nuts provide an excellent contrast in texture while the sea salt heightens all those sweet flavors!
HANDY TIPS
- Pecans or walnuts not your thing? Try using almonds or even toasted coconut flakes!
- A light sprinkle of cinnamon sugar could also be delightful here for an autumn twist.
7. CHILL AND SET
Patience pays off in delicious ways!
Bold Action Label: REFRIGERATE – Refrigerate the bark for at least 2 hours or until fully set. Once set, break into pieces and serve! It’s that simple!
HANDY TIPS
- Want quicker results? Place it in the freezer for about 30 minutes instead!
- Be sure not to leave it out at room temperature too long—chocolate can soften quickly.
Congratulations, you’ve just created a mouthwatering Caramel Apple Bark that’s sure to impress! With layers of rich chocolate, gooey caramel, and crisp apples topped with crunchy nuts, this treat is perfect for fall gatherings or cozy nights in. Make these once, and I wager they will invade your dreams every night too! – Nagi x
FAQ – Caramel Apple Bark
🍏 Can I use a different type of apple for this recipe?
Yes, you can! While I recommend using Granny Smith apples for their tartness and crisp texture, you can definitely substitute them with other varieties. Some great alternatives include Honeycrisp, Fuji, or Gala apples. Just keep in mind the sweetness level; sweeter apples will give a different flavor profile to the bark. If you prefer a more sour bite, stick with Granny Smith!
❄️ How long can I store Caramel Apple Bark?
Caramel Apple Bark can be stored in an airtight container at room temperature for up to 1 week. After that, it starts losing its crunch and freshness. On day 3, it’s still about 97% as good, but by day 5, expect a decline to around 85% due to moisture absorption from the caramel. If you live in a humid area, I recommend storing it in the fridge for better preservation—just be aware it might get a bit firmer!
⏳ Do I have to chill the bark after making it?
Yes, chilling is essential! You need to refrigerate the bark for at least 2 hours or until fully set. This step allows the chocolate and caramel to harden properly, creating that delightful texture when you break into pieces. Skipping this could result in a gooey mess rather than crispy bark—trust me on this one!
🥖 Is this recipe gluten-free?
Absolutely! The ingredients used in Caramel Apple Bark are naturally gluten-free. Just ensure that your chocolate chips and caramel candies are labeled gluten-free if you’re serving someone with gluten sensitivities. It’s always better to double-check those labels because some brands might have cross-contamination issues.
🍬 Can I reduce the sugar or substitute with sweeteners?
No, you cannot reduce the sugar—believe me, I tried multiple times! The balance of flavors relies heavily on both the chocolate and caramel layers being sweet enough to complement the tartness of the apples. If you’re looking for a less sugary option, consider using dark chocolate with a higher cocoa percentage (like 80%) for less sweetness overall but don’t skip on the caramel—it’s essential!
🥜 What can I use instead of nuts if there are allergies?
If you need to avoid nuts due to allergies or personal preference, there are several tasty alternatives! You can sprinkle on toasted coconut flakes for added crunch or use seeds like pumpkin or sunflower seeds for a similar texture without the nutty flavor. Just be sure these substitutes are safe for anyone you’re serving—safety first!
🍫 How do I melt chocolate without seizing it?
To melt your chocolate smoothly, I recommend using either a double boiler or a microwave-safe bowl with short bursts of heat (about 20-30 seconds at a time). Stir between intervals until smooth. Be cautious not to overheat; even one little grain of moisture or overheating can cause your chocolate to seize up into an unworkable clump! If that happens… well, we all have our bad days! 😅
Troubleshooting
I will continue to add more to this Troubleshooting section as I start seeing questions coming through from people who have made the recipe.
Troubleshooting tips
“My chocolate layer turned out too thin! 😩”
- You may have poured the melted chocolate onto the baking sheet while it was still too hot, causing it to spread too much. Letting it cool slightly before spreading can help it hold its shape better.
- Alternatively, if you didn’t use enough chocolate—2 cups is key! If you skimped, it won’t create a stable base.
- I bet it still tasted amazing though!
“My caramel layer is too gooey and not setting properly! 🤔”
- If your caramel mixture doesn’t set well, you might have used too much heavy cream. Stick to 2 tablespoons for the perfect consistency; too much cream can make it runny.
- Also, be sure to melt the caramel over low heat as instructed. High heat can alter its texture and prevent it from firming up correctly.
- I bet it was still YUM though!
“The top of my bark looks uneven and lumpy! 🙈”
- If the chocolate wasn’t spread evenly on the baking sheet, that could lead to an uneven surface once set. Make sure to spread it out with a spatula until it’s smooth and even!
- Additionally, if your apple pieces were cut too large, they could cause bumps when layered with caramel and nuts.
- I bet they were still YUM though!
“Why does my bark look so pale? 😳”
- The lack of a rich color could be due to not using dark chocolate chips or semi-sweet chips as recommended. Milk chocolate won’t give you that deep contrast against the caramel and apples.
- Another cause might be under-melting the chocolate, which can leave streaks instead of a uniform color. Make sure it’s fully melted before pouring!
- I bet they were still YUM though!
Caramel Apple Bark
Ingredients
Method
- Line a baking sheet with parchment paper and set aside.
- In a double boiler or microwave-safe bowl, melt the dark chocolate chips until smooth.
- Pour the melted chocolate onto the prepared baking sheet and spread it evenly with a spatula.
- In a small saucepan, combine the caramel candies and heavy cream over low heat, stirring until melted and smooth.
- Drizzle the melted caramel over the chocolate layer and sprinkle the diced apple evenly on top.
- Sprinkle the chopped nuts and sea salt over the caramel and apple layer.
- Refrigerate the bark for at least 2 hours or until fully set. Once set, break into pieces and serve.