Salted Caramel Rice Krispie Treats: A Sweet & Salty Indul…
I first fell in love with the idea of Salted Caramel Rice Krispie Treats when I stumbled upon a cozy little café during a road trip. They had this incredible version that was so good it made my taste buds dance with joy! The perfect blend of chewy marshmallowy goodness and that rich, buttery salted caramel took me straight to dessert heaven. I knew right then and there that I had to recreate this treat at home—not just for the nostalgia but also because let’s be real, who doesn’t want a delicious dessert that’s easier on the wallet and packed with love?
After a few too many kitchen disasters (I’m talking about one batch that turned into a gooey mess on my counter), I finally nailed the recipe after five attempts. Each round was a mix of trial and error: I experimented with different caramel techniques, played around with the ratios of marshmallows to cereal, and even tried adding a pinch more salt for that perfect balance. I may have had moments where I thought I’d never get it right—like when I mistook baking soda for cornstarch (whoops!)—but each failure brought me one step closer to achieving that dreamy sweet-and-salty combo.
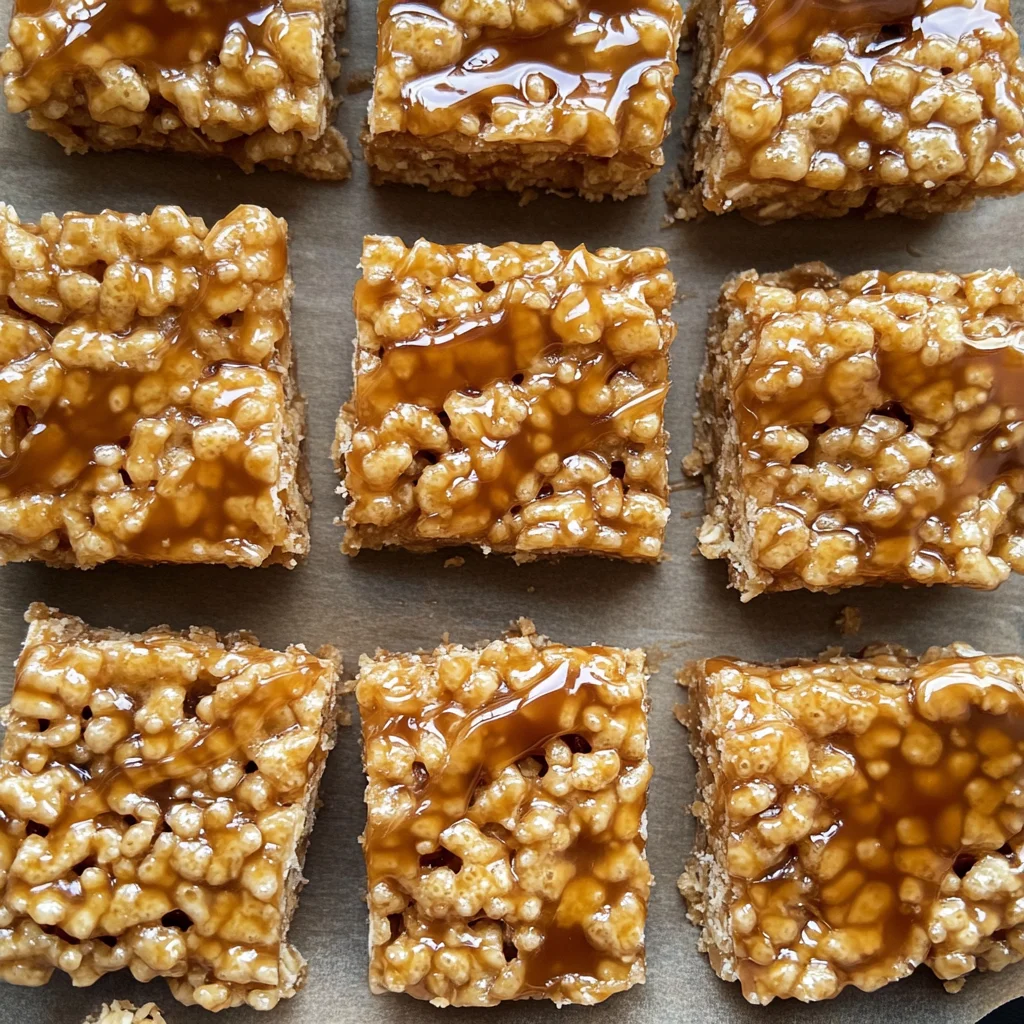
And oh boy, let me tell you, it was absolutely worth every sticky finger! My final batch of Salted Caramel Rice Krispie Treats is everything I dreamed it would be: deliciously chewy, drizzled generously with rich salted caramel, and perfectly balanced between sweet and salty. The texture is spot on—soft yet firm enough to hold their shape—and they stay fresh longer than you’d think! Trust me when I say once you take a bite, you’ll be hooked. So grab your ingredients and let’s dive into this delightful adventure together—I can’t wait for you to try them!
These Salted Caramel Rice Krispie Treats: A Sweet & Salty Indulgence are….
….the ultimate dessert that perfectly marries sweet and salty in every bite!
1. They deliver a decadent salted caramel flavor that elevates the classic Rice Krispie treat experience. The addition of rich salted caramel made from granulated sugar and butter creates an indulgent taste that lingers on your palate, turning a simple treat into an unforgettable delight.
2. Incredible texture – each bite boasts a delightful chewiness complemented by a slight crunch. The combination of the crispy Rice Krispies with the gooey marshmallows results in a perfect balance that keeps you coming back for more, ensuring every mouthful is a satisfying experience.
3. I use a key technique in making the salted caramel that transforms these treats into something special. By cooking the sugar until it reaches a deep amber color before adding cream and butter, I achieve a depth of flavor that’s both complex and addictive — far beyond what you’d find in store-bought versions.
4. Cost-effective indulgence – making these treats at home is not only fun but also saves you money compared to buying them at gourmet shops. With just a handful of simple ingredients like Rice Krispies, marshmallows, and butter, you can whip up a batch that yields generous servings for family and friends.
PS These treats are best enjoyed fresh but can be stored for up to a week if kept in an airtight container. Perfect for sharing or indulging yourself!
Ingredients for the Salted Caramel Rice Krispie Treats: A Sweet & Salty Indulgence
Each ingredient in this dish plays an essential role in flavor and texture. Here’s what you’ll need:
- 4 cups Rice Krispies: Provides the perfect crunchy base for these chewy treats.
- 3 tablespoons butter (unsalted): Adds richness and helps bind the mixture together.
- 1 package marshmallows (10 oz): Creates that classic, gooey texture that makes Rice Krispie treats irresistible.
- 1 cup granulated sugar: Sweetens the salted caramel, balancing the flavors beautifully.
- 6 tablespoons unsalted butter (cut into pieces): Contributes to a smooth and creamy caramel consistency.
- 1/2 cup heavy cream: Ensures a luscious, velvety caramel sauce that coats each bite.
- 1 teaspoon sea salt (or to taste): Enhances sweetness while adding a delightful contrast to the caramel.
You MUST make the salted caramel. No shortcuts!
I’ll be honest with you: I tried to find a way around making the salted caramel, and let me just say, it was a spectacular failure. I even considered using store-bought caramel sauce, but trust me, it just doesn’t cut it here! The difference in flavor and texture is so stark that I hung my head in culinary shame and vowed never to skip this crucial step again.
So why is this step non-negotiable? When you make your own salted caramel, you’re developing deep, complex flavors that simply can’t be replicated with pre-made options. Think of it like making fresh pasta instead of using dried—there’s just no comparison! The rich, buttery notes combined with the perfect touch of salt elevate your Rice Krispie treats from ordinary to extraordinary.
What does making salted caramel do?
- Flavor — Homemade salted caramel adds a depth of flavor that enhances each bite. The sweet and salty combination dances on your palate, creating a treat that’s hard to resist.
- Texture — A well-made salted caramel provides a gooey richness that binds the Rice Krispies together while keeping them chewy, rather than turning into a crunchy mess.
- Color — The beautiful amber hue of freshly made caramel gives your treats an appealing look that immediately signals indulgence.
- Moisture — The moisture from the caramel helps keep the Rice Krispie treats soft and chewy for days—no one likes stale treats!
- Shelf Life — By making your own salted caramel, you also control the sugar content, which can help preserve the freshness of your treats longer than store-bought alternatives.
Different caramel-making times
- 5 minutes (good) — You’ll get a light amber color with some flavor development; it’s okay but lacks depth.
- 8 minutes (better) — A medium amber color forms with improved flavor complexity; still not at its best.
- 10 minutes (great) — Deep amber perfection! This level brings out rich flavors and ideal texture for drizzling over the treats.
- 12+ minutes (best) — Maximum flavor impact; however, be cautious as overheating can lead to bitterness.
Don’t even think about skipping or rushing through the salted caramel step! The most common mistake is getting impatient and not cooking the sugar long enough. If you pull it too soon, you’ll end up with a bland flavor profile that leaves your Rice Krispie treats feeling flat. Trust me—take your time!
How to make Salted Caramel Rice Krispie Treats: A Sweet & Salty Indulgence

Are you ready to see how straightforward it is to make the Salted Caramel Rice Krispie Treats: A Sweet & Salty Indulgence of your dreams??
1. PREPARE THE CARAMEL
First up, let’s make that luscious salted caramel that takes these treats to the next level!
1. MELT THE SUGAR – In a saucepan over medium heat, add the granulated sugar. Stir constantly with a wooden spoon, watching closely as it begins to clump and then melt into a smooth liquid. Continue stirring until the color transforms to a deep amber, about 8-10 minutes. This stage is crucial because the caramel flavor develops at this temperature. ⚠️ Be careful not to burn it!
2. ADD THE BUTTER – Once you reach that beautiful amber hue, carefully remove the pan from heat and add the unsalted butter pieces immediately. Stir vigorously until melted and fully combined with the sugar; this will create a rich, buttery consistency.
3. INCORPORATE THE HEAVY CREAM – Gradually pour in the heavy cream while stirring continuously—this step can cause bubbling, so watch your hands! Continue mixing until everything is smooth and well incorporated, then add sea salt to taste. Set aside your caramel mixture to cool slightly; it should thicken as it cools.
HANDY TIPS
- For a deeper flavor, you can let the sugar cook a bit longer before adding the butter.
- If your caramel gets too thick while cooling, just warm it gently on low heat again before using.
2. MAKE THE RICE KRISPIE TREATS
Now onto everyone’s favorite part—the Rice Krispie base!
4. MELT THE BUTTER – In a large saucepan over low heat, add 3 tablespoons of unsalted butter and allow it to melt completely. This should take just a couple of minutes; keep an eye on it so it doesn’t brown!
5. ADD THE MARSHMALLOWS – Once melted, add the package of marshmallows into the pan with the butter. Stir constantly until all marshmallows are fully melted and the mixture is smooth and glossy—this usually takes about 3-4 minutes.
6. FOLD IN THE RICE KRISPIES – Remove the pan from heat and quickly fold in all 4 cups of Rice Krispies into the marshmallow mixture using a spatula or wooden spoon, ensuring each puff is well coated without crushing them too much.
7. SET UP THE BASE – Pour half of your Rice Krispie mixture into a greased 9×9 inch baking dish and press down firmly with your hands or spatula to create an even layer.
8. DRIZZLE WITH CARAMEL – Drizzle half of your cooled salted caramel over this first layer of Rice Krispies for that perfect sweet-and-salty bite!
9. ADD MORE RICE KRISPIES – Next, spread out the remaining Rice Krispie mixture on top of the caramel layer, pressing down firmly once again to compact everything nicely.
10. FINISH WITH CARAMEL – Finally, drizzle any remaining salted caramel over the top for some extra indulgence! Allow your creation to cool at room temperature for at least 30 minutes before cutting into squares.
HANDY TIPS
- If you’re finding it hard to spread out or press down your layers, lightly greasing your hands or spatula can help.
- You can also mix in some chocolate chips or nuts during step 6 for added texture!
Make these once, and I wager they will invade your dreams every night too! – Nagi x
FAQ – Salted Caramel Rice Krispie Treats: A Sweet & Salty Indulgence
How long will these Rice Krispie treats keep?
These Salted Caramel Rice Krispie Treats will stay fresh for about 3 days at room temperature, retaining 97% of their original deliciousness on day 3. After that, they might start to lose some of their chewiness and flavor. To extend their shelf life, you can store them in an airtight container to prevent them from drying out. Just be sure not to refrigerate them, as that can make them hard and less enjoyable!
❄️ Do I really need to let the treats cool before cutting?
Yes, you definitely need to let these treats cool for at least 30 minutes before cutting into squares. This cooling time allows the caramel to set properly and helps the Rice Krispie mixture firm up, ensuring you get neat cuts instead of a gooey mess. Trust me, I’ve tried skipping this step—and let’s just say my kitchen looked like a sticky disaster zone! 😅
🥶 Can I freeze these treats for later?
Absolutely! You can freeze the Salted Caramel Rice Krispie Treats for up to 2 months. To do so, wrap them tightly in plastic wrap or aluminum foil, then place them in an airtight container or a resealable freezer bag to prevent freezer burn. When you’re ready to eat them, simply thaw them in the fridge overnight or at room temperature for a few hours. They might lose a bit of texture but will still taste amazing!
🌾 Can these be made gluten-free?
Yes, you can easily make these Salted Caramel Rice Krispie Treats gluten-free! Just ensure that you use gluten-free Rice Krispies, as regular ones contain barley malt extract which has gluten. The rest of the ingredients are naturally gluten-free, so you’re all set for a delicious treat that everyone can enjoy!
Can I substitute the butter with something else?
No, unfortunately, substituting butter in this recipe isn’t recommended if you want to achieve that rich flavor and chewy texture. I’ve tested it with margarine and oil—let’s just say it did not yield the same delightful results! If you’re looking for dairy-free options, look for vegan butter alternatives that mimic butter’s texture and flavor closely.
Why do I need to stir the sugar constantly while making caramel?
Stirring constantly helps distribute heat evenly throughout the sugar as it melts; this prevents any hot spots that could scorch your caramel. If left unattended or stirred infrequently, you risk ending up with burnt sugar—which is not what we want! I’ve burnt my fair share of batches before mastering this technique—so trust me on this one!
💡 Can I add other mix-ins or toppings?
Absolutely! Feel free to customize your Rice Krispie Treats by adding mix-ins like chopped nuts (pecans or walnuts), mini chocolate chips, or even crushed pretzels for an extra salty crunch. You can also top them with drizzles of melted chocolate or sprinkle some sea salt flakes on top of the caramel for added flair. Get creative—it’s your sweet and salty indulgence!
Troubleshooting
I will continue to add more to this Troubleshooting section as I start seeing questions coming through from people who have made the recipe.
Troubleshooting tips
“My Rice Krispie treats were too thin! 😩”
- You may not have pressed the mixture down firmly enough in the baking dish. Properly compacting the mixture helps maintain its shape and thickness.
- Alternatively, if you used a larger baking dish than specified (9×9 inches), this could result in a thinner treat. Always stick to the recommended size for best results.
I bet they were still YUM though!
“The caramel turned out grainy! 😭”
- If your sugar wasn’t melted completely before adding the butter, it can lead to a grainy texture. Be sure to stir continuously until it reaches a deep amber color.
- Adding the heavy cream too quickly or while the caramel is still boiling can cause it to seize. Always add it slowly while stirring to maintain a smooth consistency.
I bet they were still YUM though!
“My treats are way too sticky! 😖”
- If your marshmallows didn’t melt fully or you added too many Rice Krispies, the mixture can be overly sticky and difficult to handle. Make sure they are completely melted before adding the Rice Krispies.
- Not letting the treats cool adequately before cutting can also make them stickier than desired. Give them at least 30 minutes to set!
I bet they were still YUM though!
“The top of my Rice Krispie treats cracked! 😬”
- Pressing down too hard while layering or not allowing enough cooling time can cause cracking on top. Gently press down just enough to compact without squishing it.
- Overheating your marshmallows during melting can also lead to changes in texture, making them more prone to cracking when cooled. Melt on low heat for best results.
I bet they were still YUM though!
Salted Caramel Rice Krispie Treats: A Sweet & Salty Indulgence
Ingredients
Method
- In a saucepan over medium heat, melt the sugar, stirring constantly until it turns a deep amber color.
- Remove from heat and carefully add the butter, stirring until melted and combined.
- Slowly add the heavy cream while stirring, then add the sea salt to taste. Set aside to cool slightly.
- In a large mixing bowl, melt the butter over low heat in a saucepan.
- Add the marshmallows and stir until completely melted and smooth.
- Remove from heat and quickly fold in the Rice Krispies until well coated.
- Pour half of the Rice Krispie mixture into a greased 9x9 inch baking dish, pressing down firmly.
- Drizzle half of the salted caramel over the mixture, then add the remaining Rice Krispie mixture on top.
- Press down firmly again and drizzle the remaining salted caramel over the top.
- Let cool for at least 30 minutes before cutting into squares.